In this article, we’ll teach you how to create, import, export, and edit QuickBooks IIF File to move transactions, lists, and accounts to and from other systems.
IIF (Intuit Interchange Format) is based on ASCII and TSV (Tab Separated Value) files. By creating an IIF file in QuickBooks Desktop you can import data like bank transactions, accountants changes, general journal entries, and batch transactions. List of vendors and customers. Read the full article to learn everything about IIF files in QuickBooks Desktop and how it works?
Limitations of Export and Import through IIF
Here is the list of limitations if you use IIF (Intuit Interchange Format) for exporting and importing data.
- If you are using IIF for transferring data, then you’ll be only able to import transactions but you can’t export from QuickBooks.
- You are only allowed to import up to some maximum number of lists of the chart of accounts or other accounts.
- The transactions you import using the IIF are not linked after the transfer i.e. when you transfer an invoice, it is not linked with the payments. You’ll need to manually link them either using Receive Payments or Pay Bills window. You can also use some other third-party software for linking these transactions.
- Items prices that are set up on a per-item or percentage cannot be imported or exported using IIFs.
- IIFs are not able to export payroll data from QuickBooks Desktop to other software. Although you can use IIFs to export data from Intuit Online Payroll or Intuit Full-service Payroll to QuickBooks Desktop.
- Using IIFs, you cannot export data from QuickBooks One country version to another country version i.e. you can’t transfer data between QuickBooks Canada and QuickBooks USA.
- When you create an IIF file in excel try to avoid using numbers beginning with ‘0’.
The lists you can Import
- Chart of Accounts
- Employees
- Vendor types
- Items
- Shipping methods
- To-do list
- Notes
- Sales tax codes
- Customers and customer: jobs
- Other names
- Classes
- Payment terms
- Customer messages
- Sales reps
- Vendors
- Customer and job types
- Payment methods
- Budgets
- Price levels
Transactions you can Import
- Account beginning balances
- Cash sales to customers
- Checks
- Deposits
- Invoices
- Account transfers of funds
- Vendor bills
- Cash refunds to customers
- Credit card transactions
- Estimates
- Payments from customers
- Vendor bill refunds
- Credit card refunds to customers
- Credit memos to customers
- General journal entries
- Purchase orders
Other Recommended Articles:
5 Best Software for Inventory Management 2022 for ECommerce Business
How to Update QuickBooks Desktop to 2022
Top QuickBooks Online Classes 2022 For Beginners
Create IIF Files for QuickBooks Desktop
To create IIF files in QuickBooks Desktop you first need to run the Payroll service and then you will be able to create an IIF file in QuickBooks. The file you create will have the information transactions and the accounts to which these payments were connected to. Follow the below-mentioned instructions step by step to create a file.
- Open QuickBooks Desktop and then run payroll service, after that open the Reports tab.
- In the Reports tab, click on the Payroll History option.
- Find the payroll that you want to run and then click on the View Details option.
- After that click on the Export option, next to the QuickBooks.
- Then you need to select the location on the computer where you can download the IIF files.
- After selecting the location, IIF files will start downloading on the computer.
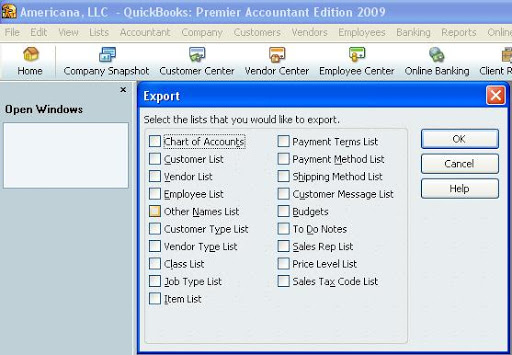
Export QuickBooks IIF File
To export the QuickBooks IIF file, you will be going to need administrator credentials i.e. admin username and password. Follow the steps mentioned below to export IIF files.
- Open QuickBooks Desktop and then sign in to the company file with admin credentials.
- If you are using the multi-user mode then you need to switch to the single-user mode. For this open the File menu and select the Switch to Single-user Mode option.
- To export IIF files, first, go to the File menu and then select the Utilities option and then Export. After that click on the option Export IIF Files.
- Then, select the location where you want to save the IIF files on your system and click on the Save drop-down menu.
- After that give a name to the file so that you can easily find them later and then Save the files.
- When downloading is finished, select OK.
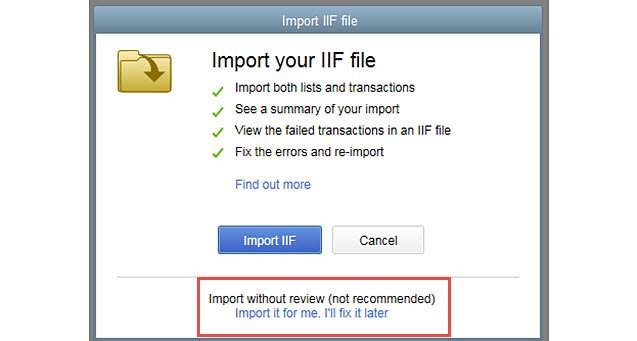
Import QuickBooks IIF Files
Same as when you export the IIF files, you also need admin login credentials of company files when you import the QuickBooks IIF file. Follow the below-mentioned steps carefully to learn how to import IIF files in QuickBooks.
- Open QuickBooks Desktop and login to company files with the admin username and password.
- You need to exit the Multi-user mode if using and for this, you need to the Files menu and then select the option stating Switch to Single-User Mode.
- We recommend you to create a backup of company files before importing the IIF files. In case something went wrong, you can easily restore the company data from backup.
- To import the IIF files, first, you need to go the File menu and then select the Utilities option and then click on Import. After that select the Import IIF Files option.
- After that, go to the location on your computer where you have saved the IIF files and then select and open the file.
- Check whether you selected the right file or not and then select OK.
Edit a QuickBooks IIF File
You can also make some changes to the QuickBooks IIF file that you have created earlier using the Microsoft Excel. To learn how you can edit an IIF file follow the steps mentioned below carefully.
- Open Microsoft Excel and then open the IIF file that you want to edit.
- For this, go to File option and then select Open.
- Next, go to the location on your computer where you have stored the IIF file.
- If the IIF file is not shown then go to the File Type and change the option to All Files.
- After that, select the IIF file you want to edit and then open it.
- Now a Text Import Wizard will open. Here select Next and then Next and Finish.
- Here, you can make changes that you want and then save the changes.
- For this go the File menu and then click on the Save option.
- After that click on Yes and close MS Excel.
- When you close MS Excel, remember to choose Don’t Save option when a window is prompt asking you to save the IIF file again.
Conclusion
We hope that now you’ve understood how you can use QuickBooks IIF file to export and import data in QuickBooks Desktop. We’ve mentioned all the important steps required to create, import, export, and edit IIF files for QuickBooks. If you still have some queries related to the IIF files or QuickBooks accounting software then you can have the assistance from our team of QuickBooks Proadvisors. Our team consists of certified and experienced accounting and bookkeeping professionals. To get the instant solution of all your issues, call us at our 24/7 toll-free customer support number +1-844-405-0904.
