In today’s topic, we are going to know about the setup procedure of the QuickBooks Desktop multi-user. Because QuickBooks Desktop multi-user is one of the beneficial features of QuickBooks provided by Intuit. It increases collaboration and productivity and makes the users together in one place (file) to perform their work simultaneously. To know more about this topic stay connect with us:
Other Recommended Articles:
QuickBooks ERP System (ERP Quality Functionality in QB)
QuickBooks Point Of Sale Errors
QuickBooks QBDBMgrN Error (Server not Running on this Computer issue): Fixed
To set up the QuickBooks Desktop Multi User Mode
To set up the QuickBooks multi-user you have to follow all the steps one by one with a lot of patience.
1: Download and Install QuickBooks Desktop
Follow the steps to download and install the QuickBooks Desktop:
- First check that, all the requirements are ready to download the QuickBooks Desktop on the server computer.
- If you haven’t downloaded QuickBooks Desktop on your server, then you can follow the above-linked text. And if you already did it then skip it and proceed for the next step.
- In the next step, choose the installation type, here you have to select the ‘Custom and Network Install’ option.
- If you want the full version of QuickBooks desktop on your main system, then click on the ‘I’ll be using QuickBooks Desktop on this computer, And I’ll be storing….’ option.
- And if you don’t want to get the full version of QuickBooks Desktop, but just need your server to host files then, select ‘I will NOT be using QuickBooks Desktop on this computer….’ option.
- Then follow the on-screen instructions to complete the install.
- Activate the QuickBooks Desktop, and proceed for the next step to set folder permission.
Point to Remember: Keep the server computer’s local hard drive, so that, you can share the files over the network easily.
2: Set Up Folder Permissions
The steps to set up folder permission to share company files are listed below.
- Right-click the folder containing the company file and click Properties.
- Choose Advanced on Security tab.
- Then, choose the option of “QuickBooks Data Service User Name” and then select the option “Edit”.
- Allow the following settings
- Traverse Folder/Execute File
- List Folder/Read Data
- Read Attributes
- Read Extended Attributes
- Create Files/Write Data
- Create Folders/Append Data
- Write Attributes
- Write Extended Attributes
- Read Permissions
Change Folder permissions
- Click the option of “Windows+E” on the keyboard of your system to open the “File Explorer”.
- Then, you press the Right-click to the parent folder and then click on the option of “Properties”.
- After that, you click on the “Security tab”, and then select “Everyone”.
- Then, select the option of Full Control then, Apply, and then OK.
Set Windows access permissions to share company files
Windows 10, 8 and 7
- Press Windows+E on your keyboard to open the File Explorer
- Browse and Right-click the folder containing the company file.
- Then, just select the option of “Properties”, which is given then “Sharing”, and then “Share Add”.
- Then, select the corresponding “QuickBooks Data Service User Name” for your version.
- Create the permission level of both users to Full Control and select Share
When you run QuickBooks File Doctor on the system this automatically opens the firewall ports and this tool can be used to configure the Windows Firewall.
3: Add Windows Admin Rights To Allow Configuration Of Multi-User Access
Windows 10
- Select the “Start menu”, then Settings, then Choose Accounts and then Family & other users.
- From the Other Users, section clicks the option of Add someone else on this PC.
- Then, just select the option of “I don’t have this person’s sign-in information at the bottom of the page” and then click the given option of “Add a user without Microsoft account” and the option are given in the display.
- Enter the login credentials
- Click Finish.
- Provide administrator privileges to the new user.
I. Select the newly created account > Account Type.
II. Select the option of drop-down Administrator.
III. Then, finally, click on the option of “OK” to save the changes.
The Windows Servers
- Type Server Manager and then select OK.
- Select the option of “Tools” then “Computer Management” then “Local Users” and then “Groups”.
- Double-click Administrators Group > Add
- Enter the account name for adding to the local admin group
- Click OK.
Provide Administrator rights to QuickBooks Desktop Database System User
First of all close QuickBooks Desktop and open User Accounts from the Control Panel. For Windows 10, 8.1, 8, and Server 2012 follow the below steps:
- On the keyboard press, the Windows key and then type User Accounts.
- Press Enter.
- Select the option to manage another account.
- Double-click the QBDataServiceUserXX for your QuickBooks Desktop version
I. QuickBooks Desktop 2018 QBDataServiceUser28
II. QuickBooks Desktop 2017 QBDataServiceUser27
III. QuickBooks Desktop 2016 QBDataServiceUser26
- Choose Change the account type > Administrator > Change Account Type
4: Configure Firewall And Internet Security Settings For QuickBooks Desktop
When you run QuickBooks file doctor then it automatically opens firewall ports. It can be used for the automatic configuration of Firewall settings.
5: Set Up The QuickBooks Database Server Manager And Scan Your File
Install QuickBooks Database Server Manager
- You need to close all the running programs including QuickBooks on your server computer.
- Search and install the downloaded file exe.
- Follow the instructions which are displayed on the onscreen.
- Click Custom or Network Options in install type and then click Next. Don’t click Express.
- You need to select the best choice for your network setup and then click Next.
- If you want the system Database Server Manager and QuickBooks Desktop on your server system.
- And then, if you only want a Database Server Manager on your server, then just select I will NOT be using the QuickBooks Desktop option.
- Now follow the rest instruction from the screen. And when you have done then click on the option of “Install”.
- Allow if Windows asks for permission.
Scan your folders
- Press Windows key and type QuickBooks Database Server Manager in the search box and open it.
- Click the Scan Folders
- Choose Browse and select QBO files that contain your company file.
- Click OK when finished. Now Click Start Scan
6: Open A Company File That Is Located On A Remote Computer
- Press Windows Key and Type This PC in the search bar.
- Open Computer > Map a network drive.
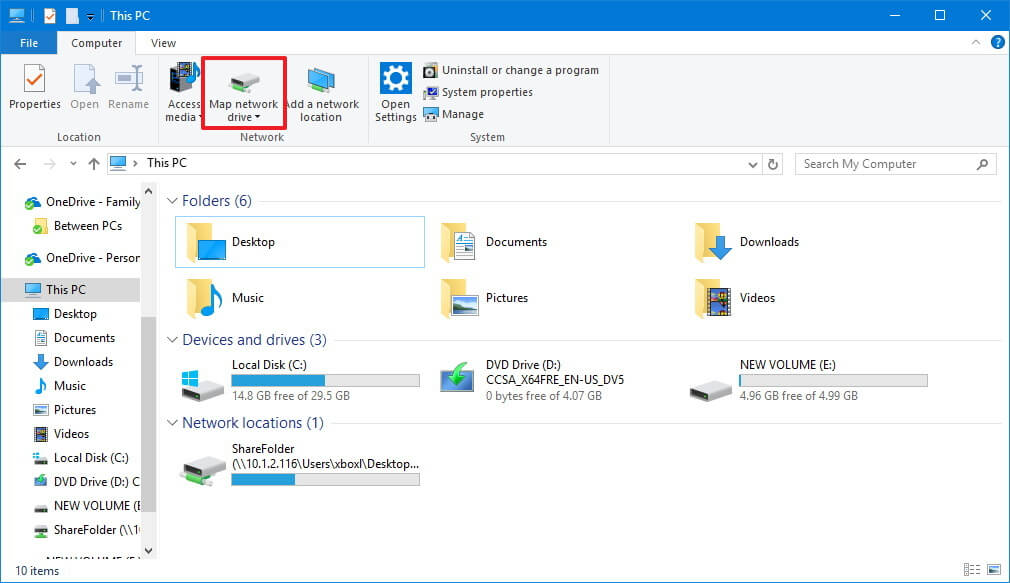
- Select any unused drive letter then select Browse.
- Open the network location where you have kept the company file.
- Select OK then Finish.
- Reopen your QuickBooks company file from the new mapped drive.
7: Locate and then open the company file
- From the File menu, select Open or Restore Company
- Select Open a company file and then click Next
- Search the location of the company file and click on the company file with file extension .qbw from the list and select Open
- Type your user name and password, If required
Open the company file
- From the File menu, click on Open or Restore Company.
- Select Open a company file, then Next.
- Search and open company file (with file extension .qbw)
- If asked, enter your login credentials.
8: Turn on Hosting
QuickBooks uses a Database File Manager to interact with the company file. You have to turn on hosting for the Host computer or where the company file is kept. Do not turn on Hosting for a workstation.
- Firstly, you from the File menu, to select the Utilities.
- Then, Click the option of Host Multi-User Access.
- After that finally, click the “Yes” option on the confirmation window.
If you follow these steps carefully, then you will surely set up and install the multi-user network for QuickBooks Desktop. Further, If in case, you have any problems or any queries regarding this topic then you can get support from our Accountwizy platform.
