Here is the article, we are going to discuss ‘How to import and export CSV files in QuickBooks Desktop?’. If you are interested to get some knowledge regarding this query, then stay with us, and read this blog carefully.
The CSV files are simple text files, that’s containing the data in the tabular form. And the all table field is in the file is separated from the next by a comma. Although you can create and edit CSV files with any text editor like Notepad to the most spreadsheets support this given format.
Here we will provide the steps for exporting and importing CSV files in QuickBooks Desktop. And if you want more details about the other types of data, then you can import and export in QuickBooks Desktop, then you need to see the Import or export overview. Let’s start:
Procedure to Import and Export CSV Files in QuickBooks Desktop:
Here in the below, we have provided the procedure for the both import and export of CSV files in QuickBooks Desktop. Have a look:
How to Import CSV Files in QuickBooks Desktop
In the CSV format to import a list, you need to install the QuickBooks Import Excel and CSV toolkit. The toolkit contains:-
- Import from Excel and CSV Manual:- A PDF document with instructions, best practices, and notes.
- CSV Examples Folder:- the 4 samples of CSV files, and the one for each type of list.
- XLS Example Folder:- a sample Excel file containing 4 worksheets, one for each type of list.
- Allowed fields:- a reference guide explaining what fields are available for Excel and CSV import.
Steps to Install the QuickBooks Import Excel and CSV Toolkit
- For the toolkit, open the file download window, and then click on the option of Save.
- Then, go to your Windows Desktop, then click on the option of Save.
- After that, you need to open the WinZip Self-Extractor window, and you double-click on the option of QuickBooks_Import_Excel_and_CSV.exe on your Windows desktop.
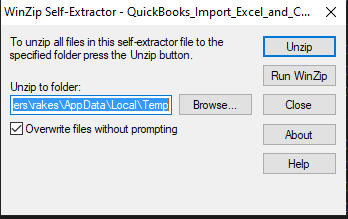
- Then, click on the option of Browse, and choose the folder where you want to install the toolkit such as your Desktop, and then click on the option of OK.
- To extract the contents, you need to click on the option of Unzip, and then to close the WinZip Self-Extractor window click on the option of Close.
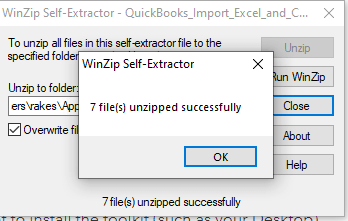
- Go to the location of the window, where you selected in step 4, and then open the QuickBooks Import Excel and CSV folder.
Other Recommended Articles:
How to fix QuickBooks Error 6189
QuickBooks Has Stopped Working, What to Do to Activate It Again
A Way to Use GoPayment QuickBooks
How to Export CSV files in QuickBooks Desktop
If in your computer system, you do not have MS Excel installed or if you want to use a different format to your data, and also want to view and edit this, then that time you need to export a list as a CSV file.
Customers and Vendors
- Go to the QuickBooks, and then click on the option of an open the Customer/ Vendor Center.
- Then, click on the Excel drop-down option, and then choose the option of the given list:
- If you want to export customer/ vendor data such as name, balances, and contact information, then export the Customer/ Vendor list.
- If you want to export transactions, then export transactions; that is by name or transaction type.
- Click on the option of Create a comma-separated values (.csv) file in the Export window.
- After that, you need to click on the option of Export, that is given.
- Then, you need to assign a file name, and then choose the location where you want to save the file.
- Finally, click on the option of Locate, open, and edit the file as needed.
Items
- Go to the Lists menu option, and then click on the option of Item List.
- Click on the option of Excel drop-down, and then click on the given option of Export all Items.
- Click on the option of Create a comma-separated values (.csv) file in the Export window.
- After that, you need to click on the option of Export, that is given.
- Then, you need to assign a file name, and then choose the location where you want to save the file.
- Finally, click on the option of Locate, open, and edit the file as needed.
Reports
- Go to the QuickBooks, and then open to the report option.
- Click on the option of Excel drop-down, and then click on the given option of Export all Items.
- Click on the option of Create a comma-separated values (.csv) file in the Export window.
- After that, you need to click on the option of Export, that is given.
- Then, you need to assign a file name, and then choose the location where you want to save the file.
- Finally, click on the option of Locate, open, and edit the file as needed.
The End Line:
In the above article, we have discussed ‘How to import and export CSV files in QuickBooks Desktop?’. We hope, you like it and able to perform the task correctly without facing any problem. Still, if you have any kind of doubts regarding this topic, then you can get ProAdvisor support from our Accountwizy platform.
