In this article, you are going to know, ‘How to E-File with the refreshed Intuit 1099 E-File service in QuickBooks Desktop?’. Those who need the solution to this query, read and follow the blog carefully without wasting any time.
In one year if you paid a vendor more than $600, then you need to fill out a 1099-MISC form, its important for you. And be sure to e-file by January 27, 2020, so to your contractors by January 31, 2020, your 1099s can be postmarked with the vendor. To be on time with the IRS, the 1099s can be e-filed through January 31, 2020.
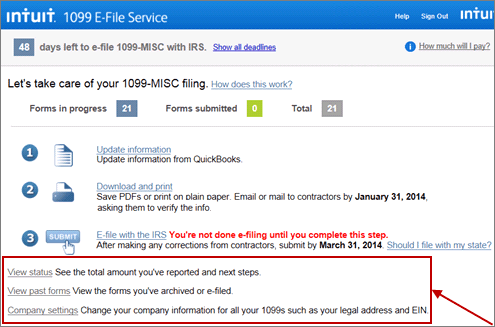
Procedure to E-File With The Refreshed Intuit 1099 E-File Service in QuickBooks Desktop
Here follow the below methods to complete the process:
Use E-File 1099s in Quickbooks Desktop
When Quickbooks gives you complete information of 1099 or you have the information then you will see this in the e-file service of 1099. If you like the information given, then you’re ready to e-file the forms to the IRS
- Go to the ListView, and then click on the option of sign in to the 1099 E-file.
- Then, you can Enter or confirm your payment information and select Pay and E-file
- Upon successful payment, you’ll return to the ListView with the forms in the “Submitted” status.
Note: All forms will be automatically physically delivered via USPS mail, and also e-filed to the IRS and to your vendors where you want. So, that time if you have an email address that is included for your vendor, the vendor will receive notification that they can access their 1099 via an Intuit account.
Process of Adding or Editing Form Information
If you expect something else and you don’t get the awarding information or you see that a form “requires info”. So you can handle this thing directly in your own way to each form:
- Go to the ListView option, and then choose the saved form, that you wish to change to go to its Detail View.
- Then, you need to change the desired information. And when it is ready, then click on the Complete form option which is found at the bottom of the page.
- Now you can go on the ListView, and then click on the option of either E-file selected or repeat the above steps as necessary for multiple forms.
Note: In this process, you can only edit “Saved” forms. And when once a form is “Submitted”, then it cannot be edited or deleted.
Steps to Delete Information Form
Sometimes if you make a form that is no longer relevant or cannot see duplicate information, then you can delete the saved form in your system.
- For deleting first, you need to go to ListView.
- Choose the option saved form, that you wish to delete to go to its Detail View
- Click on the opinion of Delete form, and the option found the upper right on the screen
- And the last is to click the Yes option, and the file will be deleted.
Mean of E-File Statuses
The E-File status indicates where the return is in the transmission process and allows CCH iFirm Tax to filter the returns that can be transmitted. The E-File status is different from the return status. Therefore, the status of a return might be In progress, and the E-File status might be Eligible.
E-file Status
- Submit Process:- This form is first submitted in the IRS.
- Form accepted by IRS:- After submission the form the IRS has confirmed the form is valid or not, it takes time up to a one week after the form submission.
Print Status
- Mail submitted:- The information of the accepted form is sent to the printing facility when the IRS receiver accepts the form.
- Send the Mail to the recipient:- The form has been then printed and postmarked.
- In transit:- The printing form is now in transit.
- In the local area:- The form has arrived in the recipient’s local area
- Form out for delivery – The form is out for delivery, which can take 2 business days from here to arrive in the recipient’s mailbox.
Steps to Check the Status of Your E-filing
Here, we can provide the steps of how to check the status of your e-file, follow the given steps, and check your e-file status:-
- In the File Forms tab, click the E-Filing tab given in the Filing History area.
- Find the form you have E-filed and look in the Status column.
- And then “Submitted to Intuit” shows that you’ve submitted this form via QuickBooks whereas “Submitted to Agency” depicts that Intuit has E-filed the form on your behalf with the agency.
- After that, you need to click either “Agency accepted” and “Agency rejected,” which told about acceptance and rejection of your E-file.
- You should receive a confirmation email, which is proof of e-filing.
Steps to Make a Correction
If you find that something was incorrect about a form you filed, you can issue a corrected form. Common scenarios include incorrect money amounts, a form filed that shouldn’t have been, an incorrect tax identification number, and an incorrect name. Here’s how to correct the previously filed form:
- First, you need to go to the ListView and then choose the form that you wish to correct to go to its Detail View option.
- Then, the option of Correct Form, which is at the bottom, then selects it.
- Then the form’s fields become an edit mode
- Change the incorrect information which you want.
- Click on the Complete form option.
- Click on the E-file option either selected or repeat the above steps as necessary for multiple forms on the ListView page.
- You can change the correct information or confirm your payment information and then click on the option of Pay and E-file
- When your payment process is done, you will return to the ListView with the corrected forms in the “Submitted” status.
- The previous form with the incorrect information will now show as “Void”.
Note:- Only forms that are in the “Accepted by IRS” status can be corrected.
Other Recommended Articles:
QuickBooks desktop users and restrictions
FreshBooks vs QuickBooks: Which is Best for Small Business
Resolve QuickBooks sync manager error
Which Type of Boxes are Supported
All types of boxes are supported in the file. To enter values, you can follow the directions in “Adding or editing form information”.
Steps to Print the Additional Copies
Sometimes you need to print an additional copy of the form, then the easy method to make a copy of the form is you can download a PDF version of the form. The process of download the PDF version of the form is given below:-
- Go to the given option ListView, and then click on the option of the desired form to get its Detail View
- Choose the Download PDF option.
- The addition file will download to your device for viewing and printing.
State Filings of USA
The state filing is a refreshed 1099 e-file service that uses the United Federal States Filing Program (CF/ SF) to allow the IRS to automatically transmit 1099 information to partner states.
Note: Some participating states have additional obligations and exceptions that we do not cater to. Check with the appropriate state’s tax collection agency for further information.
Name of the States which participate in CF/SF
Here, we can provide you the names of the state which are participating in CF/SF, check the given table, and know about it:-
| Alabama | Arizona | Arkansas | California | Colorado |
| Connecticut | Delaware | Georgia | Hawaii | Idaho |
| Indiana | Kansas | Louisiana | Maine | Maryland |
| Massachusetts | Michigan | Minnesota | Mississippi | Missouri |
| Montana | Nebraska | New Jersey | New Mexico | North Carolina |
| North Dakota | Ohio | Oklahoma | South Carolina | Wisconsin |
Conclusion
We tried our best to put information in this article, ‘How to E-File with the refreshed Intuit 1099 E-File service in QuickBooks Desktop?’ and hope you like it. Further, if you have any kind of problem regarding this topic then you can get our ProAdvisor support through the above-mentioned toll-free number.
