QuickBooks Online reconciliation is the process, in which we review the accounts in QuickBooks to ensure that the credit card and the bank statements are the same or not. This process gives us a clear indication that our all transactions are accurate, and match with the bank transactions. Today here, we will know more about this, and going to know, how to reconcile an account in QuickBooks Online.
To reconcile your business or bank account in QuickBooks Online, you have to properly need a bank statement and all your accounting data. Here are some points of benefits in the below, have a look:
- Ensure the accuracy of your accounting data.
- It can also help in identifying the multiple entries of the business purpose transaction.
- It can also help in identifying cases of internal fraud.
Now let’s start the procedure to reconcile an account in QuickBooks Online.
Other Recommended Articles:
How to Move Fixed Asset Data to New QuickBooks
QuickBooks Online for Mac App (The Free Download & Installation Process)
Methods for Setting Up QuickBooks Desktop for the First Time
Procedure to Reconcile an Account in QuickBooks Online
Follow the below steps to start the process:
Step 1: Review the Opening Balance:
QuickBooks downloads your transactions and enters the opening balance automatically when a user connect the bank and credit cards to online banking. Here are two types of account, where you did not worry for the opening balance.
- Review the opening balance, if you are reconciling other types of account for the first time.
- If are tracking transaction in an account, but forgot to enter an opening balance, then you did not need to review the opening file. You can review it later.
Procedure to Review the Opening Balance
- First, visit to the ‘Settings’ option, and select the ‘Chart of Accounts’ option.
- After that, click the ‘New’ option.
- Name the account, select the detail type, and the account type.
- Click on the ‘When do you want to start tracking your finances’ dropdown, and select the time that when you need to start tracking of the transaction.
- If you want to choose the ‘Today’ option then, enter the balance of the account for today, in the ‘Account balance’ field.
- And if you want to choose the ‘Other’ option then, put a specific date to start the transaction tracking process. in QuickBooks. Enter the balance of the account for the specific date in the ‘Account Balance’ Field.
- At last, click the ‘Save and Close’ option to save all the changes, and to close it.
Step 2: How to Reconcile an Account in QuickBooks Online
- In the first step, log in to QuickBooks Online, and visit for the ‘Settings’ tab.
- Then select the ‘Reconcile’ option from the ‘Setting’ tab.
- Click on the ‘Get Started’ option, and then on the ‘Let’s do it’ if first-time reconciliation.
- Then go to the ‘count’ drop-down menu, and choose the account that you want to reconcile.
- Now check the ‘Last Statement ending date’ and ensure that the bank statement starts the day after the last reconciliation.
- Then review the beginning balance, and ensure that the balance in QuickBooks is matched with the bank statement.
- Type the ‘Ending Balance (New Balance), and date. Recheck all the details and click on the ‘Start Reconciling’ option.
Step 3: Compare the Bank Statement:
In the third step of reconciliation an account in QuickBooks Online is very simple. Just compare the list of transactions with the QuickBooks bank statement. But make sure that, you have the right date and transactions.
The below given steps for reconciling accounts connected to online banking are different from accounts that are not connected. Reconcile the accounts types by following these steps:
Reconcile the credit card and bank account connected to online banking:
Before starting the procedure, match and categorize all the downloaded transaction details.
- Start the reconciliation with the first transaction on your bank statement, and find the same one in the reconciliation window.
- Now compare the two transactions. If all the transactions match, then ensure there is a checkmark next to the amount in QuickBooks.
- If all the transactions are not matches, and they are in the statement, place a checkmark next to it, and if the transaction is not showing on the statement, then don’t mark it as reconciled.
- Then compare each and every transaction on the statement.
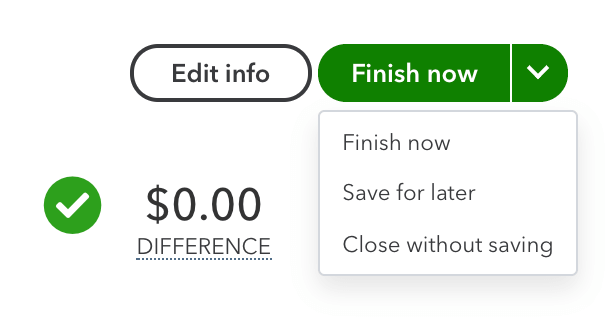
- After finishing all things, the difference between the QuickBooks and the statement should be $0.00. Click ‘Finish Now’, and then the ‘Done’ option if it is.
- At last, you can click the ‘View Reconciliation Report’ option to review the work.
Reconcile the Accounts, which are Not Connected to Online Banking:
- First, start with the first transaction on the bank statement, and find the same one in the Reconciliation window.
- Compare the transactions, if they match, then put a checkmark, and if the transactions are not appearing on the statement, then don’t mark it.
- If the amount and payee don’t match, then click the transaction to expand the view.
- After that click on the ‘Edit’ option, and make an edit, so that it will match with the statement.
- After the end, you will found the difference between QuickBooks and the statement is $0.00.
- Then click the ‘Done’ option from the ‘Finish Now’ tab, click on the ‘View Reconciliation report’ to review the work.
Step 4: Review the Past Reconciliation
- Select the ‘Reconcile’ option from the ‘Accounting’ from the ‘Accounting’ menu.
- Then click on the ‘Summary’ to see the past reconciliations. Or you can click on the ‘History by account’ option to see the reconciliation by account.
- Select the date range and account by using the drop-down menu.
Procedure to Edit the Complete reconciliation
If you want to review reconciliations, then follow the steps. Here we have provided a solution to review the past reconciliation.
Wrapping Up
This was the blog, about reconcile an account in QuickBooks Online. Hope, this article will help you to perform the bank account reconciliation in QuickBooks Online. Still, if you have any kind of doubts regarding this topic, then you can get our ProAdvisor support through the toll-free number.
