Today Accountwizy is here with a new article to move fixed asset data to new QuickBooks. If you are also searching for a way to move the fixed asset data then stay connected with us, and start reading this article without skipping any single step.
Procedure to Move Client’s Fixed Asset Data to New QuickBooks
You can move the client’s fixed asset data to New QuickBooks easily, but the procedure will vary with your QuickBooks Upgrade version. So first of all, you need to make sure that which QuickBooks version you are using, after ensuring with the upgrade version follow the procedure according to your QuickBooks upgrade.
Here we have two different solutions for two scenarios, you just need to choose the appropriate solution according to your scenario.
Scenario 1: If you Skipped a QuickBooks Version when you Upgraded
If during the upgrading process, you have skipped a version of QuickBooks. For example, if your previous version was QuickBooks Desktop 2018, and you upgrade your QuickBooks Desktop version directly to QuickBooks Desktop 2020, without upgrading it to QuickBooks Desktop 2019. In this situation, you can follow this procedure to move fixed asset data to new QuickBooks.
Step 1: Check that the Client’s Fixed Asset Files are Not Compressed
In the first step, you need to check the ‘Automatically compress clients’ is not turned on in the previous QuickBooks version. If the ‘Automatically compress clients’ option is turned on then, it will compress your clients’ fixed asset files into a single file. Now go for the procedure to find your client’s fixed asset folder.
- Create the backup of the company file, and select the ‘Manage Fixed Assets’ option from the ‘Accountant’ menu.
- If you are using QuickBooks Enterprise then, you will get the ‘Manage Fixed Assets’ option in the ‘Company’ menu.
- Then go to the Tools, and choose the ‘Program’ option.
- Click on the ‘General’ option.
- At last, uncheck the ‘Automatically compress client’ option, and then the ‘OK’ option.
Note: You can directly go for the second step if you no longer have access to the QuickBooks version you upgrade from.
Step 2: Find Out the Client’s Fixed Asset Folder
It is the most important step of this procedure. As you know, clients in QuickBooks have their own fixed asset folder. You may go through multiple folders to find the correct fixed asset manager file, but it totally depends on your client’s number.
- Browse to your previous QuickBooks ‘Clients’ folder (C:\Users\Public\Documents\Intuit\QuickBooks\Company Files\FAMXX\Clients)
- Every sub-folders contains the client’s fixed assets file.
- Open the folder “{0000301”, and find the file “0000301M.FX0”, here X is the version of your QuickBooks.
- After that, right-click on the file, and select the ‘Open’ option. Now in Windows, select the ‘Select program from a list’ option, and then the ‘Notepad’.
- Now you can notice the file path ending with .QBW, at the bottom of the text.
- Move to the next step, if the file is the client file that you want to transfer.
- If it is not the client file then, follow the same steps above for the other client folder to find ou the exact file for the client.
- Copy the folder “{0000301,” and save it in a folder temporarily, by which you can access quickly, like your desktop.
- Open the copied folder, which contains the client’s fixed asset files.
- And check for the ‘!’ marked file
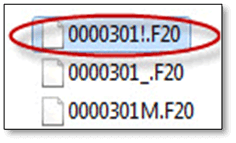
- If you can’t see this type of file then, continue with the next steps.
- If you can see this type of file then, it indicates that clients fixed asset data is compressed. You can use a compression utility to extract the files back into the same folder. And delete the file with ‘!’.
- Now change all the extensions of files, which match with QuickBooks.
| QuickBooks Desktop 2018 | F70, F71, and M70 |
| QuickBooks Desktop 2019 | F80, F81, and M80 |
| QuickBooks Desktop 2020 | F90, F91, and M90 |
| QuickBooks Desktop 2021 | F00, F01, and MOO |
| QuickBooks Desktop 2022 | .F10, .F11, and .M10 |
- At last, copy the client’s fixed asset folder from where you saved it temporarily.
Step 3: Move the Client’s Fixed Asset Folder
Now its time to move your client’s fixed asset folder, and to do this follow the steps;
- In the first step, you need to browse to your new QuickBooks ‘clients’ folder (C:\Users\Public\Documents\Intuit\QuickBooks\Company Files\FAMXX\Clients)
- And ensure that, there is no existing folder, having the same number.
- At last, move the folder to your new QuickBooks clients folder.
Note: The FAM folder is always one year earlier than its QuickBooks Version, for example, QuickBooks 2020, then the FAM folder will be the ‘FAM18’ folder. And replace the ‘XX’ in the place of ‘FAMXX’ with the folder number for the new QuickBooks version.
Step 4: Run Fixed Asset Manager
In the last step run, or open the fixed asset manager, by following the below procedure;
- First of all, open the client’s desktop file.
- And then, go to the ‘Accountant’ menu to select the ‘manage Fixed Assets’ option.
- Now you will see the asset manager will open the correct list of fixed assets.
- You will get a warning message.
- Click on the ‘Yes’ option, if you want to continue opening the fixed assets.
And if you want to connect the fixed asset client file with a new or different accountant’s copy then, you need to select the ‘Reconnect Accountant’s review Copy with fixed Asset Manager Client File’ option. But remember that, this may cause the loss of account mapping in fixed assets.
Other Recommended Articles:
‘QuickBooks is Unable to Send Your Email to Outlook’ – How to fix it
How to Manage Your Payment And Plan Info In QuickBooks Online
How to Download Bank Feed Transactions In QuickBooks Desktop
Scenario 2:If you Didn’t Skip a QuickBooks version when you Upgraded
If during the upgrading process, you have not skipped a version of QuickBooks. For example; if your previous version was QuickBooks Desktop 2018, and you upgrade your QuickBooks Desktop to QuickBooks Desktop 2019, without skipping any QuickBooks version, then follow the below steps to move the client’s fixed asset data to the new QuickBooks.
- At first, open your client’s company file, and create a backup for the fixed asset data.
- Select the ‘Manage Fixed Assets’ option from the ‘Accountant’ or ‘Company’ menu.
- A new window will appear on your screen, and you need to choose the ‘Transfer a prior year Fixed Asset Manager Client File’ option.
- And if the fixed asset client file is already set up, and created then, choose the ‘Transfer Client…’ option.
- After clicking on that option you will get a warning message that you’ll overwrite the existing data, and click the ‘yes’ option to continue it.
- Click the ‘Next’ option, and go to the transfer client to select the client window and client file that you want to transfer.
- In the next step, correct the calculation, and go for the next to select the ‘Asset Synchronize’ option. Just click the ‘Next’ option.
- At last, recheck your transfer summary, and click the ‘Finish’ option to start the transfer.
Procedure to Move Fixed Asset Data to Another Computer
Here is the procedure if you already reinstalled QuickBooks, use a flash drive to store all the backup data, and move the client’s fixed asset file from the old system to the new system or computer. This procedure will be complete in just two steps, you just need to follow the exact steps we mentioned below to move the fixed asset data to another computer. Let’s start the procedure;
Step 1: Get the Back Up of Client’s Fixed Asset Data
In the first step, you need to create a backup of the clients’ fixed asset data, and do this follow the steps;
- At first, open the client’s company file.
- And then, go to the ‘Accountant’ menu. If you are using QuickBooks Enterprise you can go to the ‘Company’ menu.
- From the ‘Accountant’ menu or ‘Company’ menu, select the ‘Manage Fixed Assets’ option.
- After that, go for the ‘File’ menu, and then select the ‘Backup’ option.
- Click the ‘Ok’ option to start the backup.
- Now you have to browse to the drive where you want to save your file. And make sure that, you save the backup in a new folder.
- Once the backup is ready, click on the ‘Ok’ option.
Step 2: Restore the Client’s Fixed Asset Data
In the next step, restore the client’s fixed asset data
- Take the flash drive, and connect it to your new computer.
- After that, log in to QuickBooks, and open your client’s company file.
- Select the ‘Manage Fixed Assets’ option from the ‘Accountant’ menu or from the ‘Company’ menu (If you are using QuickBooks Enterprise).
- Now select the ‘Restore a current year QuickBooks fixed asset manager client file’ option.
- After that, browse your saved client’s file, and make sure that to select the folder where you saved the backup.
- At last, click the ‘Restore’ option.
The End Line
So this was the article, hope you like it. We tried our best to describe all things in a proper manner. Follow the procedures carefully, without skipping any single step to move fixed asset data to new QuickBooks. Further, if in case, you are unable to follow any steps perfectly, or have any doubts regarding this topic then you can get our QuickBooks expert support to troubleshoot your problem instantly.
