It is very important to collect the taxes, or set up the sales taxes in one place, so that a user can easily monitor them, and can send them to the exact tax collecting agency. If you are a new user of QuickBooks, having the product of QuickBooks Desktop and don’t know ‘How to set up sales tax in QuickBooks Desktop?’, then stay with us. Here you will get the appropriate solution regarding this topic through this blog.
Before starting the blog, you have to check some points before setting up the sales taxes, which are given in the below point:
Things to Know Before Setting Up the Sales Tax in QuickBooks Desktop:-
If you don’t have any idea about the QuickBooks Sales tax, then must have to check all these points:
- Check the tax rates and requirements with your tax agency.
- The business CRA website is an excellent sales tax resource for your business.
- Check your business sales tax requirements for your business location where you sell your product and services, as per there compliance law.
- You will also know the tax agency to pay the collected tax of your business.
Steps to Set up Sales Tax in QuickBooks Desktop:
Generally, when we set up sales tax in QuickBooks, we set up the tax rate, agency, add combined rate, edit tax rate, agency’s rate, configure sales tax settings, by changing the sales tax center filter, sales tax settings, and etc. But in QuickBooks Desktop we will set up sales tax items, sales tax group, non-taxable status item, the non-taxable status of a customer. Let’s follow the steps to start the process:
- Firstly, go to the ‘Edit’ option.
- Then, select the preferences option which is given on your system.
- In the preferences, the display select sales tax option, and then go-to company preferences tab of your system.
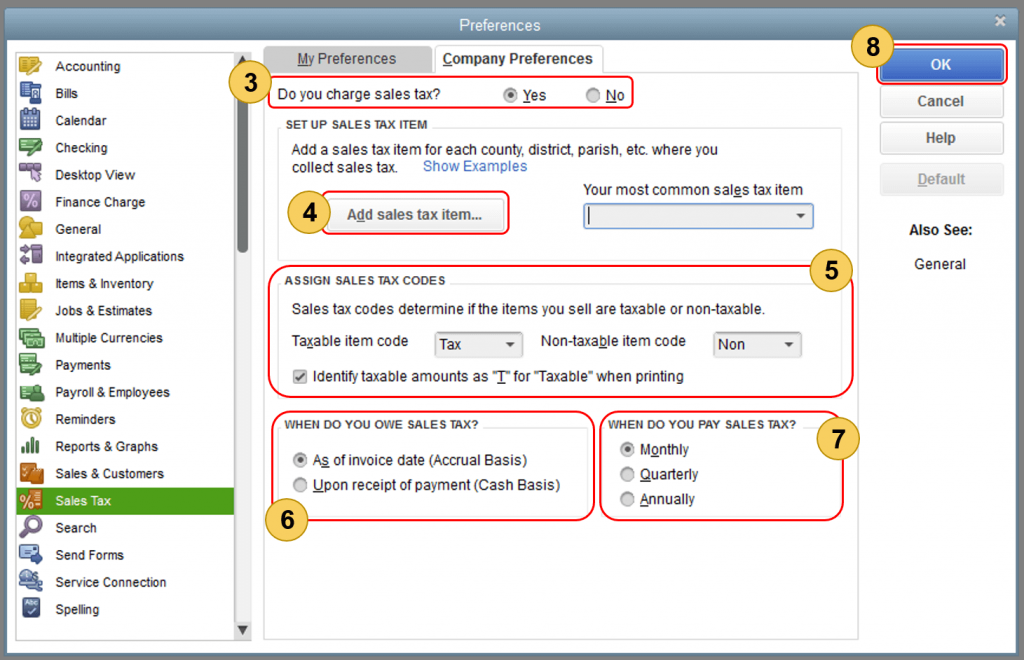
- After that, select the Yes option to turn on sales tax.
- Now set up the sales tax items or sales tax groups for each country, district, city, etc. where you collecting sales tax.
- Then click on the ‘Add sales tax item’.
- After that, you have to set up the sales tax item, sales tax group, non-taxable status of an item, and non-taxable status of a customer. And you will be able to set up all the things very easily by following the below steps.
Set Up Sales Tax Item:-
Setting up of sales tax item is necessary to calculate tax charges, during the making of taxable sales.
Steps to Create New Sales Tax Items:
- Click on the ‘Type’ drop-down, and select the ‘Sales Tax Item’ option from the list.
- Enter the preferred name, in the Sales Tax Name field.
- Put the specific rate for the item, on the Tax rate (%) field.
- Enter the collecting agency name in the Tax Agency field. If the agency is not listed, then add it by clicking on the ‘Add New’ option.
- And then, click on the ‘OK’ option.
Steps to Edit An Existing Sales Tax Item:
- Select the ‘Item List’ option from the ‘Lists’ menu, and search for the sales tax item that you need to update.
- Then right-click on that item, and choose the ‘Edit Item’ option.
- Now update the information, and click on the ‘OK’ option.
Set Up Sales Tax Group:
A QuickBooks user can track and report sales taxes individually, by setting the sales tax group.
- Select the ‘Sales Tax Group’ option from the ‘Type’ drop-down menu.
- Type the preferred name in the ‘Group Name/Number’ field.
- Put all sales tax that you need to include in the group.
- Then click on the ‘OK’ option.
- After that, assign the sales tax codes.
Other Recommended Articles:
QuickBooks Desktop 2022: New Changes in Features, Plans & Pricing
QuickBooks Error 557 (Fix the QuickBooks Update Error)
QuickBooks Desktop Premier Plus Subscription 2022: What’s New in It
Set Up the Non-Taxable Status of an Item:
- From the ‘List’ menu select the ‘Item List’.
- Then select Item and New from the Item List window.
- Select ‘Non Taxable Sales(or Non Taxable labor) option from the Tax Code drop-down.
Set Up the Non-Taxable Status of a Customer:
- First of all, go for the ‘Customers’ menu, and click on the ‘Customer Center’ option.
- Now right-click on the name of the customer that you want to set up as non-exempt.
- After that click on the ‘Edit Customer Job’ option.
- And if the customer is not listed yet, then click on the ‘New Customer & Job’ option, then click on the ‘New Customer’ option.
- Now you will be taken to an ‘Edit Customer screen’, in that screen, click on the ‘Sales Tax settings’ tab.
- Go to the ‘Tax Code’ and click on the ‘Non-Taxable Sales (or Service).
- Enter the customer resale certification number in the ‘Resale No. field’.
- Then click the ‘OK’ option.
To Create a Sales Tax Code:
Go for the ‘Tax Code’ drop-down, and click on the ‘Add New’ option. Here are several examples of non-taxable codes, that you can also use for specific tax codes.
| Sales tax codes | Time to Use |
|---|---|
| OOS | OOS stands for Out of State Sales. This tax code will be used when when a customer has bought a product from your company, but he/she lives in another state. |
| NPO | NPO stands for Non-profit Organizations. It assigned to a customer |
| GOV | It sales to the government, that are not taxed. |
| LBR | LBR means LABOR- A few QuickBooks company files include this non-taxable sales code. |
| RSL | RSL stands for RESELLERS. Those who are using products from you and create products of their own for selling. |
| WHL | WHL stands for WHOLESALERS. We use it when customers resell things or goods they buy from us. |
- Now set the sales tax basis, and also set up the preference for paying the sales tax.
- At the last of the process click on the ‘OK’ option.
Conclusion:
Setting up QuickBooks Sales tax is very easy, you just have to follow all the instructions in the step-by-step method. We tried our best to provide an easy and exact solution for this query, hope you like it. Still, if you have any kind of doubts regarding this article, then you can get our ProAdvisor Support through the toll-free number +1-844-405-0904.
