Every QuickBooks users know, QuickBooks has amazing facilities to manage the whole finance action of a business with its automatic feature starting from the preparation of the report to run the reports. But sometimes, we need to customize the reports according to our needs. At that, time, we need to customize the QuickBooks custom reports. But now, here the problem is, how to do it. If you also have then question then, don’t worry, here today we are with the article, where you can know, how to customize, and create QuickBooks Custom Reports.
As we all know, QuickBooks custom reports are the reports of all the finance details and also crucial for QuickBooks, to manage the finance of the business. So it always needs a proper recheck before sending it out. To make it easy, QuickBooks allows you to delete, and add columns, remove and add header or footer details, personalize the report font style, and can customize the data.
Different sections has different works to customize the QuickBooks custom reports, so you need to check all the customizing option to customize the QuickBooks Report properly. But for now, let’s know, how to customize reports in QuickBooks.
How to Customize Reports in QuickBooks
Here is the procedure to customize reports in QuickBooks. Read, and follow the instructions step-by-step to customize the report easily.
Customize the Profit & Loss Report
In the first step, we will customize the profit and loss report. But for that, we need to follow the below steps:
- Go to the Home screen of the QuickBooks, and click on the ‘Reports’ option from the navigation bar.
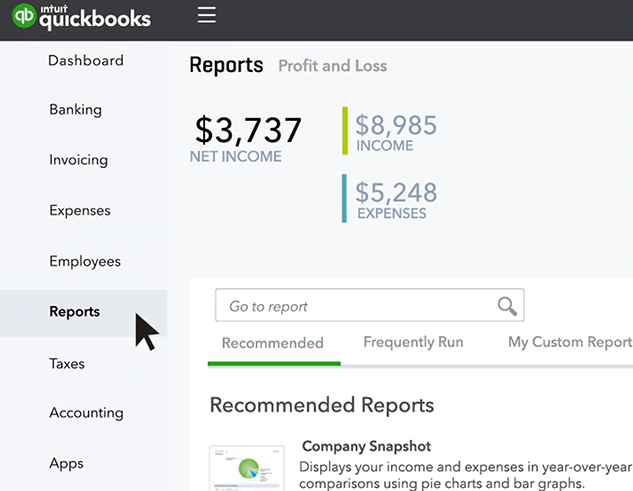
- Now the QuickBooks customize Profit and loss report will open in front of your screen.
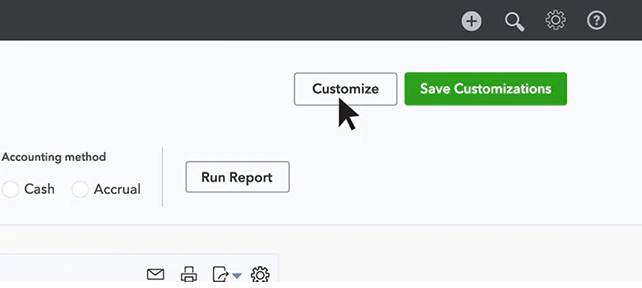
- Click on the ‘Customize’ option from the ‘Profit and Loss Report’ page.
Familiarize with the Customization Option
After doing that, you can notice that, there are lots of options available to customize the reports. You have to check all the customization reports option to know, what kind of modification can be done by this option. For example the profit and loss report. You can modify the ‘Rows/Columns’ section, ‘Header/Footer’ section and etc of the profit and loss report.
Customize the ‘Rows/Columns’ Section
After completing the ‘Step-1’ procedure you can see a section of ‘Customize Report’, and under the ‘Customize Report’ section, choose the ‘Rows/Columns’ drop-down menu, and customize anything according to your need.
You can also change the ‘Report Title’, and run the report to see the custom profit and loss by Month report.
Save Customizations
Now save all the customizations, by clicking the ‘Save Customizations’ option from the top row.
- Go to the ‘Save Report Customizations’ window, and check the ‘Add this report to a group’ box.
- After that, give a report name for the new report group.
- Click the ‘Add Management Report’ drop-down menus, and then the ‘Ok’ option.
Other Recommended Articles:
The way to Recover QuickBooks error 6129
A Way To Create And Restore a QuickBooks Portable Company File
QuickBooks File Extension ( The File Type of QB in Windows & Mac)
Create a Custom Sales Report
If you want to customize the Sales report then follow the below steps:
- At first, go to the main page of the Reports.
- And in the search box, type ‘Sales’.
- Now you can see a list of options related to the ‘Sales’, including the ‘Sales by Customer Summary’ option.
- Just click on it, and change the report to last Quarter.
To Change Report to Last Quarter
- Go to the Report period header, and click the below box.
- After that, click on the ‘Last Quarter’ drop-down menu, and then select the ‘Customize’ option.
To Enter Sales Receipt Customization
- To enter the sales receipt customization, go to the ‘Rows/Columns’ and click on the ‘Months’ option.
- And then enter into the lists, and select the ‘Design’ option for the ‘Products/Services’ option.
- Then go to the ‘Header/Footer’, and title the report ‘Quarterly Design Sales by Month’, after that, click the ‘Run Report’ option.
- Save all the customizations, and click the ‘Save Customizations’ from the top of the screen.
Set Email Schedule for Reports
By customizing the email schedule for reports you send all the reports to your clients every month. Follow the steps to set the email:
- At first, visit the ‘Reports’ screen, and search for the group under the ‘My Custom Reports’ tab.
- Select that group name report, and then on the ‘Management Reports’, and the ‘edit’ button.
- Select the ‘Set the email schedule’ option, and in the ‘To’ field, put your client’s email address.
Edit Email Schedule
- Go to the ‘Set Recurrence’ section, and select the Monthly on the first Monday, of every month.
- At last, click the ‘Save and Close’ option.
- Now all of your reports will be run automatically and sent to your clients on every first Monday of each month.
Search for Other Reports to Customize
Apart from the above, you can customize other QuickBooks custom reports like you can see your profits, if you have a project for your customer. Just customize the profit, and loss report with the customer column, and see the project profit.
If you have a non-profit project then, you can customize the Statement of Activity report, and get the idea, how much amount you have spent.
How to Create QuickBooks Custom Summary Report
Follow the below steps to, create QuickBooks custom summary report.
- From the left menu, select the ‘Reports’ option.
- Then search for the All tab, in the business overview segment, and click on the Custom summary report.
- After that, click the ‘Customize’ option.
- Now set the report Filters, and go for the ‘Run Report’ option.
- Hit the ‘Save Customization’ option, if you need it for future use.
How to Create a new Report Group in QuickBooks
Create a new report group in QuickBooks, by following the below steps:
- First of all, click on the ‘Add new group’ link, and give a name to the group report.
- Click the ‘Add’ option after, typing a name for the new report group.
- Click on the ‘Share with’ option, and choose an option ‘All’ or ‘No’, if you want to share the report with others.
- After doing all these, click the ‘Save’ option to save all the customization reports.
- Click the ‘Reports’ option, and then the ‘My Custom Reports’ link, if you want to find the saved customized reports.
- Now you have the list of all saved customized reports.
- And now you can collapse, and expand the listing of reports, by clicking on the arrow to the report group’s name.
- Click the name from the list to run the report.
Tabs for QuickBooks Custom Reports
Get some idea regarding the tabs for the QuickBooks custom reports:
Display Tab:
The display tab determines the details with the intention to be displayed on the company report. There are such a lot of factors that you may modify, which range depending on the report you run.
Report date range:
You may choose the dates that the report will cover. Select the dates drop-down and then select the to actual date range or you may manually select the date by choosing the calendar icon within the From and To fields. if you type a to date but leave the From date null, you get data as of the to date.
Report basis:
Select either the accrual or cash radio button to choose the report basis.
Accrual basis:
- A bookkeeping technique in which you regard profits or expenses as happening at the time you ship a product, render a service or acquire a buy.
- In accrual accounting, the time when you type a transaction and the time when you truly pay or acquire cash may be two separate activities.
- An accrual basis report shows income no matter whether or not your shoppers have paid your bills and prices no matter whether or not you have paid all of your bills.
Cash Basis :
- A cash associated report explicit income as well as prices only when you have received cash.
- In case you haven’t received an amount for the bill, an amount related report does no longer upload the income.
Use the above tabs to customize QuickBooks custom reports properly.
The End Line
Hope, this article will give you very big changes in your QuickBooks custom reports by customizing it. We tried our best to provide information regarding this topic, and we hope you like it. In addition, at last, we just want to say that, you can get our Accountwizy ProAdvisor support if in case, you face problems to customize the QuickBooks custom reports.
