As we know, deposit slips provide protection to both customers and banks, so it is important to set up the deposit slips to maintain perfect account management. In this blog, we are going to know the procedure to set up and print deposit slips in QuickBooks Online. If you also want to set up the deposit slips, then read this blog carefully.
You can print your deposit slips onto pre-printed forms flawlessly and with ease when you set up your system properly. Printing the deposit slip directly in QuickBooks is easy – choose the payments for your deposit via the “Record Deposits” window as you normally do. Once you get to the final screen of the “Record Deposits” process, simply click the black arrow to the right of the “Print” button at the top of the screen.
Other Recommended Articles:
QuickBooks Company File : Different Operations Performs On It
How to Cancel & Reactivate QuickBooks Online Subscription
How Do I Reinstall QuickBooks on a New Computer
Steps to Set Up and Print Deposit Slips in QuickBooks Online:
First of all, we will setup and print sample deposit slips in QuickBooks Online, so let’s proceed for that:
Step 1: Print a Sample Deposit Slips
If you want to print both a sample deposit slip and in the setting up deposit slip printing the first steps check how this is lined up with the deposit slip form.
Before printing the sample deposit slip, it will be good to print on a blank paper or on a regular paper, so that you can correct the alignment without pre-printed forms.
- First, you need to open the account and then click on the option of + New.
- Then, click on the Bank Deposit option that comes under the Other option.
- Choose the Print option.
- To open the Print deposit slip setup page, you need to click on the option of Setup and alignment.
- Then, click on the option of View preview and print sample.
- Choose the Print option.
- Here go on the top of a blank pre-printed form, and that can be placed with your printed sample deposit slip.
- And then, you hold both up to the light.
- After that, if the printed information lines up with the correct areas of the form, then you need to click on the option of Yes, I’m finished with setup in the Print window.
- And if not, then you can click on the option of No, continue with the setup.
After this sample deposit slip printing process is completed, then you need to set up Adobe Reader in the next step, when your printed page is not aligned with your form.
Set Up the Adobe Reader
Here, if you want to set up the Adobe reader then, first you need to download and use Adobe Reader to control printing in QuickBooks Online for the more consistent results.
- To download the latest version of Adobe Reader, you can click the on-screen link.
- As your default PDF viewer, you can set the Adobe Reader.
- Here, after that, you can click the on-screen link for the information about setting a default PDF viewer.
- Then, click on the given option of View preview and print sample and then, click on the option of Print.
- to the pre-printed form that compares the print and if the information lines up with the form then click on the option of Yes, I’m finished with setup.
- If not, then click on the option of No, and then select the option to continue setup.
The next step is to fine-tune the alignment of your printed page if your printed page is still not aligned with your pre-printed form.
Fine Tune Alignment
Note:- To the fine-tuning screen you can go directly from the Bank Deposit window by selecting the option of Print, and after that, you can click on the option of Setup and alignment, and then selecting the option of No, to continue setup twice. Here you know the details of the fine-tuning alignment process. Check the given process
To match your pre-printed forms to the fine-tune your printed page’s alignment:
- On the Fine-tune alignment page, and in the Preview window with the grid, then you need to compare the alignment grid.
- To match its location on your printout, drag the on-screen grid.
QuickBooks Online determines how to adjust the alignment and changes the Horizontal and Vertical offsets as necessary to form this position.
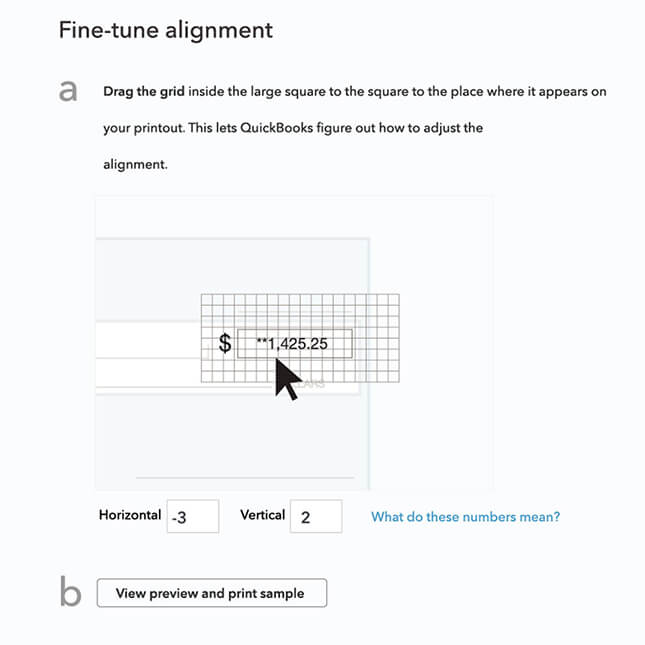
- To learn more about horizontal and vertical offsets, you can select What do these numbers mean?.
- After that, you can click on the option of View preview and print sample then, to make sure the information on your printed sample deposit slip lines up with the correct areas of your pre-printed form, and that time click on the option of Print.
- Then, click on the option of Finish setup if the sample lines up with your form. And continue to fine-tune the alignment until it matches if it is not.
Do the following steps, if the alignment tool is not saving your changes:-
- First, you need to go to the fine-tune alignment screen page.
- To match its location on your printout you need to drag the on-screen grid.
- Click on the option of Finish setup, and then try printing a sample, that is see Print a sample deposit slip section for the steps.
- Then, you need to repeat the 1 to 3 steps until the sample print lines up with your form.
When the all above process is completed, then that time you can now print your deposit slips.
Step 2: Print Deposit Slips
And this process is that once you have set up deposit slip printing, then you can print a deposit slip, and the steps are given below:-
- From the Bank Deposit window, that created a deposit transaction.
- As the account when receiving payment against that specified Undeposited Funds an invoice or when creating a sales receipt
If you are printing deposit slips instead of just a summary, in addition, you make sure that you have printable deposit slips loaded in your printer. And then you can order a printable deposit slips here, the details are given below:-
How to Print Deposit Slips in QuickBooks Online
- Go to the account, and click on the option of + New.
- You just click on the option of the Bank Deposit, and it comes under the Other option.
- Click on the opinion of the customer payments in the Bank Deposit window, that you want to deposit.
- To Print deposit slip and summary or Print deposit summary only, click on the option of Print, and specify whether (useful if you’ve filled out deposit slips by hand). You can also select Setup and alignment to check your print alignment.
- Click on the option of Print, and, depending on your browser, and then click on the option of the Print icon either from the floating toolbar on the Preview page or from the toolbar on the separate Preview window.
- to manually download the PDF file and no Print icon appears on the screen, in case if the preview appears blank, or if you are prompted, download the PDF file, then open it, and then you print it from there.
- When you are finished printing, then you need to close any open previews or print windows.
- Click on the option of Save and close.
Your deposit slips or summaries are printed as specified, then you know how to print deposit slips.
Conclusion
We hope this information helps you to understand ‘How to Set up and Print Deposit Slips in QuickBooks Online’, but if in case, you are unable to print the deposit slips then you can get the ProAdvisor support from our Accountwizy platform through the toll-free number +1-844-405-0904.
