If you are planning to share and sync QuickBooks file between two computers, and don’t know how to do this. Then don’t worry, here we have the solution for you. In today’s blog, you will be able to share and sync QuickBooks files between two computers. Let’s begin the blog:
It is a good decision to sync the QuickBooks files between two computers because, the synchronization method increases the level of business productivity into the QuickBooks files to different computers. Before proceeding for the share and synchronizing method ensure the below two points:
- If you want to sync the files:
- Check if both computers have the correct installation options.
- And, if not, then just check for the correct installation options.
- Then, connect both the computers on the same network.
- If you want to do this, by uninstalling the QuickBooks in both computers:
- In this way, you have to first uninstall the QuickBooks application on both the computers firstly.
- Use QuickBooks on both computers with the right option.
Note:- In your primary QuickBooks Desktop will always keep the files stored safely and will also allow you to sync them to the secondary computer. That time you know the benefits of sync method QuickBooks files, then let us have a look at the steps involved in the process, and the steps are given below.
Other Recommended Articles:
WooCommerce QuickBooks Integration: Syncing with Plugin
QuickBooks 1099 Forms (Purchase & Set-Up Form)
How to Create & Use QuickBooks Accountant’s Copy
Procedures to Share and Sync QuickBooks Files Between Two Computers:
Start the process by following the steps:
Steps to Sync QuickBooks Files Between Two Computers:
- In the first step, open your QuickBooks and then enter your software license number and product code.
- Then, install and download the Intuit Data Transfer utility on the computer that hosts company files.
- Paste your company file which you want to sync on the secondary computer from the primary file.
- Start the QuickBooks on the primary computer.
- Click on File and choose Company File on your secondary computer
- Select Open Company option
- When the data utility transfer one.
- Select the button from the open-source company with the export data of your company from the source of the company
- Select the option of Yes and permit access even if QuickBooks is not running.
- After that, just look for the options to allow apps to access personal data.
- Click on Continuity option, and then Yes or Done.
- Select the end button in the currently connected area in data utility.
- Select File and choose the option of Close Company.
- Click on the File option.
- Open or Restore Company, and then Open a Company.
- Select the data from the Open Destination Company Import Data of the disk data in the destination company
- Select the Yes option, and it always allows access, even if the QuickBooks is not running.
- Allow the app to access personal data.
- Click on Continue, then Yes, and Done in the QuickBooks.
- For the currently connected area in the Data Transfer Utility, select Close
- Click on File and choose option Close Company in QuickBooks.
- Choose the Type of Data and the Change button of Data Transfer Utility.
- Select an option which best presents the information which you want to import in the destination File
- Go to Import data into a destination in Data Transfer Utility and select the button of Import Data
Steps to Share Desktop Version on Two Computers
In this process, you just use the multi-user set up on your company files stored in the host computer to communicate with the QuickBooks company file.
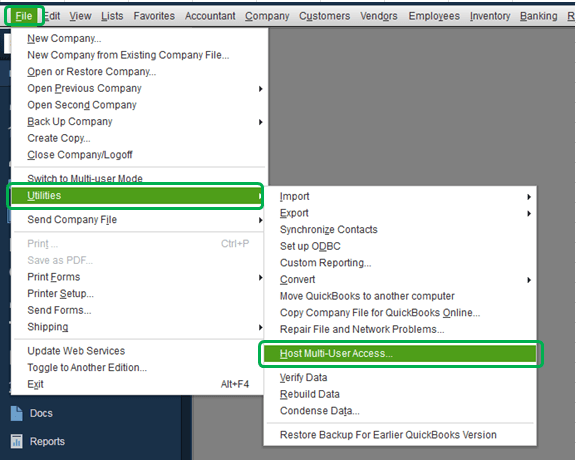
- Click on the “File” option, then “Utilities” and after that click on “Host Multi-user access” in QuickBooks on the primary computer.
- After the above steps are done, then confirmed as the host, and follow the below steps.
- Open start menu and type database in the server computer.
- Then, click on the option of QuickBooks database server manager.
- When you follow the above steps but you don’t get no folder locations are shown on your system display.
- Then, you just click on the Browse and browse to the folder where you store your company files.
- Click on the option of OK.
- Then, click on the Start Scan option, which will also repair the firewall permissions of QuickBooks software to allow the QuickBooks to communicate over your system network and resolve any type of error related to this.
- When the all process finished, then finally click on the option of close and try opening QuickBooks in Multi-User mode on your workstations.
Database Server Setup For the Synchronization
In the primary computer store the company file or network sharing. And the second way is to select the option to use QuickBooks but not store the company file on the secondary computer and install QuickBooks Accordingly. After installation complete properly follow the following steps to do the setup-
- Click the “Scan Folders” tab, “Add Folders” and “Scan” to scan the primary computer for the QuickBooks company file, click “Close” once you have verified the company file has been found
- Then, just press the “company” menu option.
- After that, click on the option of “Set up Users and Password” and then choose the “Set up Users” option within QuickBooks on the primary computer.
- Then, click on the given option of “Add User” in your system display and then assign Quyickbooks username and password.
- After that, the all above process is done then, you can select your access options for the secondary computer and click on the option of “Next”.
- Then, just select the changing or deleting transaction permissions.
- Click on the option of “Next and Finish”
- Then, click on the “File” option.
- Then, press the option of “Open or restore company” and after that “Open a Company” in QuickBooks on the secondary computer.
- Browse to the location on your network where the primary company file is stored.
- The final step is to select the file then “Log in” with the username or password created on the primary computer.
Conclusion
We hope, this blog will helpful for you. Just follow the steps carefully, and do what you want. Further, if you have any doubts regarding this topic, then you can get ProAdvisor support from our Accountwizy platform through the toll-free number +1-844-405-0904.
