In today’s topic, we are going to know that ‘How to manage bills & receipts in QuickBooks Online?’, through the QuickBooks Online Receipt Capture method. So let’s begin:
To manage bills and receipts in QuickBooks Online, the common step is login to QuickBooks Online first, then from the Dashboard, go for the ‘Receipts’ tab. In this tab, we are going to do all the things to manage receipts in QuickBooks Online like entering and tracking expenses receipts, and bills.
Before capturing, categorizing, or managing receipts and bills in QuickBooks Online, you have to keep a point in your mind, and that is: QuickBooks only supports the images with jpg, jpeg, gif, and png format and PDFs. And if you are an iPhone or iPad user then the images may be in the HEIC format, convert the HEIC images to a compatible format.
Other Recommended Articles:
Intuit Data Protect Backup Failed (It’s Not Working): Fixed
How to Create & Enter Proforma Invoice in QuickBooks
QuickBooks Enterprise Common Errors & Their Common Solutions
Procedure to manage bills & receipts in QuickBooks Online:
We have to follow two steps to manage bills & receipts in QuickBooks Online, and the first step is, adding receipts in QuickBooks, and the second step is, editing or review of receipts in QuickBooks Online. Let’s proceed to the first step:
Step 1: Add receipts and bills into QuickBooks
Here we will show you that, ‘What are 3 ways to add receipts to QuickBooks online receipt capture?’ and ‘How to do it?’.
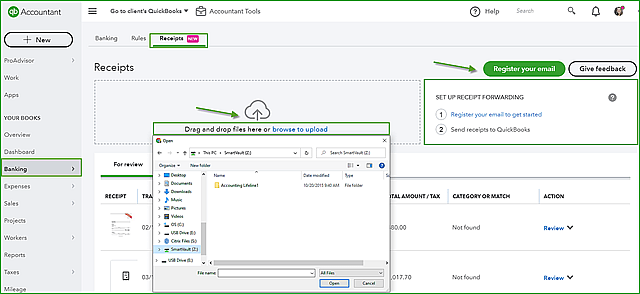
Way 1: Use web browser to add receipts to QuickBooks online receipt capture
- First of all, open any web browser (Google Chrome, Internet Explorer, Mozilla Firefox), and log in to QuickBooks Online.
- Then, choose the ‘Banking’ tab or the ‘Transaction’ tab from the Dashboard.
- And go for the ‘receipt’ tab.

- Then drag and drop the bill or receipt directly into the QuickBooks Online.
- Or you can browse and upload the file into the QuickBooks Online directly.
Way 2: Use mobile to add receipts and bills
In this way, you can use both iOS and Android to scan receipts in QuickBooks or to add receipts in QuickBooks.
- Download and install the QuickBooks Online App.
- After the complete installation of the QuickBooks Online app, open it and tap the menu icon,
- Now tap on the ‘Receipt Snap’ and then on the ‘Receipt Camera’.
- And click a photo of your receipt.
- Tap ‘Done’, after choosing the ‘Use this photo’ option.
- In the app tap the Menu.
- Tap the Receipt snap.
- Now, Tap the Receipt Camera and then take a snapshot of the photo of your receipt.
- Tap Use this photo and then tap Done.
The receipts that are captured can be appearing on the receipts tab with other receipts you’ve added.
Way 3: Use Email to add bills and receipts in QuickBooks
- After log into the QuickBooks Online, from the left menu, click the ‘Banking’ or ‘Transactions’ option.
- Now click on the ‘Receipt’ tab.
- Go for the ‘Customize email’ option.
- Create an email address having the @qbodocs.com at the end.
- After customizing the email, click on the ‘Customize Email’ option, and then click on the ‘Confirm’ option.
- Now choose the users who can forward the emails to a new address.
- Take a picture and email the image to the email address, but remember that, each image or file must contain maximum 1 receipt.
- After that review and customize the receipts into the correct accounts.
Step 2: Review, edit, or match receipts and bills in QuickBooks
- Go for the ‘Banking’ tab and choose the ‘Receipts’ tab.
- See the side-by-side view of the receipts which are sent, by selecting the row.
- Edit the extracted details for the receipt for the ‘Review’. Select review allows, if there are multiple matches, and choose the matches that you want.
- Add to create a new expense in QuickBooks with attached receipts.
- Then match the receipts with the existing records of
If in case, you have sales tax turned on in the QuickBooks company file, then follow the below steps:
- First, select the tax type, and rate, it will calculate the tax amount automatically.
- Then in the tax amount field, edit the value for multiple rates or non-taxable items.
- Change the value of tax calculated for a group rate, by editing the total amount of tax deduction.
Conclusion
To conclude the Blog, we will suggest you, follow the above steps carefully, and customize and manage receipts in QuickBooks (including adding receipt, editing receipt, review) successfully. Hope you like it still if you have any kind of problems related to this topic, then you can get help through our toll-free number +1-844-405-0904.
