Today Accountwizy with a new and important topic to customize QuickBooks Online dashboard. Because the dashboard of QuickBooks Online is the first page when, we log into the Online account, which gives us a short update of all activities. If you are a QuickBooks Online user then, you must read this article very carefully, no matter what type of user you are (old/new). Without wasting valuable time, let’s read this blog.
When you sign in to QuickBooks Online account for the first time, then you will be directed to the homepage dashboard. Your dashboard displays an overview of your company, which gives you a quick business update such as your income and expense status, your bank accounts, and more with the QuickBooks Online test drive.
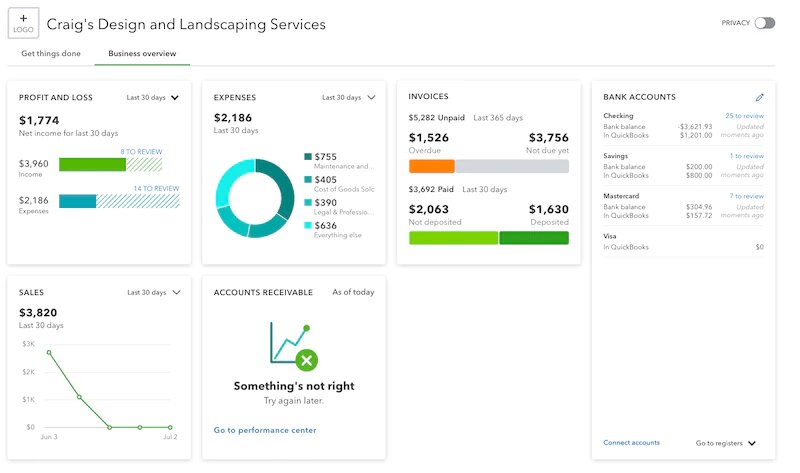
In this QuickBooks Online Dashboard example, we get a real-time view of revenue, expenses, accounts receivable and accounts payable, income by-products, vendor expenses, and more. The idea behind QuickBooks’ dashboard is to keep business owners, bookkeeping, and aware of what is happening in the business at all times.
Note:- If you are a new user, this content will be empty. Once you enter the transaction, the dashboard update displays a real-time overview of your company’s finances.
Procedure to Customize QuickBooks Online Dashboard
Here, you know the important details related to your home dashboard in QuickBooks Online. Then, you need to go from the dashboard, then you can use the + New option to do everyday tasks. And if you don’t see what you’re looking for on the menu, then you need to click on the Show to view more options.
Below some of the basic tasks that you can perform when you select + New are:-
Note:- The view of the dashboard may be different from another user in one company. QuickBooks Online determines what information it displays by each user’s usage rights.
Set Up Company in Home Dashboard
There are two ways to start your QuickBooks setup:
Option 1: Set the List of Company Settings At Once
- Go to Settings ⚙ and choose Account and Settings.
- Navigate using the sections on the left menu and edit as necessary.
Option 2: Configure Settings as Your Work
When this is your first time creating a report, a setup interview window will open for you. Each setup interview has simple, straightforward questions about what you want to do and how you plan to use the function you are using at the time.
When you answer these questions, you automatically configure your settings. You can answer some or all of the interview questions immediately, or you can choose to cancel. If you cancel, the next time you sign into QuickBooks and create a report, the setup interview opens at the point where you left off.
And if any case you want to change the setting, then you can always go back to Settings and click on the option of Account and Settings.
Search for Transactions in QuickBooks Online Dashboard
Here, in this process, you can generate a list of transactions that match a variety of search criteria you enter, likewise date range, amount, and type of transaction.
- Click on the Magnifying glass icon.
- Then, you need to enter a transaction number, a date, or an amount then select the smaller magnifying glass icon, or after that press the enter option in the Search field.
- And when some case if you don’t find what you need, then you can select the Advanced search.
- After that, you need to use one or more filters to select the type of data that you want to find, and also you can see the filter selection example below for more details.
- And when if you want to customize the results list, then click on the Settings option which is located above the table of search results, and after that click on the column(s) option, that you want to display.
- And when if you want to print the list or export it to an Excel spreadsheet, then click n the option of the Print icon or the Export to Excel icon that is next to the print icon, respectively.
Filter Selection Example
And here we have to provide the details or process when if you want to find all transactions in the past 30 days in an amount equaling $100 you would do the following steps carefully, and complete these process:-
- First, you need to change Reference no. to Last Modified Date.
- And then, you need to change Today to the Past 30 Days.
- After that, click on the option of Search and then you will find a list of transactions.
- And when you need to narrow the list, then you can change Date to Amount and enter 100 in the box.
- And at the last, click on the option of Add Filter.
Other Recommended Articles:
How to Set Up Bank Feeds in QuickBooks Desktop
How to Print Pay Stubs in QuickBooks Desktop
How to Set up Direct Deposit in QuickBooks for Company Payroll
Manage Users & Access in QuickBooks Online Dashboard
In this process, the users have to include the master administrator and also include any other users that the administrator has added. These users count towards your current user limit.
And it allows you to create this, so you must be a master administrator or company administrator to add, remove, or change a user’s access. Here, the process to manage users:-
- First, you need to go to the Settings menu.
- And then click on the option of Manage Users.
To Edit Contact & Sign-in Information
Describe here that QuickBooks Online software allows you to change your own name, address, phone number, email address, and user ID. And if you have the appropriate access, then you can change another user’s name, email address, and access rights. Below we provide the details related to your own and also another user who connect with you:-
To change Own Contact & Sign In Information:
- Firstly, you need to go to the Settings menu, and then click on the option of Account and Settings.
- After that, go to the Company section, and then under Contact info click on the option of Edit.
- Then, you need to edit the information as necessary.
- And at the last, click on the Done option.
To change Contact & Sign In Information for Another User:
- Firstly, you need to go to the Settings menu, and then click on the option of Manage Users.
- Then, choose the user that you want to change, and click on the option of Edit.
- After that, you need to update the information as necessary.
- At the last of this process, click on the option of Save and close.
Note:- You must have the appropriate permissions to change another user’s information.
Wrapping Up
Here we have provided all the details regarding the QuickBooks Online dashboard to you. We hope the blog will help you to make your accounting activities work better. Further, if you getting any problems while following the steps then, you can get our ProAdvisor support for an instant solution.
