Do you know about QuickBooks Online bank rules, and what is the benefit of setting up bank rules in QuickBooks Online? Don’t worry, if you have no idea regarding this. Today in this article, you will be able to know about the QuickBooks Online bank rules, and the setting procedure of bank rules. If you are excited to know this then, read the blog till the end.
QuickBooks Online helps to classify your common transactions. Banking rules are a great tool in accounting software that teaches QuickBooks how your transactions should be classified. QuickBooks rules allow you to customize banking transactions that you accept in QuickBooks Online. QuickBooks rules save you valuable time by establishing the automatic classification of regular recurring transactions.
When you download the account to account transactions from your bank, that time you need to categorize them so that they go to the correct accounts. The Bank regulations give impetus to this review process.
You can create rules that automatically classify transactions for you. The more QuickBooks uses your bank rules, the better it is found in the classification. After a while, it can scan transactions and add details such as payments.
Are you ready to know, how to do bank rules in QuickBooks Online? Here you for the setup procedure of QuickBooks Online bank rules
Other Recommended Articles:
How to Set Up QuickBooks Desktop Multi-User
How to Record QuickBooks Vendor Refund?
How to Create Journal Entries in QuickBooks Desktop
Procedure to Setup QuickBooks Online Bank Rules
Below we have explained some simple steps for you to complete this process. Read the complete steps given and follow it, by doing so, you will be able to complete this process.
Step 1: Create Bank Rules in QuickBooks Online
- Initially, go to the Banking menu or Transactions menu.
- Then, click on the Rules tab.
- Click on the option of New Rule.
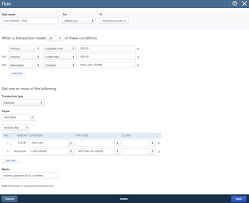
- After that, you need to enter a name in the Rule field.
- Click on the Money in or Money out option from the For dropdown.
- Go to the in the dropdown, and then click on the bank or credit card account.
- After that, you need to set the rule conditions. And that decides the transaction must meet All or Any of the conditions, where you can add up to 5 conditions.
Tip:- Instead of creating multiple rules, you can create with OR conditions. QuickBooks edit transactions when they meet any of the mentioned conditions. Set When a transaction satisfies any of these conditions, select Add Line.
- If you want that transactions get edited when they meet any of the outlined conditions, create rules with or option.
- You have to specify whether the rule applies to bank text, amount, or description in the conditions field. Then after identifying the content that the transactions contain, doesn’t comprise, or is just for the rule to apply.
- Choose the settings for the rule and specify the payee, transaction type, and the category to apply.
- Select the trash bin icon for removing a condition.
- Finally, choose the save option.
QuickBooks automatically applies your rules to transactions in the For Review tab. These are what you need to review every day.
Tip:- You can add a rule for transactions in the For Review tab. You can just select a transaction and then create a rule from this transaction link to open the rule transaction and after that start setting the conditions for the rule.
Steps to Import Existing Bank Rules in QuickBooks Online
In this process, if you set up banking rules on another QuickBooks Online company file, you can export them to another company file, and the steps are given below, you need to follow these steps carefully:-
- First, you need to go and Sign in to the company file that you want to export the bank rules from.
- After that, go to the Banking menu or Transactions menu. And then click on the option of the Rules tab.
- Then, click on the New Rule dropdown and then select the Export Rules option.
- Afterward, click on the option of save the export file in Excel.
- Then, you need to sign out of the company file, and after that again sign in to the one you want to import the rules into.
- After, you need to go to the Banking menu or Transactions menu. And then click on the Rules tab option.
- Click on the New Rule dropdown and then select the Import Rules option.
- Then, click on the Browse and find the Excel file you exported.
- After that, click on the rules and details you want to import.
- And when all processes completed then, you need to follow the prompts to finish the import.
Step 2: Review Recognized Transactions
After setting up the bank rule, the recognized tab of the bank and credit card screen will show an indicator for the transactions that are recognized by the system.
If required, you can add transactions directly from the recognized tab or choose the transaction for editing it before adding it.
Note:- If QuickBooks does not know how to classify transactions, it uses Uncategorized Income, Uncategorized Expense, or Uncategorized Asset Accounts to temporarily keep them. You cannot use these accounts to make bank rules.
Step 3: Set up the Automatic Add Feature in QuickBooks Online
This is the final step of this process, and it is also called Automatically Add to My Books Option, follow and complete this:-
Targeted rules are automatically created and specific transactions are automatically accepted into the books from the Banking page.
- If you want to turn this option on, choose the “automatically add to my books” option on the Rules window and then click on the option to save.
- Now, after creating an Auto-add rule, any transactions of yours on the “For Review” tab will be added automatically.
After creating an auto-add rule, any transaction on the For Review tab that satisfies the conditions is automatically added. You can auto-add rules run when you have to perform the following tasks:-
- Log in
- Create or modify a new auto-add rule
- Upload file
After creating an auto-add rule, any transaction on the For Review tab that satisfies the conditions is automatically added.
Last Note
That’s it, we hope, the above-mentioned information will help you a lot to set up bank rules to categorize online banking transactions in QuickBooks Online. These are very simple steps, hope you like it. Still, if you have any doubts regarding this article, then you can get our QuickBooks ProAdvisor support for the best and instant help at any time and anywhere.
