QuickBooks has the facility of sending online invoices to the customer. Also, an offline invoice printing facility is available. And this printing and mailing service can also help you market your company with targeted direct mail campaigns, which will help your business reach its ultimate potential. But sometimes QuickBooks user faces an error during printing any record. So QuickBooks has launched QuickBooks PDF Repair Tool to fix QuickBooks online printing problem. So let’s see what is QuickBooks pdf repair tool.
What is QuickBooks PDF Repair Tool
QuickBooks pdf repair tool is a part of the QuickBooks tool hub. That is used for resolving QuickBooks printing-related issues. And if you want to print any document from QuickBooks. Then QuickBooks requires various components like XPS document writer, MS.Net latest version, and MSXML.
And when anyone amongst them is an error. Then QuickBooks throws an error message on your screen. In order to resolve the QuickBooks online printing problem. Intuit has developed a QuickBooks tool hub. And inside this QuickBooks tool hub, you will get a QB pdf repair tool. That is used, especially for QuickBooks printing problems. So let us see which types of error it can resolve.
Types of Errors Solved by QuickBooks PDF Repair Tool
During printing any document in QuickBooks, you can face various types of QuickBooks errors. That can be solved by the QuickBooks PDF repair tool. Some of the errors are defined below to inform you.
- QuickBooks is unable to complete printing action due to missing components
- Your QuickBooks is unable to select the current Printer or MS.XPS document writer on XPS port
- QuickBooks isn’t responding
- There is a problem of saving a PDF file
- QuickBooks is unable to save your document as a .pdf extension
- Your system print driver host is not working
- QuickBooks error 1722 and 1801 appear during pdf converter.
- Unrecoverable error in QuickBooks
Note: Before performing how to resolve all these errors. Make sure your printer is on and able to print via another program.
System Requirements for QuickBooks PDF Repair Tool
If you don’t want to stick into the above QuickBooks printing problem. Then you must have installed QuickBooks pdf repair tool in your system. But if you want to download it then you must have a compatible computer system. Let’s see the system requirement for the QuickBooks PDF repair tool…
- You must have a high-speed internet connection to download the QuickBooks pdf repair tool.
- You must have a dual-core processor and above to work smoothly
- Minimum 1GB RAM required and 1 GB free hard disk space needed.
- Computer screen resolution must have 1024*768 and higher screen resolution recommended.
- And all types of operating system support
Other Recommended Articles:
Fix QuickBooks Error 6010- 2, 100 (The Database Server Error)
QuickBooks Clean Install Tool (Clean Install of QuickBooks Desktop to Fix Company File Issues)
How to fix QuickBooks Error 12157?
How to Download & Install QuickBooks PDF Repair Tool
As you have seen it can solve QuickBooks printing problems. Then it must be in your computer system. So let’s see how to download & install the QuickBooks PDF repair tool…
- First close all the running applications in your system
- Then click on here to download QuickBooks tool hub, because QuickBooks pdf repair tool is a part of QuickBooks tool hub.
- After downloading completion, you need to click on the QBtoolhub.exe setup.
- Then you need to follow the instruction to install it in your system
- And wait for installing process complete, after completing the process you can run this tool.
How To Run QuickBooks PDF Repair Tool
Most of QuickBooks user doesn’t know how to run QuickBooks pdf repair tool. So we write this blog to inform you how to do that.
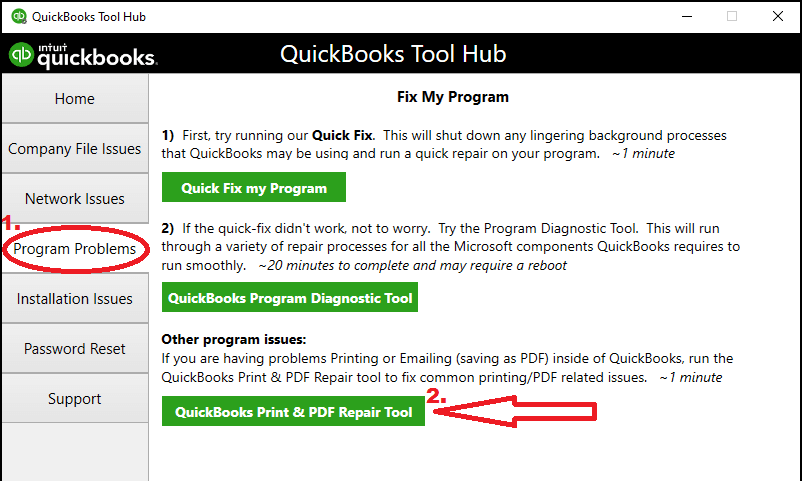
- Open your QuickBooks tool hub software
- And click on the Program Problem tab inside QuickBooks tool hub
- Then you need to select QuickBooks PDF & Print Repair Tool
- After clicking on it, it takes some minutes to run the application.
- Now you can print, email and save as pdf file from QuickBooks
We hope these steps can fix your QuickBooks printing problem. But yet if you see the QuickBooks printing problem then follow the next solution.
How to Fix Printing & PDF Issue in Other Ways
Here, we have given all the alternative solutions to fix the printing and PDF issue. You can follow this solution to troubleshoot the problem.
Solution 1: Reset Your Temp Folder Permissions
- First, you need to reboot your PC then try to reset your folder permission
- You need to open the run command by pressing window+r key
- Then type %temp% and click on Enter
- Now you need to write click on the blank area and select properties
- Then make sure all usernames and groups appear on the Security tab have full control.
- After you have done permission set to full control, you need to save as PDF file
- Then confirm that, you can print the XPS document, and if you don’t know how to confirm that follow the given below steps:
- Go to the ‘Notepad’ and launch it.
- Enter Test, and go for the ‘File’ menu.
- Select the ‘Print’ option from the ‘File’ menu.
- After that click on the ‘XPS Document Writer’, and then click on the ‘Print’ option.
- Give a name to your file and save it on your desktop.
- Now visit your desktop, and see the XPS document you printed from notepad.
Solution 2: Make sure you can print to your XPS
It’s necessary to check your printer is accepting the XPS document writer or not. Because QuickBooks uses some portion of the XPS document writer to save as a PDF
- To succeed in this process you will need to open Notepad
- Then click on File and select the Print option
- Now you can select XPS document writer
- After selecting XPS writer you can print doc.
- Now have to save this file with a unique name
- And if you want to see XPS document print, then you can see the XPS document on the desktop that you printed.
Solution 3: Check the Reconcile Window
Sometimes the errors appear due to the off of the screen in reconcile window, and this may be happening during the time of selection of reconciling from the Banking menu, but the PDF functions appear.
- Go to the Window menu and check that the reconcile window is listed or not.
- After that, click on the ‘Close All’ option, and start the Reconcile again.
Solution 4: Adjust the Permissions for XPS Document Writer
We will guide you to adjust the permissions of the XPS document writer. In this process, you will test, verify, reinstall, adjust, edit, install, create, and bypass the document. Let’s start the procedure:
Test the XPS Document
- Go to the ‘File’ menu, and select the ‘print’ option.
- Select the ‘Microsoft XPS document Writer’ option from the list, and click the ‘print’ option.
- After that, save the .xps file on your desktop.
- Then search for the .xps file.
- If you find out the .xps file, but with an error to open then, the XPS need to be reinstall.
- And if you can’t find out the file, and didn’t get an error while saving it then the problem may be from the end of the security setting.
- Again if you find any error during the time of printing then the XPS needs to be installed again.
Verify for the Enabled XPS Service
- Press the ‘Windows’ + ‘E’ key from the keyboard for the Windows explorer.
- Choose the ‘Computer’ tab from the upper left.
- From the ‘System Group’ select the ‘Uninstall’ or ‘Change a program’ option.
- Enable the XPS service, and XPS viewer, and press ‘Ok’.
- And if the the both are enabled already, and still the problem appearing during the pinting process then, reinstall it.
Reinstall the XPS Document Writer
- Open thee ‘Control Panel’, and go for the ‘devices and Printer’ option.
- Then click on the ‘Microsoft XPS Document Writer’, and remove the device.
- Confirm it by ‘Yes’.
- Go to the toolbar, and select the ‘Add a printer’ option, and then the ‘Add a local printer or network print with manual settings’ option.
- Now, select the ‘PORTPROMPT: (Local Port)’ from the ‘Use an existing port’, and click the ‘Next’ option.
- Visit to ‘Manaufacturer’ , select the ‘Microsoft’ option from the list, and then the ‘Microsoft XPS document Writer v4. Click ‘Next’.
- Remove the v4 from the ‘Printer Name field’ to make the ‘Microsoft XPS document Writer’.
- At last, click the ‘Finish’ option
This process is only for Windows 8 users. If you are a user of Windows 7 then, get the latest version of Windows because in the future Microsoft will not support Windows 7.
Adjust the Windows user Permissions
- Use the Windows as an admin, and open the ‘Printer Control Panel’ in Windows.
- Selec the ‘Printer properties’ option after rthe right -click on ‘ Microsoft XPS Document Writer’ .
- Go to the ‘Security’ then the ‘everyone’ in the user group.
- Go to the ‘Allow’ column, and click the ‘print’ option then the ‘Ok’ option.
- Visit for this location ‘C:\Windows\System32\spool’ in the Windows Explorer, and choose the ‘Properties’ option from the ‘printers’ option.
- Click the ‘Security’ option, ‘edit’ option, and then the ‘Add ‘ option.
- In the add bar, type local service, and hit the ‘Enter’ key.
- You must have the full control of local service.
- Click ‘Ok’, after confirming it.
- And at last, try to create a .pdf file in QuickBooks.
Edit the Settings of Security Software
Sometimes, because of the antivirus software, the .xps file can’t create. So check the setting of your antivirus program and verify that the antivirus program does not block the .xps file.
Final Words
QuickBooks pdf repair tool is the best tool for resolving QuickBooks printing problems. But before using this tool, you must check your printer with another computer, if the printer doesn’t work then change your printer.
Hope, this source will give you the desired solution to the problem. Still, if you have any issues following the solution given in above then you can ask for a QuickBooks ProAdvisor for the solution.
