In a QuickBooks error survey, we found that the QuickBooks users face different types of errors in it. But the QuickBooks installation error is the topmost error according to the survey. So here we decided to bring an effective, and informative topic for you and that is ‘QuickBooks Clean Install Tool’. QuickBooks clean install is the best solution for installation errors.
Let’s start the blog;
Maybe you have listened to QuickBook’s clean install tool before. But here you will get the proper detail regarding the tool hub with the new updates.
Overview of QuickBooks Clean Install Tool
QuickBooks’ clean install tool helps us to rebuild damaged QuickBooks applications. If you simply re-install QuickBooks desktop, it will not fix QuickBooks error. In order to resolve QuickBooks damages, QuickBooks Desktop login problems, you need to use QuickBooks clean install tool. Because clean install helps you to remove the error from opening a company file. And clean install also removes any type of QuickBooks error.
Note: if you want to perform a clean install process. Then make sure you have QuickBooks desktop download file in your Pendrive.
Other Recommended Articles:
How to delete a customer in QuickBooks?
How To Record Owner Investment in QuickBooks
How to Record QuickBooks Credit Card Cashback Rewards
Procedure to Use QuickBooks Clean Install Tool
When you want to perform a QuickBooks clean install, you need to download clean install QuickBooks. But first you have to uninstall QuickBooks and check c drive. If any folder exists with QuickBooks name then rename it. After that, you can follow the below instruction. Here we have given two methods to use the QuickBooks removal tool but, before going through the procedures you need to keep all the product information of QuickBooks.
How to Keep the QuickBooks Product Info
It is mandatory to collect all the QuickBooks Product details up to date. Here we have given some points, which you need to keep all of them before starting the procedure.
- First, download the QuickBooks installer according to your QuickBooks version.
- The very important thing is to keep the license number. ( If you purchased your QuickBooks online then you can get your license number in the confirmation mail, and if you have not purchased your QuickBooks product Online then, you can get the license number in the packaging.)
- Note down your product edition, year, and the backup company file.
Method 1: Uninstall QuickBooks Desktop
The first method to use the QuickBooks removal tool is to uninstall the QuickBooks. For now, perform this way, and if in case, you face any issue to uninstall the QuickBooks then don’t perform any troubleshooting method. The problem may be the end of your computer or system. In this situation, it will be good to consult with a technician, or with an expert of Microsoft.
Step 1: Remove QuickBooks from Your Desktop
The next step is to uninstall QuickBooks Desktop. Find out the procedure to uninstall the QuickBooks Desktop through the below procedure:
- Go for the ‘Start’ menu, and enter the ‘Control Panel’ in the search bar.
- Open the ‘Control Panel’, and go to the section of ‘Programs and Features/Uninstall a Program’ option.
- After that, choose the QuickBooks Desktop versions, in which you are facing the issue.
- Click on the ‘Uninstall/Change and accept’ option. And follow all the onscreen instructions.
- During this procedure, if you get any issue then, log out from your current account, and get into your system as the admin.
Step 2: Again Reinstall the QuickBooks Desktop
After the complete uninstall process you need to reinstall it again.
- Reboot the system after the complete uninstall process.
- And download, update QuickBooks Desktop to the latest release version.
- After that, save the file to your desktop, where you can easily access it.
- Open the downloaded.exe file, and follow the onscreen instructions.
- Agree with the license agreement, and click the ‘Next’ option.
- Now put the license, and product number in the appropriate field, and click the ‘Next’ option.
- Choose the installation type, and activate the QuickBooks Desktop again in your system.
Method 2: Run QuickBooks Removal Tool for Installation Issue
QuickBooks clean install tool can be used through the QuickBookstoolhubs to fix the installation issues.
Step 1: Download QuickBooks Tool Hub
After uninstalling the QuickBooks Desktop, download the QuickBooks tool hub. Follow the procedure to download it:
- At first, you need to download QuickBooks tool hub. And install the tool hub (QuickBooksToolHub.exe) on your desktop, where you can access it easily.
- Follow, and accept all the terms and conditions to install it.
- Double click on it, to open the file.
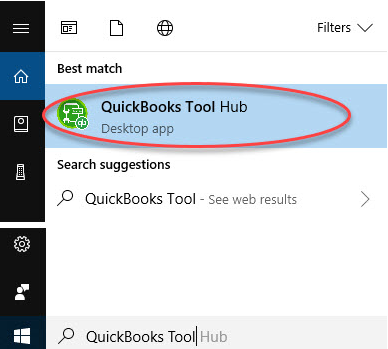
- If you are unable to find out the tool hub on your desktop then, go to your ‘windows’ button, and search for the ‘QuickBooks Tool Hub’. The option will be shown to you, just click on it, and get started with the tool.
Step 2: Run the QuickBooksToolHub.exe File
Now you can run the QuickBooks clean install tool in the tool hub easily. This tool renames the old install folder itself all the QuickBooks to add new installation files after the restoration of the file.
- Open the QuickBooks tool hub, and go to the section of ‘Installation issues’.
- There you can use the clean install tool, just click on it, and then ‘Ok’.
- Select your QuickBooks version, and the product version, and click on the ‘Continue’ option.
- After that, you will get the message on your screen ‘Please Install your copy of QuickBooks to the default location’, and click on the ‘Ok’ option.
- After the complete process, you will be allowed to reinstall the QuickBooks Desktop.
Method 3: Rename the Installation Folder Manually
To complete these steps you will need to show your hidden folders. You can then rename the download folder location. But to remember you can add an old or corrupt word to the end of the folder name. By doing this, QuickBooks will not recognize that you want to create a new folder.
- First, uninstall the QuickBooks, and display the hidden files.
- To display the hidden files follow the procedure:
- Open Windows Explorer, and open the search box by pressing the ‘Ctrl+ F’ key from the keyboard.
- Enter the file name or the extension of the file.
- Now the results will be displayed.
- Open the file explorer, and find the folder which holds the company file.
- You can go to the below location to find the folder.
- C:\ProgramData\Intuit\QuickBooks (year)
- C:\Users\(current user)\AppData\Local\Intuit\QuickBooks (year)
- C:\Program Files\Intuit\QuickBooks (year)
- 64-bit version C:\Program Files (x86)\Intuit\QuickBooks (year)
- Rename the folder by adding .old extension at the end of the file.
- Then reinstall the QuickBooks Desktop.
Try this process, if you getting problem getting an access error message;
- First right-click on the taskbar and select Task Manager
- Select Image Name & Column header from Process Tab.
- Select all the setup files like QBDBMgern.exe, QBCFmonitorservice.exe. And click on the End option
- Now you will see an error message on the screen, click on Yes, if you end this process then you can face errors.
Final Thoughts
Using of QuickBooks clean install tool is not so difficult. It helps you at the time when you are not able to resolve your QuickBooks error after many tries. It is the best solution to fix any kind of QuickBooks installation error in a few minutes. You just need to follow all the steps carefully, and to use it in a proper way. We hope, you like this article, and now you are able to use the tool without any doubts. Further, if you have any doubts regarding this tool then you can get our ProAdvisor support to clear your all doubts.
