How to sync square with QuickBooks? How do Square and QuickBooks work together? How do I record Square transactions in QuickBooks? If such questions are bothering you then read this article. Here you will get all answers to your questions regarding Square QuickBooks Integration. In this article, we will provide you the syncing process of QuickBooks Desktop and QuickBooks Online with Square and its benefits.
By connecting to the Square app you can automatically import your sales into QuickBooks. It is the one-way integration that monitors your sales account for all transactions such as refunds, sales, tips, taxes, and discounts. It reviews all the item-level data before adding the transactions into QuickBooks Online. This makes your books accurately updated.
Key benefits of Syncing QuickBooks with Square
Import your sales automatically to QuickBooks using Connect to Square app. Here are some key features of the integration of Square to QuickBooks.
- Avoid manual data entry: You don’t need to create data manually. It can import sales, taxes, discounts, invoices, and tips into QuickBooks overnight.
- Easily reconcile your books: It matches your deposits, refunds, payments, and fees against bank statements.
- Imports refund: By syncing QuickBooks to the Square app, you can easily import the refund.
- Import multiple locations: It brings the data from the multiple locations of business into QuickBooks.
- Import daily summary: you can import your transaction on the daily basis with help of the Square app.
Other Recommended Articles:
How to Process, Record, and Receive QuickBooks ACH Payments
WooCommerce QuickBooks Integration: Syncing with Plugin
QuickBooks 1099 Forms (Purchase & Set-Up Form)
Helpful Points to Check Before Starting
You should know some points before proceeding further. It will avoid any issues and make the process uninterrupted. Let’s have a look.
- Before starting the process, reboot (turn off and then on) your system.
- Sometimes anti-virus and malware block the installations of apps. Disable the program only for the installation process.
- You should log in to the QuickBooks on the system you want to sync.
- Sign in as admin in QuickBooks and enable single-user mode.
- The QuickBooks Company file you wish to be sync needs to be open during installation.
- Don’t right-click on the run as administrator. You may face issues during installation.
Procedure for Square QuickBooks Integration
You can sync the Square app with QuickBooks Desktop as well as with QuickBooks Online. Here we will discuss the integrating procedure for both versions. Let’s start with QuickBooks Desktop.
Integrating Square with QuickBooks Desktop via Commerce Sync
There are some steps for integrating square with QuickBooks Desktop. Follow the steps to get started.
- First of all, you have to sign in to your Square account.
- In your Square account, click on the Apps option.
- Scroll down and search for Commerce Sync, then click Get Started or Launch the app.
- After the Permissions pop-up, click Allow on the bottom.
- If you have several locations in your Square account, connect Commerce Sync to each location manually. Then select the location that you are currently connected to.
- Download the Commerce Sync installer online.
- When the Commerce Sync installer has finished downloading, open the program and click Run.
- You will see the Starting up screen when launching Commerce Sync for Desktop.
- Here, you are required to log in again to your Square account.
- Before clicking the Continue button, double-check that you have QuickBooks Online and the correct company files open on your desktop screen.
- In QuickBooks, you will see a pop-up. Check the box next to Yes, always allow then click Continue.
Note: When you are installing another location, this step is skipped. - Click the Done button on the second pop-up.
- Now you have to choose your settings for Commerce Sync: the time zone in which your Square account is present, whether you would like to transfer sales into a single income account or according to category etc.
- Fill up billing information carefully. Your free 15-day trial will be started. Your customer’s sync subscription will begin after 15 days.
- You will see the Installation complete message on the screen and then click the View Dashboard button.
- At this time, we suggest that you open the Commerce Sync for Desktop app immediately and wait for the sync to complete. The green permit will stop spinning and the next sync Timestamp will be shown.
- As soon as the sync is completed, open the Commerce Sync web dashboard to review your settings.
Integrating Square with QuickBooks Online
Here’s how you can integrate Square with QuickBooks Online. Let’s discuss the process:
Set up the QuickBooks
For setting up your QuickBooks, go through the following steps:
1. Connect the Bank Account that you use in Square
- Now, open QuickBooks and go to the ‘Banking’ menu.
- After that, select the ‘Add Account’ option.
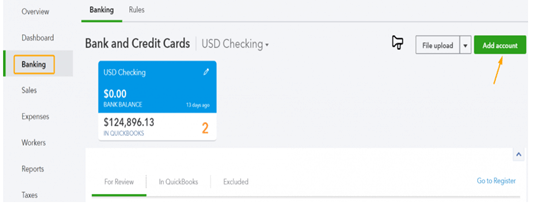
- Add a bank account and enter connect to Square in the next step.
- Click the button Get Started.
- Enter your ID and password to sign in.
- Add your business location and click Next.
- Select one option from Record sales Individually and Record sales summary.
- Hit the Next button and then select a date from the drop-down. After that hit Finish.
- After the process completes, it connects to the Square. Click Check it out.
2. Turn On the Sales Tax Center:
If you have not turned on the sales tax center, follow the procedure to turn on it.
- Go for the ‘Taxes’ menu, and select the ‘Sales Tax’ tab.
- After that, select the ‘Set Up Sales Tax’ option.
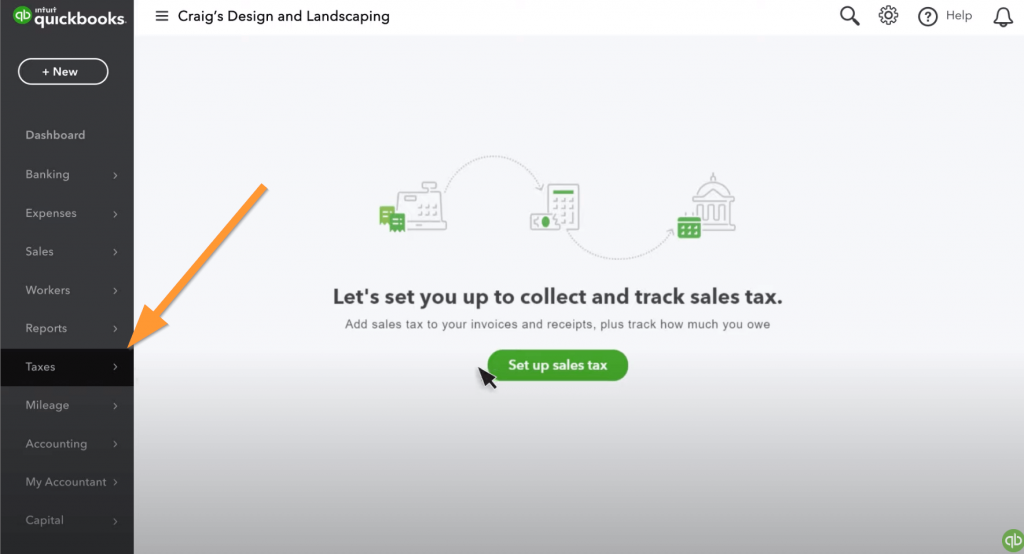
- Now you can follow the onscreen instructions to set up the feature. But be sure, you need to add the same sales tax agencies which you use for square transactions.
3. Import the product and services of Square:
- Visit Square and export the products and services in a .csv format.
- Again visit QuickBooks and select the ‘Products and Services’ menu, and at last import the list.
Get The App
Follow the below steps to get the app.
- Log into QuickBooks Online.
- Then from the QuickBooks Online app store go to the ‘Sync with Square’ page.
- Now on the ‘Sync with Square’ page, you can see an option for ‘Get App Now’, click on it.
- From the drop-down menu, choose the company that you want to connect with.
- Then go to the Square account and log into it with the same sign-in information of Square.
- Select the Bank and Expense accounts from the primary settings window. After that choose the default payment method. Go for the ‘Set Up QuickBooks’ click on the ‘Save Changes’ when you are done.
- Now you can edit any settings, on the screen.
Connect QuickBooks Online to Square
connect QuickBooks with Square to proceed further. Let’s see how to do so.
- Open QuickBooks and click Apps from the side menu.
- Choose to Find apps from the top.
- Enter square and select Connect to square from the search apps field.
- Click the Get App now button.
- Follow the on-screen instructions to complete the process.
Get Transactions
After connecting QuickBooks to Square, you don’t need to create transactions manually because the transactions will transfer to QuickBooks Online. Remember, you can only download the transactions one time a day. So make sure to download it at the end of the day.
Update details
You can easily change or update the details with the following method. Let’s start the process.
- Sign in to QuickBooks Online and click on the ‘My Apps’ option.
- After that, click on the ‘Settings’ option under the ‘Sync with Square’.
- Change the default bank, expense accounts, or payment method by clicking on the ‘Edit’ option.
- Update the income account, sales tax code, by clicking on the ‘Edit’ option next to ‘Defaults’.
- At last, select the ‘Save Changes’ option to save all the changes.
We hope that you find the article helpful. If you are stuck in between the process or have any queries regarding QuickBooks, get instant support with our QuickBooks ProAdvisor. It feels us happy to help you. Get in touch by dialing our toll-free number +1-844-405-0904.
