Account numbers in QuickBooks are numbers that you can assign to each account to make them easier to find and better organized. Account numbers are not turned on automatically so if you, or your accountant, would like them on we will show you how to turn on and use account numbers for a chart of accounts in QuickBooks Online.
The Chart of Accounts offers an excellent way to record all of your transactions for income, expenses, or liabilities. When the company earns money or having a profit for the products then all the income will be recorded in an income account of the company. And when your company buys business supplies, then that of the transaction will be recorded in an expense account of your company.
Other Recommended Articles:
Learn easy steps to fix QuickBooks Error 12002
Fix QuickBooks Error 1935 (The .NET Framework Error)
QuickBooks errors Code 15102
Steps to Turn On and Use Account Numbers for Chart of Accounts in QuickBooks Online
Here we will provide you with the steps to turn on and use account numbers for your chart of accounts in QuickBooks Online
Step 1: Turn On Account Numbers
- Click the setting option which shows you the upper right-hand corner on your system.
- Then, click on the option of Account and Settings in Your Company section.
- After that, you need to click on the option of Advanced that is found on the left-hand side of your system screen.
- In the 3rd option, go to the option of Chart of Accounts, where you will see Enable account numbers are off. Then, click on the given option of pencil that is on the right-hand side of this section.
- Check the Enable account numbers box, you’ll see “off” change to “on.”
- A Show account numbers checkbox will appear, check this box as well.
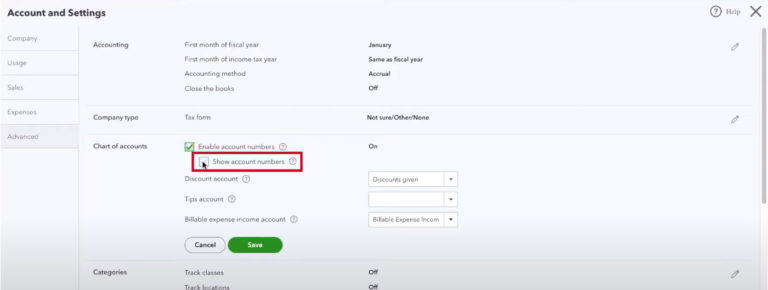
- Click the Save button.
- Click the Done button in the lower right-hand corner of the screen.
Numbers will now be visible in your Chart of Accounts. If you haven’t assigned any numbers yet I’ll show you how to do that as well.
Step 2: Assign Account Numbers
The next process which you need to pick up is assigning the account numbers. You have to remember that QuickBooks Online doesn’t assign any account numbers because of the difference in the numbering systems followed by the organizations. Assigning the account numbers involves the following steps:
- The first step remains the same in both cases which is selecting the Gear icon at the top of the page.
- Next, select the edit icon similarly which is present above the action column.
- Next, under the Number column, enter your account numbers. The account numbers can be up to seven digits long.
- Finally, select the Save option present on the upper right after you have finished entering all of your account numbers.
You will now see the number in the Number field in your Chart of Accounts. This number will also appear in the Name field in front of the account’s name. The account’s name has not changed this is just how Quickbooks displays it.
If you view your Balance Sheet you will now see your accounts in order by number instead of alphabetically. This can be a great way to better organize your accounts and maybe something your accountant requires.
Want ideas for how to number your accounts?
You can specify any number in your accounts. But if you are looking for recommendations, these account numbers can help. These ranges are based on account types and follow commonly accepted accounting principles (GAAP).
- Numbers in the 1000s are for Asset Accounts
- Numbers in the 2000s are for Liability Accounts
- Number in the 3000s are for Equity Accounts
- Numbers in the 4000s are for Income Accounts
- Numbers in the 5000s are for Cost of Sales Accounts
- Number in the 6000s and 7000s are for Other Operating Expense Accounts
- Numbers in the 8000s are for Other Income Accounts
- Numbers in the 9000s are for Other Expense Accounts
Conclusion
Thus, with this, we come to the end of discussing the QuickBooks account numbers. We hope it will be truly useful for your business in QuickBooks Online. If you are seeking professional help, then please get in touch with our customer support number, and speak to Accountwizy ProAdvisor.
