Today, we are here with a new article to show you ‘How to set up QuickBooks Online expenses?’. If you are also want to know the setup procedure of QuickBooks Online expenses then stay with us to get the detail like editing, creating, and deleting QuickBooks online expenses.
As we know, cash and check purchases will come under the QuickBooks Online expenses, so it is necessary to set up QuickBooks Online expenses perfectly. Let us start the procedure without spending much more time.
QuickBooks makes the process error-free to the users for recording the expenses, letting you enter them when they occur. Anytime you can delete or edit expenses to ensure that everything is working accurately. For creating, If you have a large number of expenses then it may be very easy to enter them in the register instead.
Other Recommended Articles:
Fix QuickBooks Error 324 in QuickBooks Online & Self-Employed
License Properties QuickBooks Error 3371 (How to Resolve It)
QuickBooks For Healthcare Professionals & Medical Practice
Steps to Set Up QuickBooks Online Expenses
Here we have given the solution for creating, editing, and deleting the expenses in QuickBooks Online in simple methods, you just need to follow the steps carefully.
How to Create an Expense in QuickBooks Online
- In the starting, you have to Choose “+ New” Option
- After that choose “Expense”
- Visit the Payee Field: In this field, select a vendor. You can either select the name of a person or the name of the business. If this if your transaction cover more than one petty cash expense then left the field as an empty field.
- Now ready to choose a payment method through which you credit this expense.
- Use the payment filed to enter the date of purchase then use the selected payment method for the expense.
- Optional: For entering the Identifying number from the Purchase Receipt you can either choose Ref. No field.
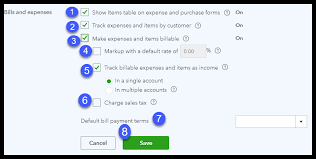
You should be noted that it has an additional facility for QuickBooks Online Plus users When both location and Class tracking are turned on, you will see the additional fields for Location and class. Go to the account and Settings in the Advanced tab if you want to turn on location or class tracking.
- Optional: Manually enter a description of the expense
- Enter the balance amount of the purchase and any taxes you paid, if applicable
- You have two choices either go for “Save and Close” or “Save and New”. It is up to you which option you want to pick depend on your work.
Before Picking the “Save and Close” Option, some key points might you know and can be very helpful in tracking the expenses.
- If the expenses billed to a selected client, Choose the Billable check box, and then manually enter the real name of the client. You need to turn on Billable Expense tracking for checking and visiting the Billable column.
- If you want to turn on Billable Expense tracking, Go to the Account and Settings on the Expense tab.
You must be remembered that if you receive a credit for an expense previously billed to a customer later, ensure to specify that customer on the credit, and choose the Billable checkbox, or either choose the customer you need to bill for the expense on the next invoice, also the credit will not appear to you.
- For checking the report of income versus expenses for a particular customer, you have to run an income through the Customer Summary Report.
- You have to enter a note or memo which you want to see in the register, And on reports simply mention their purchase.
- In the “Item Details,” Section use the fields, it is for entering the information about the product or service you have purchased.
After reading the above procedure you can experience that, the setting up of QuickBooks Online expenses is not so difficult.
How to Edit an Expense in QuickBooks Online
Accepting Changes and modifications in an expense billed to a customer, may also change the customer invoice. Before starting the process to edit an expense, keep remembering this point in your mind.
- Choose “Expenses” and pick Expenses from the left menu.
- Navigate the expense you want to edit in the “Expense Transactions Window”
- You can choose view or edit option under the Action column
- Update the transaction whenever you require
- Choose “Save and Close”
How to Delete an Expense in QuickBooks Online
- Choose “Expenses” and pick Expenses from the left menu.
- Navigate the expense you want to Delete in the “Expense Transactions Window”
- From the Action Drop-Down menu, simply choose “Delete”
- Hit the “Yes” option for full confirmation that you are agreeing to delete the expense or transaction, Once it deletes, only the Audit log maintains a record of it.
- For opening the Audit log, choose “Reports” from the left menu and then manually enter the Audit log in the Search Bar.
Final Note
We make available this article for those users who are unaware of the “How to set up QuickBooks Online expenses?’. We hope, we added all the important information in it. Still if in case, you need Proadvisor Support to perform the procedures then you drop a call through the toll-free number +1-844-405-0904 at any time and anywhere.
