Today, Accountwizy is here with a new topic: ‘ How to Change User Account Control (UAC), & Regional Settings in Windows for QuickBooks?’. If you want to expand your idea regarding QuickBooks or having the same query on your mind then, read the blog carefully. And if you think it is the appropriate solution to this query then follow the instructions and steps.
Let’s know, How to: change UAC setting & regional settings in Windows for QuickBooks
Other Recommended Articles:
How to fix Quickbooks Error 12007
A way to Fix Issues using Verify & Rebuild Utility in QuickBooks
How to get Resolve QuickBooks Error 6000-83
User Account Control (UAC) in Windows
When you are using UAC now, then tell us that UAC improves safety for all your users. And its main purpose is to protect your system and reduce the exposure of the operating system and the surface of the attack that comes with it.
Also, an administrator can run most applications, components, and processes with limited privileges that will benefit you. But it also there is also the ability to extend or extend privileges for specific administrative computer tasks and application tasks.
Steps to Change User Account Control (UAC) Settings in Windows 10, 8.1, 8 and 7
Sometimes when we correct the kickbacks of the desktop, it may be necessary to shut down the process, and you need to turn it back on your computer to prevent security risks. It is highly recommended. Changing of user account control setting can fix the QuickBooks error code ps033. Steps are given below:-
- First, you need to click the Windows+R button On your keyboard, and then open the Run window.
- Then, type the Control Panel option on the searching bar. And then you need to select the OK option.
- Here, when you omes on the control panel, you need to choose User Accounts. And then click on the option of User Accounts or the Classic View.
- After that, you can click on the option of settings to Change user account control. Note: You need to choose the option of Yes to continue if the UAC is prompted you.
- Then you need to move the slider and go for it.
- Keep in mind that whenever you go to start UAC OFF, do not notify it, and always choose the OK option.
- And whenever you go to start UAC ON, always notify it, and choose the OK option. Note: You need to choose the option of Yes to continue if the UAC is prompted you.
- Finally, go to the windows, and press the restart option of the computer.
Regional Settings in Windows
Let us tell you that in the local version of the QuickBooks the desktop books need Windows regional settings to be set. Each version can work properly for which you are using in the desktop to see the QuickBooks system requirements, and if do not do this then you can get these errors in your system:-
- You won’t be able to open when you want to open QuickBooks (you will just see the screen loading and then it will go away)
- You will see on your screen that QuickBooks has stopped working or stopped responding
- Whenever you want an error in launching QuickBooks statement writer, please see fix issues with statement writer.
- You will see an error in Fix Asset Manager, do not cross all assets, and give out the memory.
QuickBooks also considers its recording that all the computers used to access a company’s file be set to the same regional settings. Different regional settings have different date formats due to errors in QuickBooks. Let’s see with the example if a user on a computer set to US regional settings enters a closing date of September 12, 2017, this would be interpreted as December 9th, 2017 for a user on a computer set to Canada or UK regional settings.
If you do not want to change any of your languages in English at that time, you should be aware that QuickBooks keep the knowledge of your language and Intuit supports your country’s language.
Steps to Change the Language of Your Windows
Here we can provide you the steps of how to change the language according to your need, you can just follow these given steps carefully:-
Step 1:- Verify Your Current Regional Settings
This is the first step of changing the language of your computer window, you can just read carefully and follow step by step these given steps:-
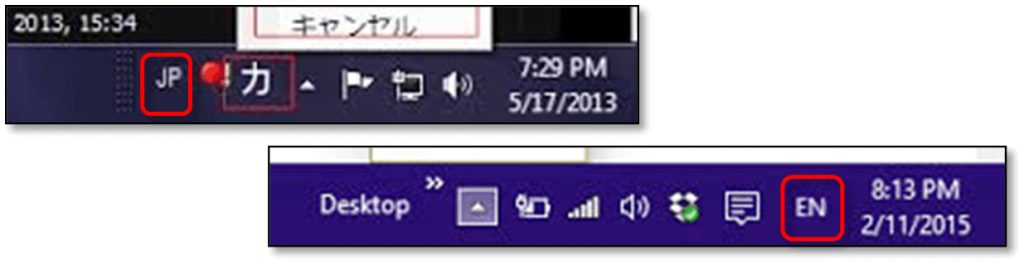
- In this step, if there is a Windows language bar, that you can check whether you can check your system tray and see if there is a language bar in your system.
- You have to change your language to English if you see the code like EN and JP for other languages.
- If you can not see any letters in a quick tip, then you can go to the Regional Setting, which is most likely set to English like US/ Canada.
Step 2:- Change Your Regional Settings to US/Canada
This is the second step of changing the language of your computer window, you can just read carefully and follow step by step these given steps:-
- In this step, you need to click on the Windows+R button on your keyboard to open the run command.
- Then, type the Control Panel option on the searching bar. And then you can select the option of OK.
- Then, you can select the given option of Clock, Language, and Region, and then click on the option of Change Location.
- In-Home Location of the Current Location in Windows7 and Vista, and then click on the option of the United States/Canada.
- After that, choose the Change System Locale option on the Administrative tab, and then choose the language English (the United States or Canada).
- Then, click on the Apply option, and then select the option of OK.
- Finally, when the all process completed then reboot your computer.
Conclusion
Here, in this article, we have mentioned the solution on the basis of your query. And hope that this solution will help you to solve your query. And if in this case, you are facing any kind of trouble then, you can reach our Accountwizy platform for the ProAdvisor support through the toll-free number +1-844-405-0904.
