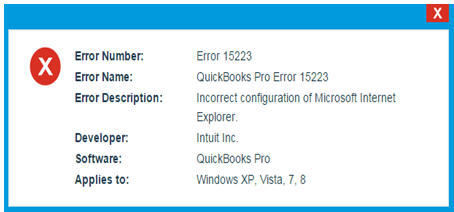
Whenever the QuickBooks Error 15223 occurs, the user does not know what to do. So no need to worry about it. We are here to help you with the article written below. When the QuickBooks error 15223 occurs it displays the message on the screen that the QuickBooks Desktop is not updated completely, or cannot connect to the QuickBooks Desktop Payroll.
What can be the causes of QuickBooks Error code 15223
Here are some of the reasons mentioned below for QuickBooks Error code 15223
- The files related to QuickBooks have been deleted mistakenly by the programs.
- The windows registry can be damaged from the recent QuickBooks software.
- The user can also face this problem when the windows files are damaged.
- The configuration of internet explorer is incorrect.
- When the update is needed for the internet explorer digital signature.
- The user might face the problem when the QuickBooks Desktop installation is not successful.
Other Recommended Articles:
Intuit QuickBooks Online Payroll Login ( Enhanced/ Full Service)
Grow your Accounting Practices with QuickBooks Online Accountant (QBOA)
QuickBooks Self Employed Login & Fixing Sign-in Error
Some of the solution to resolve QuickBooks Error Code 15223
There are many solutions that can be used to resolve the QuickBooks error code 15223. Let’s check out those solutions.
Solution 1: Register the .DLL file manually
The first solution which we are discussing to resolve the error is to Register the DLL file. You can follow the below steps.
- First of all, you have to press the Windows Button and then you have to open the Run.
- After that, you have to copy the text and then paste it to the command prompt “regsvr32/s/%SystemRoot%\system32\softpub.dll”.
- Now press the Enter.
- In case the file is already registered then you will not get any message.
- If you will get a message that confirms the register file is the same as it appeared on the screen.
- In case you receive the same error message then you have to contact the system admin or you can contact our QuickBooks ProAdvisor Expert.
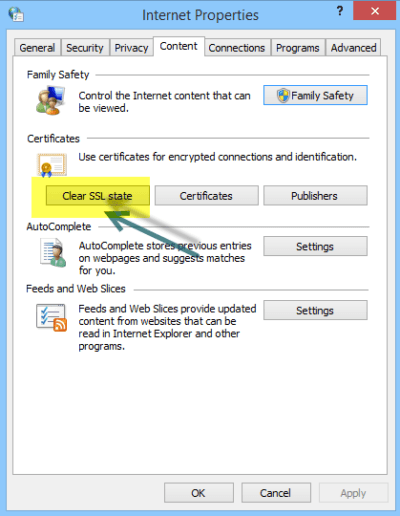
Solution 2: Remove the SSL state of the internet
- First, open the internet explorer on your windows operating system.
- After that, you have to open the properties of the internet explorer.
- Now you have to go to the content tab.
- After that, you have to click on the clear SSL button.
- The user no need to restart your system and open your QuickBooks again.
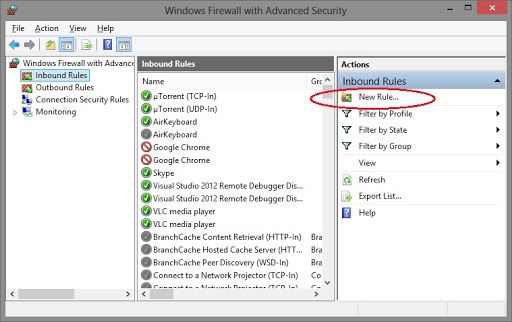
Solution 3: Configuration the Firewall Setting Manually
- First of all, you have to click on the start menu and then open the Windows firewall.
- After that, you have to select Advanced security.
- Now you have to click on the Inbound Rules and then choose the New rule.
- After that, the user has to select the program and then press the Next.
- Now the user has to click on the program path and then click the browse.
- Once it is completed, then you can select any path and then click Next.
- Now click on Allow the connection option and then press Next.
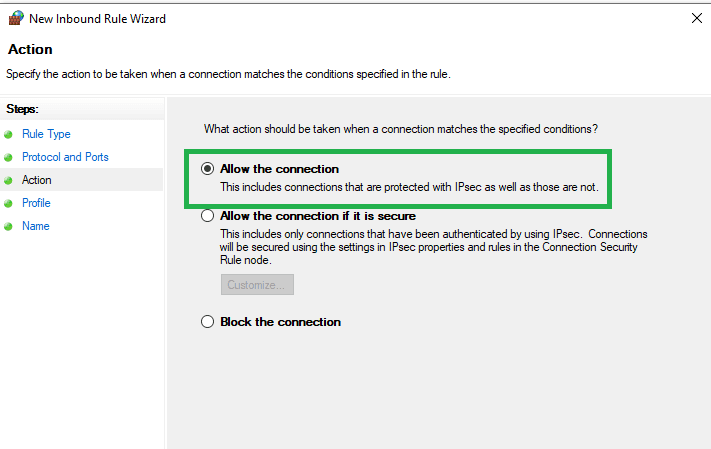
- Now click on the Finish tab and also rename the Rule.
- After that, for the outbound rule, the user has to repeat the steps.
- Now users have to open the QuickBooks in a Multi-User mode.
For the QuickBooks, adding firewall port exception
If the user is making multiple versions of the QuickBook in the same system, then you have to follow the below steps.
- First of all, the user has to open the Windows start menu.
- After that search for the Windows firewall, and then open the Windows firewall.
- Now you have to select the advanced settings.
- After that, you have to select the inbound rule and then select the New rule.
- Now you have to choose the post and then select the Next.
- After that, The user has to ensure that TCP is selected or not.
- Now the user has to enter the port number and then press Next.
- After that, you have to Allow the connection and then press next.
- Now you have to make sure that all the profiles are marked or not and then press Next.
- Now you have to create a Rule and then Name it.
- Once it is completed then Finish it.
Now check that the error is resolved or not. If it is resolved then well and good. But in case the error is not resolved then you can move to the next solution.
Solution 4: Verify the use of TLS 1.1 and then use TLS 1.2 are Not checked
- First of all, you have to open an internet explorer.
- After that, you have to select the tools from the internet option.
- After that, go to the advanced tab.
- Now you have to navigate to TLS 1.0, TLS 1.1, and TLS 1.2 from the settings.
- After that, you have to verify that the use of TLS 1.1 and use TLS 1.2 are unchecked or not.
- After confirming that the TLS1.1 and TLS 1.2 are unchecked. Then you have to select the Apply and then press the ok button. Or you can also retry to update.
Solution 5: Restart your system using only selected Apps enabled
- First of all, you have to open the Run windows, by clicking CTRL+R from the keyboard.
- After that, you have to type “MSConfig” in the Run Windows and then press enter.
- Now you have to go to the general tab and then click on the Load System & Selective Startup.
- Now you have to check to Hide All Microsoft Services, you can see the check box on the service tab.
- Now select the disable all option and then uncheck all the Hide All Microsoft Services.
- Now you have to leave the Windows installer service marked until the QuickBooks update is installed.
- After that click on the Apply and then press ok.
- Now Restart your system and check that the QuickBooks error 15223 is resolved or not.
Conclusion
I hope the above article is beneficial for you. We are discussing the QuickBooks error code 15223 and its solution using which you can resolve your problem. But in case you find any problem related to the QuickBooks. You can contact our QuickBooks ProAdvisor Expert. They will help you and provide you with the best solution regarding your concern.
