The QuickBooks Desktop users often face problems in QuickBooks firewall ports, when they are in multi-user mode. And this generally happens when the windows firewall blocks the internet access for a specific QuickBooks program or a file. To solve this problem, here we have a topic for you, where you can know ‘How to set up firewall & security settings for QuickBooks Desktop?’.
To make the user easy to understand, here we have provided the solution in the manual method. That means, in this blog, we are going to set up or configure firewall in QuickBooks manually, and security settings for QuickBooks Desktop. Let’s start the blog:
Other Recommended Articles:
QuickBooks Auto Data Recovery To Recover Lost Data
Which QuickBooks Version is Right for Small Business
QuickBooks Desktop Enterprise 2022: What’s New in It
Procedure to Set Up Firewall & Security Settings for QuickBooks Desktop:
Set up the firewall and security settings for QuickBooks Desktop, but before starting the blog, here is an important note for you, and that is; Download the QuickBooks File Doctor or download QuickBooks Tool Hub to run the file doctor, so that it will open the QuickBooks firewall ports automatically.
Configure Firewall Setting for QuickBooks Desktop:
You can also configure the firewall setting by using the file doctor tool. If you don’t want to use the file doctor tool, then you can do it manually by following the below procedure:
Add Firewall Port Exception for QuickBooks
This step is only for them, those who are using the QuickBooks Desktop multiple version in a same computer, and these steps will be repeated for each version.
- First of all, login to your computer, and go to the ‘Start’ menu.
- In the search program and files bar, enter ‘Windows Firewall’, after entering the ‘Windows Firewall’ you can see the option of Windows Firewall, just click on it.
- Now select the ‘Advanced Settings’ option from the Windows Firewall window.
- And right-click on the ‘Inbound Rules’, and then on the ‘New Rule’ option.
- Click the ‘Port’ option, and then on the ‘Next’ option.
- After that ensure that the ‘TCP’ is selected.
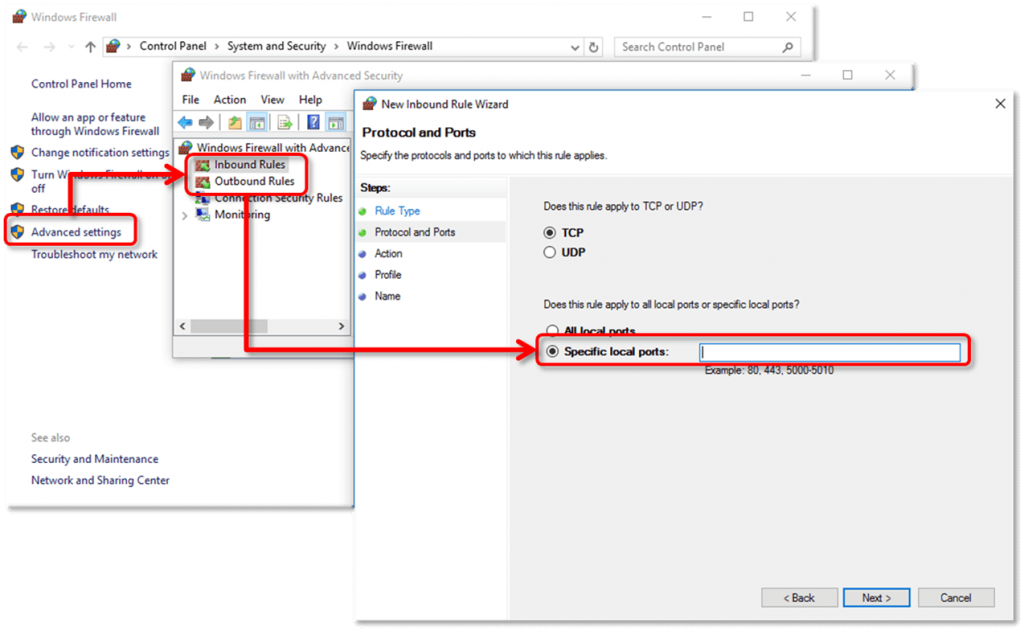
- Enter the specific ports needed for your QuickBooks version in the specific local port field.
- QuickBooks Desktop 2020: 8019, XXXXX
- QuickBooks Desktop 2019: 8019,XXXXX. (Dynamic ports are used in the future version of QuickBooks Desktop (2019, 2020), which are assigned during the installation.)
- QuickBooks Desktop 2018: 8019, 56728, 55378-55382
- QuickBooks Desktop 2017: 8019, 56727, 55373-55377
- Enter the port number, and click the ‘Next’ option.
- Now choose ‘Allow the connection’, and click on the ‘Next’ option.
- Ensure that, all the profiles are marked.
- After ensuring all things click on the ‘Next’ option, create a rule, and name it.
- After doing all the things, click on the ‘Finish’ option.
Repeat the same procedure for the outbound rules, but in this time right-click on the ‘Outbound Rules’ instead of ‘Inbound Rules’.
If you are using the latest QuickBooks desktop version (2019, 2020), and don’t how to get the dynamic port number, then follow the steps:
How to Get the Dynamic Port Number in QuickBooks Desktop
Here is the procedure to get dynamic port number in QuickBooks Desktop, just follow the procedure:
- From the Windows, go to the ‘Start’ button, and enter ‘QuickBooks Database Server Manager‘ in the search bar.
- After that, click on it to open the database server manager.
- Go for the ‘Port Monitor’ tab, and find your QuickBooks version.
- Keep the port number, now you can use the port number for the firewall port exception.
To Change the Assigned Port Number:
- Choose the ‘Renew’ option, and go for the ‘Scan Folder’ tab.
- Now click on the ‘Scan Now’ option from the ‘Scan Folder’ tab.
- The changes will be made for the new version of QuickBooks Desktop, not for the older version of QuickBooks Desktop.
Now check that the error is solved or not, by switching to multi-user mode in QuickBooks Desktop.
Add Windows Firewall Exceptions for QuickBooks Programs:
- Open the Windows Firewall, and go for the ‘Advanced Settings’.
- Then right-click on the ‘Inbound Rules’ and select the ‘New Rule’ option.
- Now choose the ‘Program’ option and then click on the ‘Next’ option.
- Click the ‘This Program Path’, and then on the ‘Browse’.
- Choose one of the executable files (.exe), and click on the ‘Next’ option. (executable files are mentioned in the below list)
- Now click on the ‘Allow the Connection’ and then the ‘Next’ option.
- Ensure that, all the profiles are marked, and click the ‘next’ option.
- Create a rule, name it, and repeat the same procedure for the ‘Outbound Rules’, but does not choose the ‘Inbound Rules’, choose the ‘Outbound Rules’.
List of Executable Files with Location:
Here is the list of executable file (.exe) with location, you have to choose one of the executable file from the below:
| Executable Files | Location of Executable Files |
|---|---|
| DBManagerExe.exe | C:\Program Files\Intuit\QUICKBOOKS YEAR |
| AutoBackupExe.exe | C:\Program Files\Intuit\QUICKBOOKS YEAR |
| QuickBooksMessaging.exe | C:\Program Files\Intuit\QUICKBOOKS YEAR |
| FileMovementExe.exe | C:\Program Files\Intuit\QUICKBOOKS YEAR |
| QBW32.exe | C:\Program Files\Intuit\QUICKBOOKS YEAR |
| Dbmlsync.exe | C:\Program Files\Intuit\QUICKBOOKS YEAR |
| FileManagement.exe | C:\Program Files\Intuit\QUICKBOOKS YEAR |
| QBUpdate.exe | C:\Program Files\Common Files\Intuit\QuickBooks\QBUpdate |
| QBDBMgrN.exe | C:\Program Files\Intuit\QUICKBOOKS YEAR |
| OnlineBackup.exe | C:\Program Files\QuickBooks Online Backup |
| IntuitSyncManager.exe | C:\Program Files\Common Files\Intuit\Sync |
| QBLaunch.exe | C:\Program Files\Common Files\Intuit\QuickBooks |
| QBServerUtilityMgr.exe | C:\Program Files\Common Files\Intuit\QuickBooks |
| QBCFMonitorService.exe | C:\Program Files\Common Files\Intuit\QuickBooks |
Again check that the error is appearing or not, by switching to the QuickBooks Desktop multi-user mode.If still the problem is appearing, then go for the next procedure.
Set Up the Anti-Virus or the Firewall Programs:
After doing all these things, if still you have the problem then check the setting of your Anti-virus. And set up the permission for antivirus software perfectly.
- Sometimes the users encounter anti-virus program errors when they open a particular file over the multi-user network, in that case, try to match the executable files according to the exact location. You may take help from the above table.
- And one more thing you should be paid attention that, Intuit doesn’t allow to support different types of third-party network security programs.
Create QuickBooks Port Exception on Firewall & Anti-virus
Ensure that you have selected the TCP, and enter the needed ports for QuickBooks version. Add ports for each year, if you have QuickBooks Desktop multiple versions.
| Executable Files | Location of Executable Files |
|---|---|
| DBManagerExe.exe | C:\Program Files\Intuit\QUICKBOOKS YEAR |
| AutoBackupExe.exe | C:\Program Files\Intuit\QUICKBOOKS YEAR |
| QuickBooksMessaging.exe | C:\Program Files\Intuit\QUICKBOOKS YEAR |
| FileMovementExe.exe | C:\Program Files\Intuit\QUICKBOOKS YEAR |
| QBW32.exe | C:\Program Files\Intuit\QUICKBOOKS YEAR |
| Dbmlsync.exe | C:\Program Files\Intuit\QUICKBOOKS YEAR |
| FileManagement.exe | C:\Program Files\Intuit\QUICKBOOKS YEAR |
| QBUpdate.exe | C:\Program Files\Common Files\Intuit\QuickBooks\QBUpdate |
| QBDBMgrN.exe | C:\Program Files\Intuit\QUICKBOOKS YEAR |
| OnlineBackup.exe | C:\Program Files\QuickBooks Online Backup |
| IntuitSyncManager.exe | C:\Program Files\Common Files\Intuit\Sync |
| QBLaunch.exe | C:\Program Files\Common Files\Intuit\QuickBooks |
| QBServerUtilityMgr.exe | C:\Program Files\Common Files\Intuit\QuickBooks |
| QBCFMonitorService.exe | C:\Program Files\Common Files\Intuit\QuickBooks |
Restart your System:
After setting up the firewall and security setting, restart your system or PC. And again reopen the QuickBooks Desktop in the multi-user mode or open that program where you found the firewall issue.
The End Line:
So here was the procedure to set up firewall & security settings for QuickBooks Desktop. We hope you like the information and procedures provided by us. Further, if you have any kind of doubts regarding this blog or still you are facing the issue while working with QuickBooks Desktop in the multi-user mode, then you can get our ProAdvisor Support.
