Is your business closed due to COVID-19 or experienced a significant decline in the gross receipt? Wondering how you can implement Employee Retention Credit in QuickBooks? Here we will show you how you can claim and record employee retention credit in QuickBooks. To begin this process you need to first qualify for the ERC as an employer.
What is Employee Retention Credit
The ERC or Employee Retention Credit is a refundable tax credit under the CARES Act for those eligible employers who have experienced a significant decline in gross receipts or certain closures to COVID-19. 50% of the qualified wages that eligible employers pay their employees from March 13 2020 through December 31, 2020 (up to $10000 of qualified wages per employee) and 70% of qualified wages that eligible employers pay their employees in 2021(up to $10000 of qualified wages per employee per calendar quarter of 2021) is the tax credit.
The ERC will also help business owners to keep their employees on the payroll and filing for unemployment benefits to minimize the number of workers. This process will be beneficial when the business is closed, and you are unable to pay your employee, and also when the employees are on COVID sick leave.
Other Recommended Articles:
How to Process, Record, and Receive QuickBooks ACH Payments
WooCommerce QuickBooks Integration: Syncing with Plugin
QuickBooks 1099 Forms (Purchase & Set-Up Form)
How can Eligible Employers Claim Benefit from the ERC
Eligible employers can benefit themselves in one of three ways.
- Employment tax deposits can be reduced.
- Eligible employers can file a claim for an “advanced refund” of the credit which is anticipated for a given quarter if they had an average of 500 or fewer full-time employees in 2019.
- They can request a refund of any credit which was not previously taken as an advanced refund or by reducing tax deposits while filing their quarterly federal employment tax return(Form 941).
For many business owners, the above tax credit would be a better option than some of the relief bills’, well-known loans, and grants. Same as the Paycheck Protection Program(PPP), the ERC’s architecture is to keep employees on the payroll and out of the unemployment office, but unlike the PPP, the ERC is not some kind of loan.
Unlike the other relief options, all the eligible businesses are eligible for the ERC if they were in operation during the calendar year 2020 or 2021. And recipients will never need to repay or seek forgiveness for the ERC funds because ERC is not a loan. Also, it is available through December 31, 2021. Each employer can claim a maximum of $5000 of credits per employee per quarter for qualified wages paid during 2021 (a potential maximum of $28000 per employee for the calendar year). And there is no cap on the total amount of ERC available for a single employer.
Qualifying for the ERC as an Employer
If you want to qualify for the ERC as an employer you must carry on a trade or business during the year 2020 or 2021 and have to meet one of the two following requirements.
- The business of the employers is suspended fully or partially due to the government’s order due to COVID-19.
- The business of the employer experiences a quarterly decline in gross receipts:
- For 2020, there should be a decline of more than 50% in gross receipts in business for each calendar quarter of 2020 for which ERC is claimed, compared to the quarter in 2019.
- For 2021, there should be a decline of more than 20% in gross receipts for each calendar quarter of 2021 for which ERC is claimed, compared to the quarter in 2019.
- The employer may also elect to qualify for quarters during 2021 by looking back to a 20% decline in gross receipts for the preceding quarter.
Calculating the ERC
Now to calculate the ERC you need to first understand a few things.
- For the year 2020, the tax credit is equal to 50% of the qualified wages that eligible employers pay their employees in a quarter. The credit applies to wages which are paid after March 12, 2020, and before January 1, 2021. If eligible 2020 wages per employee max out at $10,000, then the maximum credit for eligible wages paid to any employee during calendar year 2020 is $5,000.
- For the year 2021, the tax credit is equal to 70% of qualified wages that eligible employers pay their employees in a calendar quarter. If eligible 2021 wages per employee max out at $10,000 per quarter, then the maximum credit for eligible wages which paid to any employee during any calendar quarter of 2021 is $7,000 (and the maximum for the calendar year is $28,000).
The calculations can be a bit tough for some people. You can estimate your potential tax credit. But you will need to have some points in mind before, which are:
- The number of workers you have employed in the applicable calendar year.
- The business revenue in each calendar quarter in 2019.
- The business revenue for the relevant calendar quarters in 2020 or 2021, as applicable.
- The total qualified wages paid to all employees (which can be limited, as noted above, if you are a larger employer for the applicable period).
How to Set up and Refund Employee Retention Credit
It is easy to set up ERC or the Employee Retention Credit in Intuit QuickBooks. When you set up Employee Retention Credit in QuickBooks, make sure that your employees are getting paid if you have to close and if you are in the category of the people who are eligible for the provision found under the Coronavirus Aid, Relief, and Economic Security (CARES) Act, the American Rescue plan Act of 2021 and the Consolidated Appropriations Act.
Now before setting up the ERC in QuickBooks you have to do certain things which are:
Step 1: Ensure you Qualify for the Credit.
Before setting up the Employee Retention Credit in QuickBooks, you have to make sure that you are qualifying for the credit. The architecture of your business, the size of your workforce, and the reason why your business may or may not be closed all affect whether you can take this credit.
Step 2: Setting up QuickBooks Payroll
Now if you know that you are eligible for accepting credit, first you are required to set up payroll to accept and track the credit. As the employee retention tax credit covers overtime, regular time, and company contributions to health care, you will need to set each of these items in your payroll and then run QuickBooks Payroll.
How to Claim Employee Retention Credit in QuickBooks
In QuickBooks, you can easily claim the ERC with your selected payroll service. QuickBooks have different payroll service, so here we have to give procedures for each payroll service. Choose your payroll service type and claim employee retention credit.
Claim in QuickBooks Online Payroll and Full Service
To set up in QuickBooks Online Payroll and in QuickBooks Online Payroll Full Service you have to follow some steps which are as follows:
Step 1: Setting up the Employees with Pay Types
Firstly you need to select the employees and their pay types.
- Navigate to payroll and select Employees.
- Now choose the employee you’d like to add paid leave to.
- Select the Edit option to add more pay types in the How Much Do I Pay An Employee section.
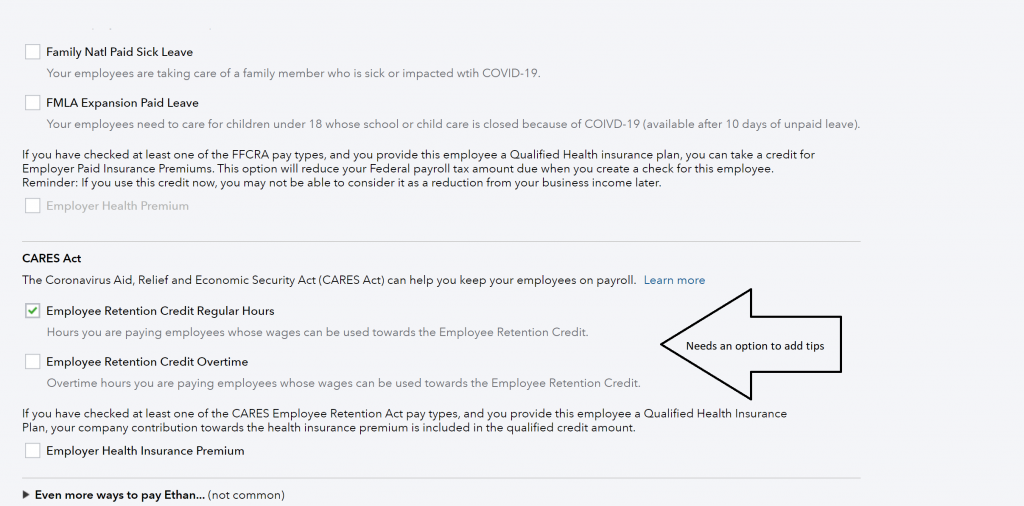
- Choose the pay types that apply to you under the CARES Act section.
- Select and enter any Employer Paid Health Insurance Premium amount which you want to track on each check.
- Click on Done.
Step 2: Running the Payroll with Pay Types
Here are the steps for running payroll with pay types:
- Now first select Run Payroll.
- Choose the schedule you are paying for if you have multiple pay schedules.
- After this enter hours in corresponding fields for :
- Overtime hours in Employee Retention Credit Overtime.
- Regular hours in ERC Credit.
- Enter in the Employer Health Insurance Premium.
- If there are salaried employees then select the salary amount shown to reduce the hours by the noumber of hours you are paying them with the Employee Retention pay items.
- If an employee is commissioned only then you are required to convert their pay to an hourly rate.
- Enter other items which you want to include.
- Select Preview Payroll.
- Now review the paychecks and select Submit Payroll.
Now you have the running payroll, the resulting tax credit will appear on your tax payments. Navigate to Taxes then select payroll tax to view your payments.
Claim in QuickBooks Desktop Payroll
Now we will learn how to set up Employee Retention Credit in QuickBooks Desktop Payroll. For this, we have different steps which are listed below.
Step 1: Setting up your Expense Accounts for the Retention Credit
In the first step, you will be required to set up your expense account to help track eligible wages to use towards tax credit until the December 31, 2021 expiration.
- Navigate to the List Menu and select Charts of Accounts.
- Now Choose the Account dropdown.
- Select New.
- After this choose ‘Expense and then select Continue.
- Now select Other Expenses from the other account type.
- Now give your expense account a name.
- Select Save and Close.
Step 2: Setting Up 3 Payroll Items
After setting up QuickBooks to accept the retention credit, you now need to set up each credit.
- CARES Retention Credit – Employee Addition
- CARES Retention Credit – Health (Company Contribution)
- CARES Retention Credit – Payroll item.
Step 3: Run a Regular payroll
Now run a regular payroll by following these steps:
- Select Employee.
- Then, select Pay Employees.
- Select the appropriate schedule to create paychecks sections and select Start Schedule Payroll.
- Now you have to verify the pay period ends date, check the date and bank account.
- Mark a checkmark next to the employee and select the Open Paycheck Detail.
- Under Earnings delete the amount listed under Rate. Below the other payroll items, in the item name, select CARES Retention – Emp. or the name used during setup. After that enter the employee’s hourly rate and quantity of hours.
- Now check in the employee summary you should see” regular wages” set to 0, with wages listed under the name entered for the credit during setup.
- After all the above steps select Save to jump to the next employee, or select save close to go back to enter payroll information window.
- When the checks are ready, select Continue.
- Review the Check/Direct Deposit printing options.
- In the verify the amounts for each employee and select Create Paychecks.
- After that, select print paychecks and print pay stubs now or later.
Step 4: Paying Liabilities
The fourth step is to pay liabilities.
- Navigate to the Employee menu and select Payroll Center.
- Select the Pay Liabilities tab.
- Mark the Federal 941 and other liabilities in the Pay Taxes and Other Liabilities section, and ensure to check the amount and item list under payroll liabilities are accurate and select View/Pay.
- Now enter the CARES Act Retention Credit and the Amount of the 941 tax liabilities you qualify based on the quick report you created. You will be required to enter the amount of the credit as a negative amount.
- The credit can roll over to future payroll or you can apply for a refund via Form 7200, check the IRS website for more information if the liability is less than the available credit.
- Select Recalculate for updating the check.
- If you want to print the check, select the check to be printed. If you have used a handwritten check, enter the check number or other reference in the number field. If you pay liabilities by electronic funds transfer (EFT), clear the ‘To Be Printed‘ box and type EFT in the number field of the liability check.
- Select Save & Next or Save & Close.
- You can see your payroll liability payment summary and can then review the payments you scheduled.
- Print a copy of the summary and print checks.
- You can again run the QuickReport to see the difference in the liabilities credit you are still able to claim if your credit was more than your liability.
This is how you can record and claim Employee Retention Credit in QuickBooks. Check your eligibility and set up payroll to accept and track the credit. If you need any assistance regarding this process, then feel free to talk to our QuickBooks ProAdvisor at +1-844-405-0904.
