Today here we are with a new topic to create invoices in QuickBooks Online. If you are a QuickBooks Online user and don’t know how to create invoice in QuickBooks Online then, continue with us to get the proper idea to create invoice.
Other Recommended Articles:
QuickBooks Bank Feeds Not Working (Bank Feed Is Not Working)
How to Fix QuickBooks Error 1723?
Is your QuickBooks Online Not Working
Benefits of Creating Invoices in QuickBooks Online
You can get a lot of key advantages by creating invoices in QuickBooks Online. Look at the below to know the benefits of invoices:
- Can maintain the record of sales that helps to assist you to keep a legal record of the sale.
- Payment tracking helps the seller and the buyer both can keep track of their payments and sum owed.
- Legal safety that helps to document acts as legal proof between the buyer and seller.
- Simple tax filing that helps to record and maintain all sale invoices guarantees that the right amount is paid.
- Business data that helps to gather vital data like customers’ buying patterns, detail of the products, buying times, and so on.
Procedure to Create Invoice in QuickBooks Online
Here, we will provide the steps and you need to follow the steps to create an invoice in QuickBooks Online:
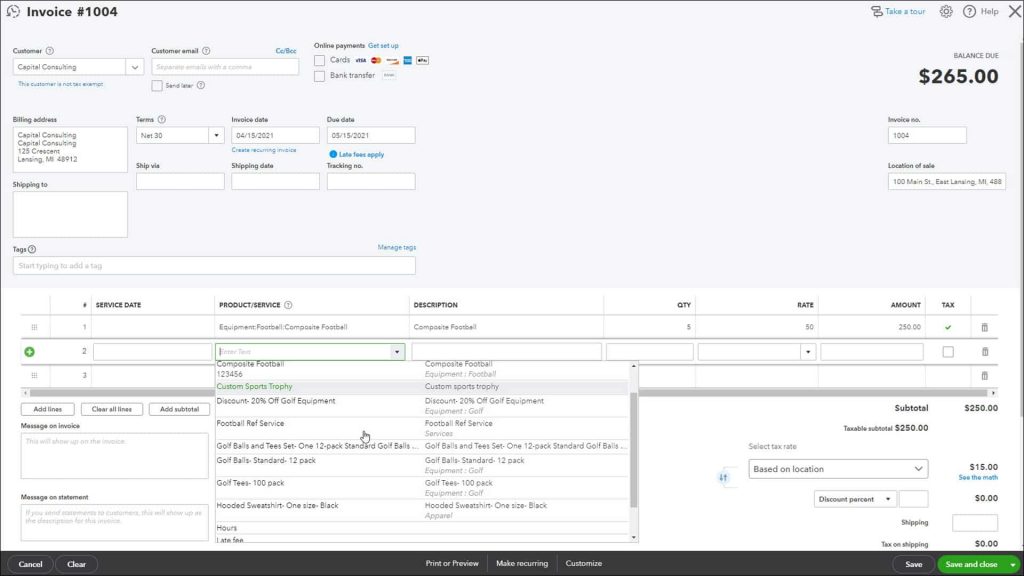
Step 1: Create and Send an Invoice
- Open, and login to QuickBooks Online, and then click on the + New option.
- Then select the Invoice or Send Invoice option.
- Go to the Customer menu dropdown, and then click on the option of the customer. And you need to make sure all of their info is correct, especially their email address.
- After that, review the Invoice date. And if you need to, change the due date in the Terms dropdown menu.
Tip:- Net refers to the number of days until the payment is due. The default is 30 days, but you can change the due date if needed.

- Go to the Product or Service column, and then click on the option of product or service.
- Then, you can also click on +Add new option to create a new product or service right from the invoice.
- After that, enter a quantity, rate, and change amount if needed.
Note:- If you see the Flat rate, By hour, or By item options, this means you’re in Business view. Your experience is slightly different.
- Choose the Tax checkbox if you need to charge sales tax.
- If you want to send the invoice, then click on the option of Save and send. Or, if you’re using QuickBooks Simple Start, then click on the option of Send.
If you want to send the paper invoice later, then you need to click on Save and close or Record option if you’re using QuickBooks Simple Start.
Print Invoices or Get a Link to Share with Customers
If you want to send a paper invoice to your customers? And When you are finished with an invoice, then select Save and send the invoice option. After that, click on the option of Print or Preview.
You can send a link to customers by SMS or Messenger service so that they can see their invoice. And when you are finished with an invoice, then you need to select Save and after that click on the option of Send and then click on Save and share the link option. You can copy the link or click on the option of the copy link. Customers can view and pay for their invoices from the link.
Step 2: Review Open Invoices
If you want to anytime you want to review your invoice then follow these steps:-
- Go to the Sales menu.
- Click on the option of All Sales tab or the Invoice tab.
- To review the invoice of a specific customer, then click on the option customer menu and then see the Status column to see where the invoices are in the sales process.
Learn more about invoice statuses:-
Open– It means that, you have not emailed the invoice yet.
Open (Sent)– It Indicates that you already emailed the invoice to the customer.
Open (Viewed)– Open (Viewed) indicates that your customer opened the invoice.
Paid– The paid status says that, your customer paid the invoice.
Overdue– It means, the invoice is past due and isn’t paid yet.
Overdue (Viewed)– Our customer opened but didn’t pay the past due invoice.
Tip:- QuickBooks puts open invoices in your account payable before you make payment. Then, you will see this account on your balance sheet and other financial reports.
Step 3: Receive Payments for Invoices
If you can use QuickBooks Payments, then the customers can pay their invoices directly by credit card or ACH transfer. We process and handle everything for you. When you make the payment, QuickBooks transacts in the correct accounts.
If you can use an external platform to process payments, then you can easily track payments. You just need to follow the steps to record invoice payments manually.
Step 4: Enhance the Invoices
Want to personalize your invoices and if you are a project-based business, then you can create progress invoices to request partial payments during a project.
At last, we hope now it will be easy for you to create an invoice in QuickBooks Online because here in the above we have tried our best to provide the simple steps to create an invoice in QuickBooks Online. Just follow the proper guidance, and create an invoice in some time. Further, if you are unable to do this then, you can get our expert support for an instant response.
