Recording all expenses is a part of bookkeeping, which keeps all of the business transactions organized in one place. To keep these expenses, we create checks and make a printout of checks for the hard copy. With QuickBooks, we can keep both soft and hard copies together by entering, and printing checks.
If you also want to write, and print checks in QuickBooks Online then read the article completely. In this article, we will know the procedure of recording, and printing checks in different ways.
To Write or Create Checks in QuickBooks Online
Generally, we need to record or create a check, in QuickBooks when we make a purchase with a hand-written check. This ensures the business transactions are up-to-date.
Follow the procedure to record checks in QuickBooks Online:
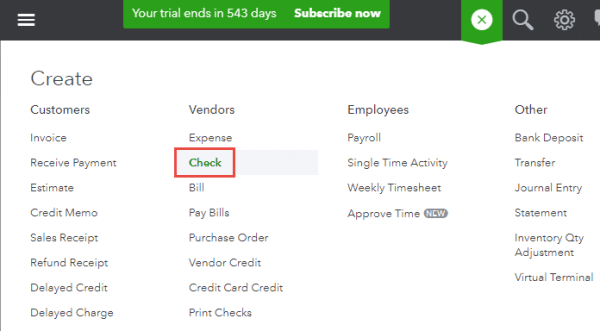
- At first, login to QuickBooks Online, and click on the ‘+ New‘ option from the top-left corner of the QBO page.
- Select the ‘Check‘ option from the ‘Vendor‘ section.
- Then click on the ‘Payee‘ option.
- After that, go to the ‘Bank Account‘ drop-down, and select the account from where the amount will be withdrwan.
- A check field window will appear in your screen with some . Enter the detail in the check fields.
- Mailing address- Enter the mail address of payees.
- Payment date- Write down the same date when you print a check.
- Account- Select the account that you used to track expenses. If you are new then you can click on dropdown arrow of account details and then click on ‘Add New‘.
- Description- A short description will be ready on the basis of account type. If you want to customize the description then you can do it.
- Amount- Fill the amount which you want to pay.
- Check No.- Here you have to write the check number.
- Now go to the ‘Print check‘ option, and click on the ‘Print Later‘ checkbox to print the check later.
- At last, click on the ‘Save and Close‘ option to close the check window.
- Or you can select the ‘Save and New‘ option to create a new one.
Other Recommended Articles:
How to Open a QBM File Without QuickBooks
How To Merge Accounts In Quickbooks?
How to set up sales tax in quickbooks online
To Print a Check in QuickBooks Online
After recording the check, if you want to keep a hard copy then you can print it out directly from QuickBooks. But before that, make sure your printer is set up correctly.
Follow the procedure to print the check in QuickBooks Online;
Step 1: Set Up the the QuickBooks to Print Checks
At first, set up the QuickBooks to print the checks successfully. So check the below points to ensure, the printer is ready to line up and print the checks.
- Set up a sample check.
- Install or update the Adobe reader in your system
- Line up the check alignment
- Configure the printere dialouge box
Note: There are two types of checks are available in QuickBooks, Standard checks, and Voucher Checks. In Standard check, you will find 3 checks per page. And in Voucher check, you will find one check per page, with pay stubs. So you can select the check type, while print checks setup.
Step 2: Add Check in Queue to Print
In the recording procedure of check, you already added the check in the queue, by clicking the ‘Print Later‘ option. So you need not add it to the queue manually.
Step 3: Print the Check
Now follow the procedure to print check directly from QuickBooks:
- Select the ‘+New‘ option from the top-left corner of the QuickBooks Online dashboard page.
- And click on the ‘Print checks‘ option.
- Now put the check in to your printer, and select the checking account.
- Go to the ‘Starting check no.‘ field, and enter the check number of the first check in the printer.
- Select the check that you want to print, and click on the ‘Preview and Print‘ option.
- Cross-check the alignment of check is right or not.
- If everything is ok then click the ‘Print‘ option, and then ‘Done‘.
If in case, your checks don’t print correctly then click on the ‘Some checks need reprinting‘ or ‘Keep checks in the Print checks list’.
To Print a Partial Page of Check in Standard Checks
The standard checks come into a page of three, so a spare check or a two check are with you might end up. You can also print the leftover checks in the same way which you have done previously.
- Select the ‘+ New‘ option from the QuickBooks Online dashboard.
- Then, click on the ‘Print Checks‘ option.
- Load the checks into the printer.
- Select the bank account which contains the checks. And fill out the check number.
- After that enter the check number of the first check-in the printer.
- Select the small arrow ▼ icon under the option of “On first-page print“.
- In the next step, choose the given option of 1 check or 2 checks.
- Now choose the check, you want to print.
- Click on the ‘Preview and print‘ option. If all steps are run properly or everything is correct then, that time you can press the Print option.
Intuit offers some Intuit forms to prevent paper jams or wasted checks. This will attach to your leftover checks so you can run them through your printer as a full sheet.
To Print Voucher Checks Without the Voucher Portion
Want to print checks without the voucher? You’ll just need to change your check type to Standard.
- Select the ‘+ New‘ option, and then the ‘Print Checks‘ option.
- Click on the ‘Print Setup‘ option.
- Choose ‘Standard Type‘ , and then select the ‘Yes, I’m finished with setup‘ option.
- Click on the small arrow ▼ icon under the option of “On first-page print“, and select the 1st check.
- Select ‘Preview and Print‘ option.
- Check everything is ok or not.
- At the end, click the ‘Print‘ option.
The complete article was all about recording, and printing check in QuickBooks Online. Hopefully, you find it informative. Still, if you have any kind of doubts on this topic then you can take support from the certified QuickBooks ProAdvisors.
