Finding the way to make and view adjusting journal entries in QuickBooks? No need to worry more, we are here with a helpful article to provide you with complete guidance to perform the task. Read the article to learn how to make and view adjusting journal entries in QuickBooks.
An adjusting journal entry is simply a journal entry that adjusts the total balance of the account. It is used to fix minor mistakes or unrecorded transactions. It is created in the company’s journal ledger at the end of the accounting period. Usually, accountants perform the adjusting entries so this feature is only available in QuickBooks Online Accountant.
Other Recommended Articles:
QuickBooks Error 6000 80
How to fix QuickBooks error 1328
QuickBooks Online vs Desktop (Compare & Choose the Best One)
Why should you create Adjusting Journal Entries?
You can create adjusting journal entries for various reasons. Some of them are listed below.
- For depreciation and amortization.
- For the adjustment of tax payables for discounts, interest, and fines.
- To enter bank and credit card fees or interests.
- To reallocate accruals and reverse accruals of prepaid income or expenses.
Steps to Make an Adjusting Journal Entry in QuickBooks
Here we describe how you can create adjusting journal entries. Follow the steps as given.
- Sign in to QuickBooks Online Accountant.
- Click on the Go to QuickBooks dropdown and choose the client’s company.
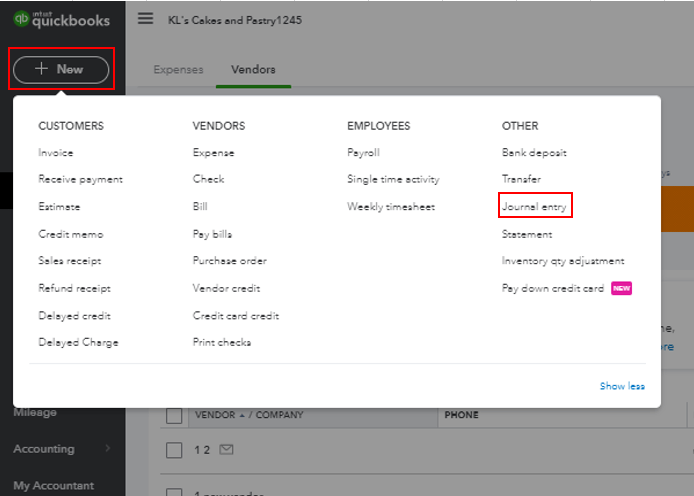
- Click + New option.
- Click Journal entry from there.
- Click the Is Adjusting Journal Entry? checkbox.
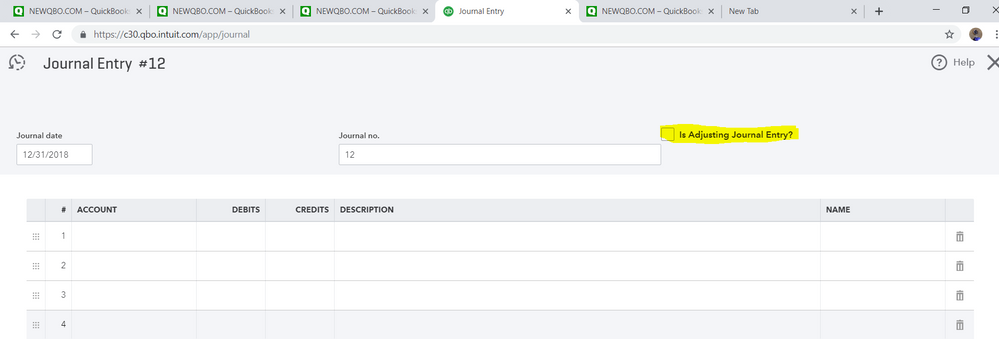
- Follow the instructions to record the journal entry.
- In the end, Hit Save and Close to complete the process.
Steps to View an Adjusting Journal Entry in QuickBooks
You can view adjusting journal entries in the following reports in QuickBooks.
- Adjusting Journal Entries
- Adjusted Trial Balance
You can customize the following reports all you need to do is turn on the Adj column.
- Journal (QBOA users view the Adj column by default)
- Details of transactions by account (QBOA users view the Adj column by default)
- Transaction List by Date
- Transaction List by Splits
- Recent Transactions
- General Ledger
Review Adjusting Journal Entries
You need to run an adjusted trial balance report to review adjusted journal entries. It shows the list of all account balances in the journal ledger. Let’s discuss how you can adjust journal entries.
- Sign in to QuickBooks Online Accountant.
- Go to the search bar and enter Adjusted Trial Balance. Or click the Reports menu and select Adjusted Trial Balance report.
- To adjust the report, click on Customize.
- Ensure the total debit balance and total credit balance are equal.
View Journal Entries
You can view Journal entries easily in QuickBooks with the following steps.
- Select the Create icon (+) from the top right corner.
- Click on the Journal entry.
- From the top left corner, select the icon with a counter clockwise arrow.
- Click on the View More option.
- Now you can view journal entries and apply filters.
Reverse Journal Entry
If you need to fix the debit credit or some minor errors you can reverse the journal entry to neutralize the effect of it. Reversing the journal entry doesn’t delete any entry. If you need to reverse the journal entry follow the given steps.
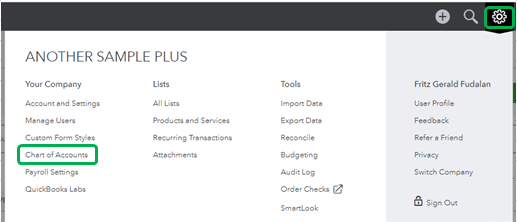
- Select the Gear ⚙️ icon.
- Select Chart of Accounts from Your Company.
- Find the account for which you created the journal entry. Select Account history.
- Go to the account register and find the journal entry. “Journal” should be mentioned in the Ref no. or Type column.
- Click on the journal entry to expand and then select Edit.
- Click on the Reverse button and hit Save.
Delete Journal Entry
If you created journal entries by mistake and want to delete them now. You can delete them permanently but make sure you are deleting the right journal entries or not.
- Go to the Setting ⚙️icon and click Charts of accounts.
- Find the account for which you created the journal entry. Select Account history.
- Go to the account register and find the journal entry. “Journal” should be mentioned in the Ref no. or Type column.
- Click on the journal entry to expand.
- Click on the Reverse button and select Yes to confirm.
This is how accountants use adjusting journal entries for fixing any minor errors or recording any uncategorized transactions. Hope you find the article helpful. If you still face any issues with QuickBooks, you can immediately connect with QuickBooks ProAdvisor. Dial our toll-free number +1-844-405-0904 and resolve your query instantly.
