Are you ready to learn the brief information through this article “How to create sub accounts in QuickBooks Online?”. If you want a perfect solution to this query then read the article till the end because the missing and wrong interpretation of one manual step will lead the wrong results. So let’s begin the blog:
There are multiple reasons for creating subaccounts in QuickBooks. When we are talking about QuickBooks Online then it is essential to create sub-accounts for managing the incomes, expenses, and others in a separate account. The expenses account includes all the dues, bills, and payments you have to be paid whereas the Income account includes the amount of money you will earn as a profit.
Let us take an example for providing a better understandability of the topic, you can split your utility account into different sections or sub-accounts for successfully tracking the multiple utility payments such as gas, water, telephone, and many other expenses. All these utilities come under the expense account because you have to pay the bills. But whenever you earn something it is put into the Income account.
Sub-account and Subsections are always created by dividing the parent account or main account. Keep them for an organized chart of accounts and generate helpful reports for the users. Below we discuss the complete procedure of creating a sub-account. Follow the procedure manually and in the same order.
Procedure to Create Sub Accounts in QuickBooks Online:
It comes with the biggest question mark, we get lots of queries with the same issue. So here you will learn the appropriate manual steps to create a sub-account. Follow all the steps to add a sub-account under the existing account. But it is essential to have a parent account otherwise you can’t create new sub-accounts in QuickBooks Online. So in the first step, you need to create a new parent account, if you have not.
Steps to Create a New Parent Account
If you already have a parent account then go to the create a sub-account step and follow it. But if don’t have then you must create a parent account first. So, apply the steps given below:
- To create a new parent account, You have to visit the “Chart of Your Accounts”
- Then click on the new option
- After that Choose the “Account Type” and “Detail Type” that define the nature of your account. Edit it for providing a valid name that suits and matches the behavior of your account.
- In the end, save your account
If you want to add the sub-account to your parent account so you will get a different option to add in it.
Steps to Create Sub Accounts in QuickBooks Online
Once your Parent account is successfully created, you can add one or more sub-accounts to the QuickBooks account. If you want to create sub-accounts linked with your existing parent account so you have to follow these steps:
- You have to open the “Settings” and then visit “Chart of Accounts”.
- Choose the new option and click on it
- After that Choose the “Account Type” and “Detail Type” that define the nature of your account.
- Choose the “Is Sub-account” option and then enter the main/parent account.
- You can’t add the sub-account if your parent account is” Income” and you want the sub-account based on “Expenses”.
- Give your Sub-account a new name different from their parent account. A valid name that suits and matches the behavior of your account.
- Add a new description for a sub-account.
- You will see the option “When you want to start tracking your finances from this account in QuickBooks Online”.
- Fewer accounts are required to select this option such as Bank, Credit Card, All Assets, and Liabilities.
- In the End, Select the “Save and Close” button to save the changes.
To Change an Existing Account into a Sub-Account
In this step, you have to change the existing account into the created sub-account
- You have to open the “Settings” and then visit “Chart of Accounts”.
- Browse for picking the account and choose the small arrow present in the action column.
- After that, choose the “Edit” option
- Select the option “Is Sub-account” and then enter the main/parent account.
- If you want to change the name then give your Sub-account a new name different from their parent account. A valid name that suits and matches the behavior of your account.
- In the End, Select the “Save and Close” button to save the changes.
This was the last step to create sub-accounts in QuickBooks, now see sub-accounts in chart of account
Other Recommended Articles:
QuickBooks Restore Failed Error (How to Fix It)
The way to Fix QuickBooks Balance Sheet Out Of balance In Accrual Basis
A Way To Fix Quickbooks Error 404
How you Can See your Sub Accounts in Chart of Accounts Tab and Reports
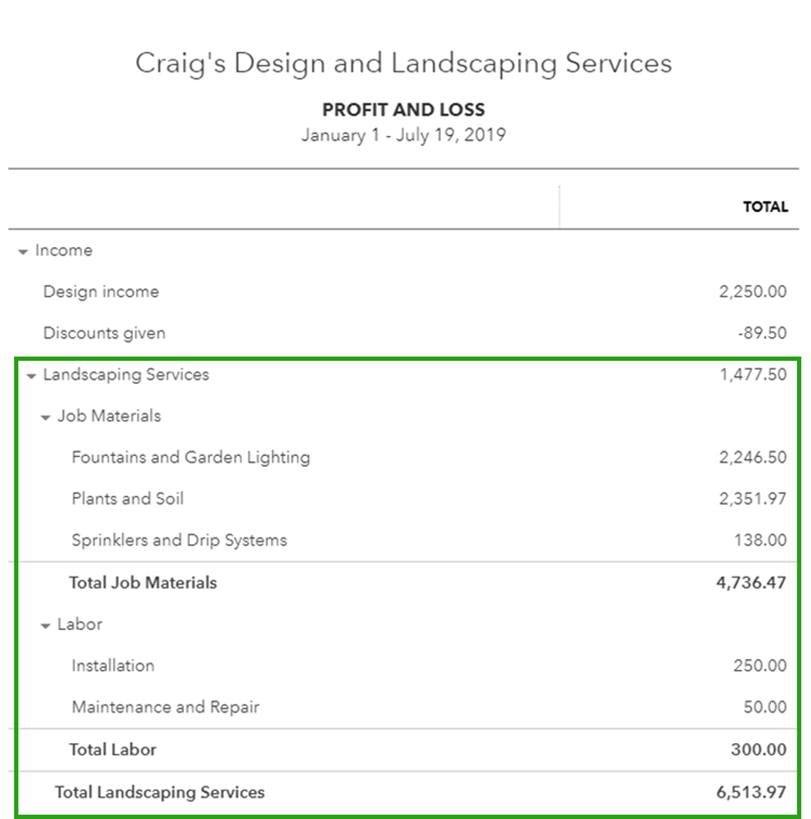
Here you learn about the Craig design and landscape services used by both Parent account and their subaccounts in a QuickBooks company.
Chart of Accounts
Look at the picture to know how sub-accounts will appear in the chart of accounts. It will display with the landscaping services. For example:

Reports
Look at the picture with clear visibility of records to know how sub-accounts will appear in the Reports. It is in the form of Craig design and landscape services along with a Profit and Loss Account(P&L account). The creation of sub-accounts will break Craig’s design and landscape services.
Final Note
We have discussed “How to create subaccounts in QuickBooks Online” in this article. We hope, this article is helpful for you, and if in case there is any problem, then you can get our ProAdvisor support at that time. Contact immediately if you are unable to find the path to follow the steps.
