Are you considering switching from QuickBooks Online to QuickBooks Desktop? No need to start over again, just migrate the online file to the desktop. Walk through this guide to know the procedure to move QuickBooks Online to QuickBooks Desktop.
In this article, we will show you the updated way to switch the QuickBooks Online files to the Desktop version. And also discuss some issues and their solutions that you may face, when converting data from one QuickBooks version to another one. Let’s read the article, till the end;
Other Recommended Articles:
Set-Up and Access QuickBooks Workforce
How to Print W2 in QuickBooks
How to Merge Accounts, Customers, and Vendors in QuickBooks Online
Steps to Convert QuickBooks Online Data to QuickBooks Desktop
There may be various reasons to convert QuickBooks Online to QuickBooks Desktop. But during the transfer process, it is very important to convert the data carefully. A single mistake can be the cause of data loss, so it is always recommended to create a data backup of QuickBooks Online files. Apart from that, there are some important points for you. have a look;
- Now QuickBooks Online doesn’t support the Windows version of 7. So keep remembering that, the system you are using Windows 7 with the IE’s, 64-bit version.
- Log in to the system or to windows with the admin password, and the user ID. And must ensure that, you have full access and permission to use the system.
- The minimum version of Internet Explorer should be 10.
- The QuickBooks Desktop 2004 edition doesn’ t support the convert process, so make sure that you have the later version of 2004.
- You can’t convert all of the QuickBooks Online files to the QuickBooks Desktop file, if your QuickBooks is a non US edition.
- And you can’t complete the conversion process directly in the QuickBooks Desktop Mac version.
Let’s start the process;
Step 1: Enable Protected Mode in Internet Explorer (IE)
First of all, turn on the protected mode in the Internet Explorer, by the following procedure;
- Open your system, and right-click on the ‘Internet Explorer’ icon.
- After that, you can see an option of ‘Internet Explorer’, again right-click on it, and choose the ‘Run as Administrator’ option from the menu.
- Visit the ‘Tools’ settings icon and then on the ‘Internet’ option.
- Click on the ‘Security’ option, and then on the ‘Trusted Sites’.
- After that choose the ‘Sites’ option, and enter *.intuit.com and *.qbo.intuit.com in the ‘Add this website to the zone‘ field.
- Uncheck the ‘Require server verification (https:) for all sites in this zone’, if it is not unchecked yet.
- Then close the Trusted sites window, and uncheck the ‘Enable Protected mode’.
- Click ‘Apply’, and ‘Okay’.
- At last, leave the Internet Explorer, and don’t close it.
Step 2: Download QuickBooks Desktop
In the second step, download the QuickBooks Desktop to the latest released version (2022), and install it properly. Follow the procedure to download the QuickBooks;
- Download the QuickBooks Desktop from the official site.
- And install the downloaded file in a place, where you can easily access the file.
- Agree with the license agreement, and follow the on-screen instructions.
- After that, go to the QuickBooks Desktop icon, and right-click on it to select the ‘Run as administrator’ option.
- Visit the ‘File’ menu, and choose the ‘Close Company’ option.
- Now leave the QuickBooks Desktop.
Step 3: Use the Migrator Tool in QuickBooks Online
In this step, you need to use the QuickBooks migrator tool in QuickBooks Online to transfer data. Follow the procedure to set up the tool in QuickBooks Online;
- Login into QuickBooks Online by using the Intuit Account credentials.
- Choose the url, and type anything, you want to replace after the /aap with exportqbodatatoqbdt.
- After that, hit the ‘Enter‘ key.
- QuickBooks will display a ‘Export Overview‘ window. Read it, and click on the ‘Get Started‘ option.
- Now click on the ‘Download Tool‘ option to download the migration tool.
- Install the tool, and click ‘Next‘.
- Agree with the license agreement, and click on the ‘Next‘ option.
- After that, click on the ‘Complete‘ option, and then the ‘Next‘ option.
- At last, click ‘Install‘, and ‘Finish‘.
Step 4: Prepare File for Export
Now follow the procedure to prepare the files for exporting;
- Again open the QuickBooks Online. And click the ‘Continue‘ option in the ‘Prepare to Export‘ window.
- Now select, that you want to export, and then ‘Continue‘ option.
- Click on the ‘Learn about the limitations of converting data for QuickBooks Desktop‘ option. this will know you about the limitations, that will impact on the migration process.
- After reading that, click the ‘Continue‘ option.
- Fil out your name, and mail address. The tool will send you a confirmation mail, open it, and click on the ‘Continue‘ option.
- In the email confirmation window, click on the ‘Close‘ option, and go back to the QuickBooks Online files. It may take some time to get the confirmation mail, it depends on the amount of data you migrate.
- Go back to the QuickBooks Online export screen, and again select the same file you have choosed for exporting.
- Click on the ‘Get Started‘ option.
- Now QuickBooks will take a to a several page to prepare thf files for migration.
- Prepare to Export page: Click the ‘Continue‘ option.
- Select your data page: Choose the selected file, that you have selected before, and then click ‘Continue‘.
- Exporting from QuickBooks Online: Here you will see a message, which will say you already have a file to download. Just click on the ‘Continue to Download‘ option.
- After that, click on the ‘Download QBXML file‘. save the file, where you can easily access it. And click on the ‘Continue‘ option.
- Go to QuickBooks Desktop, and then to the ‘No Company Open‘ screen. If in case, you have opened a company file then close the company file from the ‘File‘ menu.
- And view the report to compare the data before, and after the export.
Step 5: Run QuickBooks Migration Tool
You have set up all of the data or files to export. Now run the QuickBooks migration tool to export the files to the QuickBooks Desktop.
- Open the QuickBooks Desktop in the ‘No Company Open‘ screen.
- After that, open the tool, and browse to the downloaded path QBXML file.
- Click on the ‘Import‘ option.
- Now you need to choose a file name, and location for the QuickBooks Desktop file.
- Get the QuickBooks application certificate.
- If you want to allow personal data access then, visit the ‘Read/modify rights” option. And select the ‘Continue‘, and ‘Done‘ option.
- At last, click on the ‘Done‘ option.
Your data has been imported successfully. If the process is not completed yet, then wait for some time. It may take some to complete, give some time, and the progress bar will move again.
If the Status Bar is Not Shown to Move :
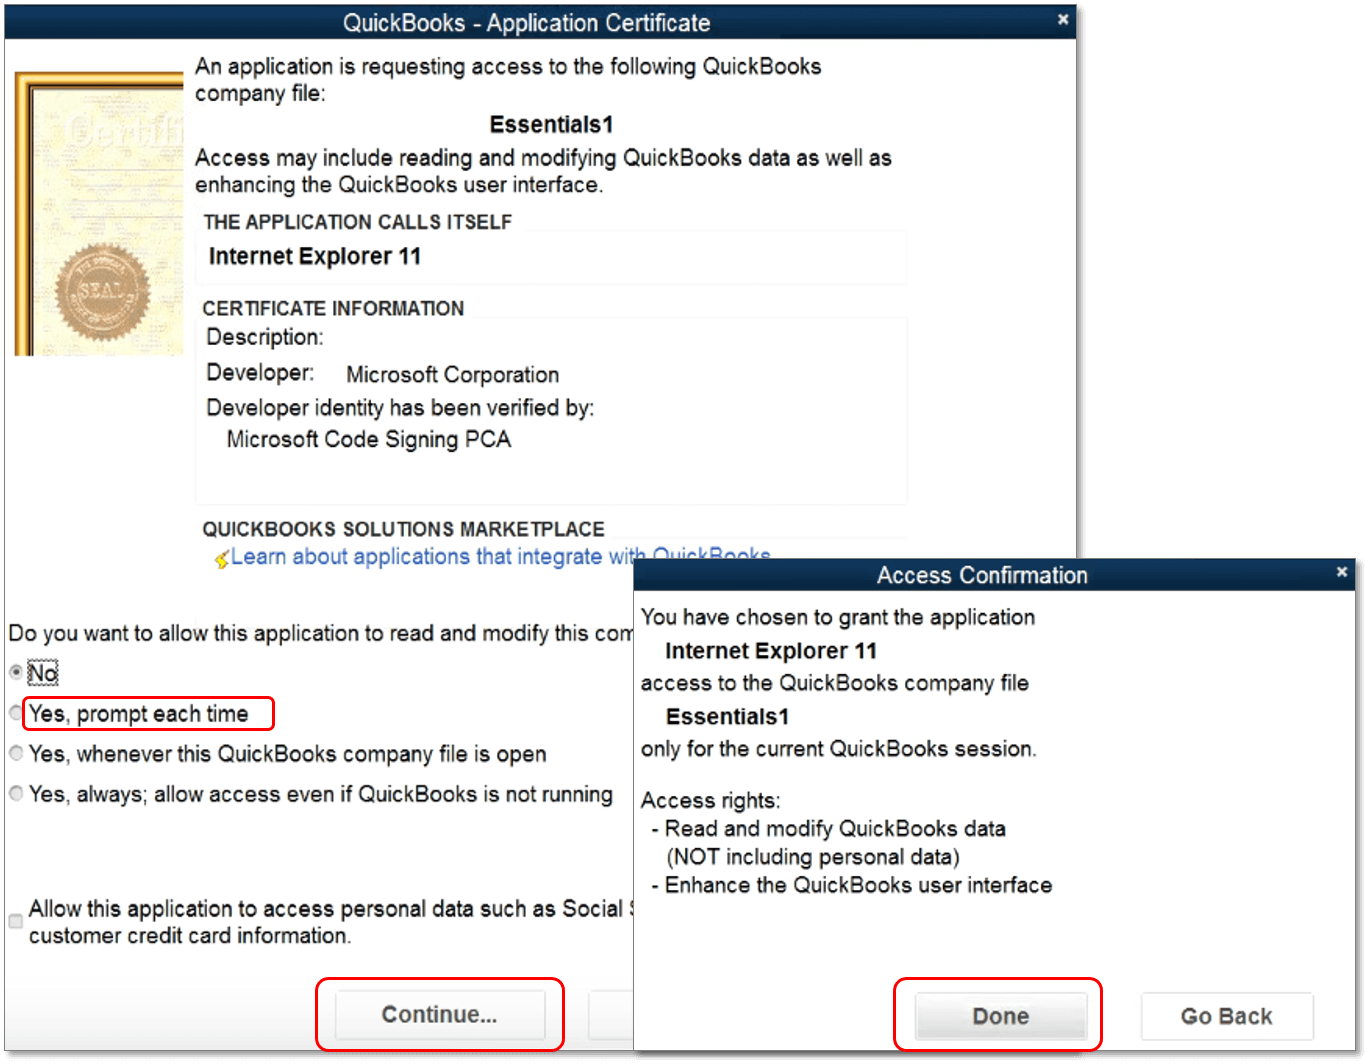
In this case, check the QuickBooks Desktop, for an application certificate, follow the below steps to perform this:
- In the Taskbar of QuickBooks Desktop. The application certificate will appear automatically.
- Select the ‘Yes, prompted each time’ option, on the application certificate, then click on the ‘Continue’ option.
- Then click on the ‘Done’ option from the confirmation window.
Step 5: Check the Exported Information is Correctly Imported or Not
- Open QuickBooks Desktop.
- And visit the ‘Profit and Loss‘ report.
- Cross-check the books, and run any one of the book compare it with the same report in QuickBooks Desktop.
If in case, the Report are Not Matched:
You can follow the below procedure if the reports are not matched.
- From the QuickBooks Desktop, visit for the ‘File’ menu.
- Then select the ‘Close Company’ option from the ‘File’ menu.
- And repeat the step to export the data from Online to Desktop again.
- Again check the exported information is correct or not.
Now, you have exported the data or the files successfully. You can cancel the QuickBooks Online subscription.
Issues During the Converting of QuickBooks Online to Desktop
Sometimes users face problems while they convert QuickBooks Online to QuickBooks Desktop. And they can’t find the solution to this problem. Here we have some solutions for the problem, have a look:
Solution 1: Reboot Your System
This is the manual solution to fix the problem, follow the procedure, and try to solve the problem.
- First of all, reboot or restart your system.
- After that, again start the program.
- And check, the error is still occurring or not.
Solution 2: Stop All the Running Instances
This is also a manual procedure to fix the problem, you can stop all the running instances.
- Stop all the running programs, if you are running any program in your background while converting QuickBooks Online to Desktop.
- After that, start the conversion process, and check that the error is appearing or not. If it is still occurring then, go for the solution 3. It will be definitely work.
Solution 3: Activate QuickBooks Desktop
Follow the procedure to activate the QuickBooks Desktop. Sometimes QuickBooks in-activation creates problems to convert the file from QuickBooks Online to QuickBooks Desktop.
- Navigate for the Sample company, and choose one of the sample company file.
- Close the company, and back to the No Company Open Screen.
- Select the ‘Help‘ option from the menu bar.
- Click on the ‘Activate QuickBooks Desktop‘ option.
- At last, click on the ‘Activate‘ option.
- In the next step, close the ‘We just need to verify your identity to activate‘ browser window.
- Again go back to the No company open screen.
- Start the conversion process.
Solution 4: Accept a Security Certificate
Some customers get an issue when they download the data process and see a “convert now” button. That time, the site will ask you to accept a security certificate prompt from the QuickBooks Desktop. Here is the solution:
- Close both IE and QuickBooks Desktop programs.
- Then, right-click on the IE and open the “Run as Administrator”.
- Repeat this for QuickBooks Desktop.
- Now, you can download the backup file and convert it.
It was the complete procedure to convert QuickBooks Online to QuickBooks Desktop. Hopefully, now you can convert the online version to the desktop version successfully. Still, if you have any confusion regarding this procedure then you can contact our certified QuickBooks ProAdvisors through the toll-free number +1-844-405-0904, for instant help.
