Did you have trouble installing QuickBooks Desktop or QuickBooks desktop app on your device or PC? If you are getting various installation error codes, interruption due to some unexpected error – then there is a special tool in QuickBooks tools hub, and in today’s topic, we are going to know about the download procedure and the usages of this tool.
Let’s start the blog with an overview of the QuickBooks Install Diagnostic Tool:
What is QuickBooks Install Diagnostic Tool?
QuickBooks Install Diagnostic tool is a one-stop solution developed by Intuit to diagnose and fix common errors and issues that emerge during QuickBooks installation on your computer. It tackles multiple issues arising with your .NET Framework, the MSXML, and your C++. This installation tool automatically diagnoses and QuickBooks repair them all.
In order to use QuickBooks Diagnostic tool effectively, you must know how it works, its downloading procedure, and other features. Let’s move on towards the working of this tool.
It amends other issues related to:
- .NET Framework
- C++
- MSXML
Working of QuickBooks Diagnostic Tool
QuickBooks desktop Install diagnostic tool is commonly designed to inspect the installation errors and rectify them. Also, this tool ensures to avoid any delay while QuickBooks installation. Not only this but also it helps in resolving issues with the .NET Framework, MSXML & C++ errors.
This software takes care of the big selection of problems taking place whilst installing the QuickBooks Desktop Variation.
Several error codes are as follows:
- QB installation error
- QuickBooks Error 6000
- QuickBooks Error 179
- QuickBooks Error 80041668
- QuickBooks Error of programming and framework such as C++.
- QuickBooks error 3371
Undoubtedly, it is the greatest resource to diagnose the problems that happen during the setup of QuickBooks. It routinely fixes the issues and that is the most crucial function.
Other Recommended Articles:
How To Create A Journal Entry In QuickBooks Online
Fix QuickBooks Desktop Activation Issue (The Incorrect Validation Code)
QuickBooks File Doctor, (Fix Company File & Network Issues)
Procedure to Download and Install QuickBooks Diagnostic Tool
Here are the steps to download and install QuickBooks Install diagnostic tool:
- Click on download QuickBooks Install Diagnostic Tool and set-up the file in the system.
- Now save the setup file on the desktop.
- The QuickBooks Company File diagnostic tool will appear on your screen in the form of .exe once the download will be completed.
- Shut-down all other apps running simultaneously in the system.
- Click on the above-mentioned tool two times & run the file in your system.
- Restart the system after the diagnose.
Points to remember:
You need to keep in mind certain points while utilizing the QuickBooks desktop Install diagnostic tool. These are as follows:
- Always remember to close all other running programs and only click the file to run this tool once you will install the tool to your desktop computer.
- It will automatically deduct and resolve the error. However, in many cases system reboot is required.
- Whenever you will receive a message called “No errors were detected”, it indicates that your problem is still unresolved.
How to Use QuickBooks Diagnostic Tool to Resolves Various Installation Errors?
Method 1– ‘RUN’ the QuickBooks Install Diagnostic Tool
- Download the QuickBooks Install diagnostic tool.
- Make sure to save the file Windows Desktop.
- Close all the programs present in the background. Now you can ‘RUN’ the tool.
- Now restart your system to ensure that QuickBooks components are updated appropriately.
Method 2- Run the Diagnostic Tool Through QuickBooks Tool Hub
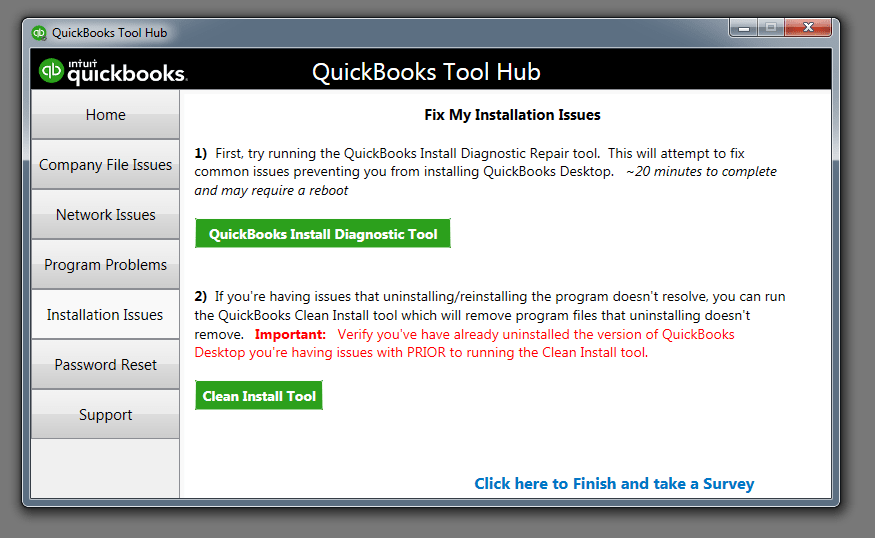
- If you already installed the tool hub in your server then open the tool hub and go to the installation issues section.
- In the installation section you can see an option of QuickBooks Diagnostic Tool, just click on it and run the tool.
- The tool will run or scan for approximately 20 minutes.
- After the complete scanning process, restart the server, and check that the installation issue is appearing or not.
Method 3- Download the Latest Update for ‘Windows.’
First of all, it is required to solve Installation issues or issues related to ‘.NET framework, C++or MSXML. For that, it is necessary to download the latest updates for your computer. Along with this, an out-dated ‘Operating System’ can be an obstacle while installing/ opening the QuickBooks correctly.
Follow the below steps to complete the process:
- Press ‘Windows Key’ on the keyboard.
- Search for the Windows Update in the search space.
- Read and apply all the ‘On-screen’ instructions.
- Do installation of the updates. Now restart your system after installing the updates.
- The problem should be completely solved now.
Method 4- Do a Manual Fix for the Errors
In case QuickBooks Desktop Install Diagnostic Tool is unable to fix the issues, you can apply the next step to fix every component manually. But this method is for advanced users. Hence, the new users need to be much careful because any mistake may lead to a discrepancy.
Method 5- Use Selective Start-up Method.
Solution 1: Start the System in Selective Startup Mode
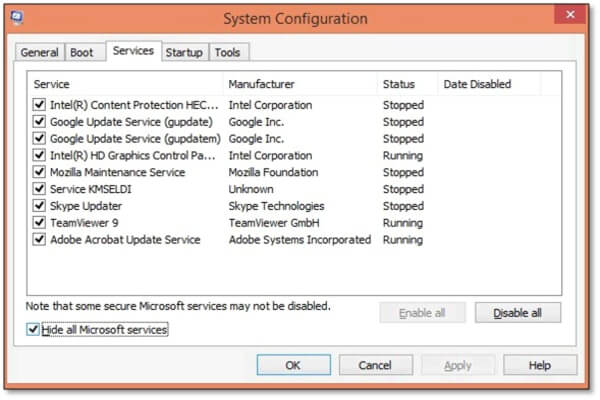
- Open MSConfig in your window, by searching it in your ‘Search Programs and files’ field. Or you can press the Windows + R Key simultaneously from the keyboard to launch the MSConfig.
- After that select the ‘Selective startup and load system services’ option from the ‘General’ tab.
- Choose the ‘Services’ tab, and pick the ‘Hide all Microsoft Services’ option.
- After that, click the ‘Disable All’ option.
- Now you have to uncheck the ‘Hide all Microsoft Services’ checkbox and make sure you have selected the Windows Installer checkbox.
- At last, click the ‘Ok’ option, and then restart the ‘System configuration window’.
Solution 2: Uninstall or Reinstall QuickBooks Desktop
Clean install QuickBooks Desktop, after opening the system.
How to Reinstall the QuickBooks in a Selective Startup Mode?
- First of all, press ‘Ctrl+R’ key to ‘Run’ the control.
- Then type MSConfig on the keyboard. Press OK.
- Choose a selective startup in the ‘General’ tab.
- Pile the system services as well as startup items.
- In the Services tab, select to hide all MS & after that click on disable all option.
- Click on the listing of services and you have to check that whether you’re Installer, simply check the box if it is selected.
- If not selected, tap on it in order to select heading after clicking on the “OK” tab.
- Visit to start again into the system configuration.
- Time to restart your system.
- At last, reinstall with the help of a clean installation procedure.
After this installation process, you need to follow the steps to restore it in normal settings.
- First of all, press the ‘Ctrl+R’ key to ‘Run’ the control.
- Then type MSConfig on the keyboard. Press OK.
- In the ‘General’ tab, choose the “Normal Startup” option. Press OK.
- Finally, click on the “Restart” tab in the system configuration, and restarts the computer again.
Conclusion:
I hope after reading this post you can easily get a solution for every QuickBooks installation errors through QuickBooks Install Diagnostic Tool. Still, if you have any doubts regarding this blog, then you can get our ProAdvisor support for instant support through the toll-free number +1-844-405-0904.
