Do you travel for business purposes and want to track mileage for tax deduction? If yes, then you just have stopped your vehicle at the right place. Here you will learn how to track mileage with QuickBooks mobile app in Self-Employed and Online versions. Along with this, you will also know about the cost and benefits of using it. Read the article to learn all about the QuickBooks Mileage Tracker App.
QuickBooks Mileage Tracker App records the miles or kilometers of your business travels for tax deduction or reimbursement purposes. Business travels include driving to meet a client, traveling between offices and worksites, and traveling to stores for business-related supplies. It is a free app with your QuickBooks subscription.
If you are an Uber driver, freelancer, independent contractor, a partner in the partnership firm, or a self-employed can claim the mileage deduction.
Why you Should Use QuickBooks Mileage Tracker App?
After knowing about the app, you might be wondering, why you should use this tracking app and what are its benefits. Here are some of the advantages listed below.
- Automatic GPS Tracking
- Organize Expenses
- Save Time
- Data saved in the cloud
- Accuracy
- Ability to add manual trips
- Save battery power
- Mileage summary print out as PDF
Set up Mileage Tracking in QuickBooks Self Employed App
Use the QuickBooks Self Employed mobile app if you drive for work and plan to write off the trips. All you need to do is turn on the mileage tracker and let QuickBooks handle the rest. But what if you forgot to turn on the mileage tracker? Don’t worry you can also add mileage manually. Here we are going to discuss how to set up the mileage tracker automatically and manually in QuickBooks Self Employed.
Other Recommended Articles:
How To Enable Chat In QuickBooks
How To Speed Up QuickBooks: To Improve Performance
Memorized Reports in QuickBooks (How to Create & Delete)
Automatically Track Mileage in QuickBooks Self Employed
Firstly we will discuss the steps for tracking mileage automatically in the QuickBooks Self Employed app. Here’s how you can easily set up for yourself.
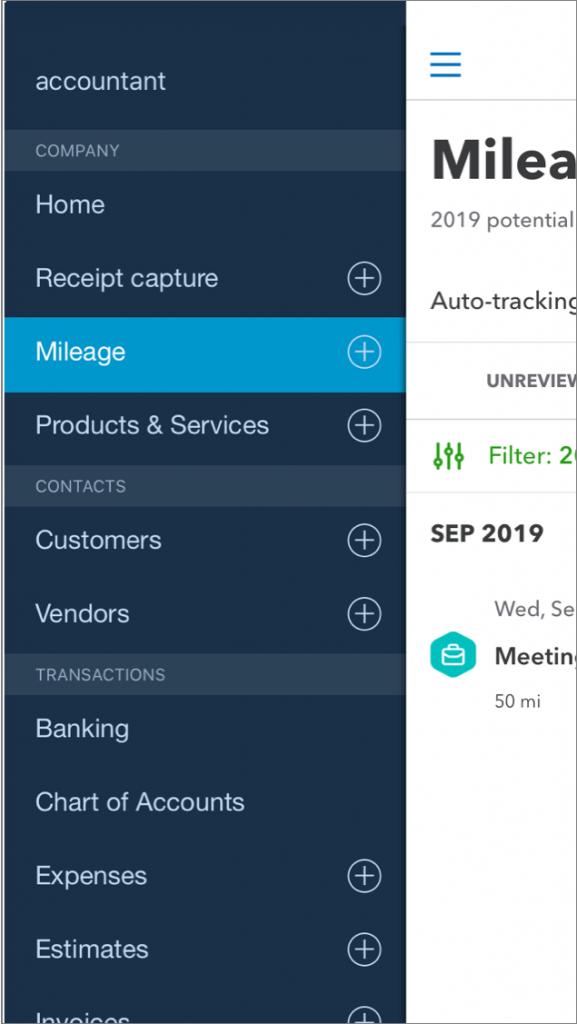
Step 1: Turn on Mileage Tracking
The first step is to turn on the mileage tracking to track the journey. Follow the given steps to turn it on.
- Open QuickBooks Self-Employed mobile app.
- Go to the Menu icon.
- Select the Mileage menu.
- Click on Auto Tracking.
- As you turn on the auto-tracking for the first time, you need to authorize the app to use the location service.
Step 2: Track Business Mileage
Mileage tracker automatically tracks mileage from start to finish. Before starting driving, all you need to do is turn on the QuickBooks Self Employed app.
Step 3: Categorize the Trips
After reaching your destination, review your trip:
- Go to the Mileage from the menu.
- Find your trip and categorize it. Swipe left for business and swipe right for Personal.
- For a business trip, add a business purpose. There is also an option for tagging your vehicle but it is optional.
- Click on the Save button.
Step 4: Edit or Delete an Existing Trip
After categorizing the trip, you can edit or delete it. Here’s how you can edit or delete the trip.
- Go to the Mileage menu and select Reviewed tab.
- Find the trip and open it.
- Click on Edit.
- Make changes.
- Select the Save option.
For deleting the trip, select the trash icon for android or the delete option for iPhone.
Manually Track Mileage in QuickBooks Self-Employed
If you forgot to turn on the mileage tracker or want to add trips manually, you can do it with the app. All you need to do is enter the mileage manually. Let’s see how to manually enter mileage in QuickBooks Self-Employed app for different devices. Follow the procedure according to your device.
For Web Browser
- Select Miles and edit the Date.
- It is optional to enter the start and end destination.
- In the Add miles field, enter the distance.
- Add a Trip purpose.
- When it completes, click Save.
For iOS Device
- Click on the Mileage menu.
- Click the Plus icon (+) and Create trip.
- Add the Trip details.
- When it completes, click Save.
For Andriod device
- Click on the Menu ☰ icon.
- Choose the Mileage menu.
- Click on the Plus icon (+) and select Add business trip.
- Add the Trip details.
- When it completes, click Save.
Set up Mileage Tracking in QuickBooks Online
If you are a QuickBooks Online user, you can use the QuickBooks Online app to track mileage for your business trips. All you need to do is turn on the mileage tracker and let QuickBooks handle the rest. If you forgot to turn on the app you can add the trips manually. Here we are going to discuss how to set up the mileage tracker automatically and manually in QuickBooks Online.
Automatically Track Mileage in QuickBooks Online
Let’s start the process of how you can track mileage automatically in QuickBooks Online.
Step 1: Turn on Mileage Tracking
The first step is to turn on the mileage tracking in the QuickBooks Online app. Let’s have a look at the process.
- Open the QuickBooks mobile app.
- Click on the menu ☰ icon and select Mileage.
- Choose Auto-tracking and turn it on.
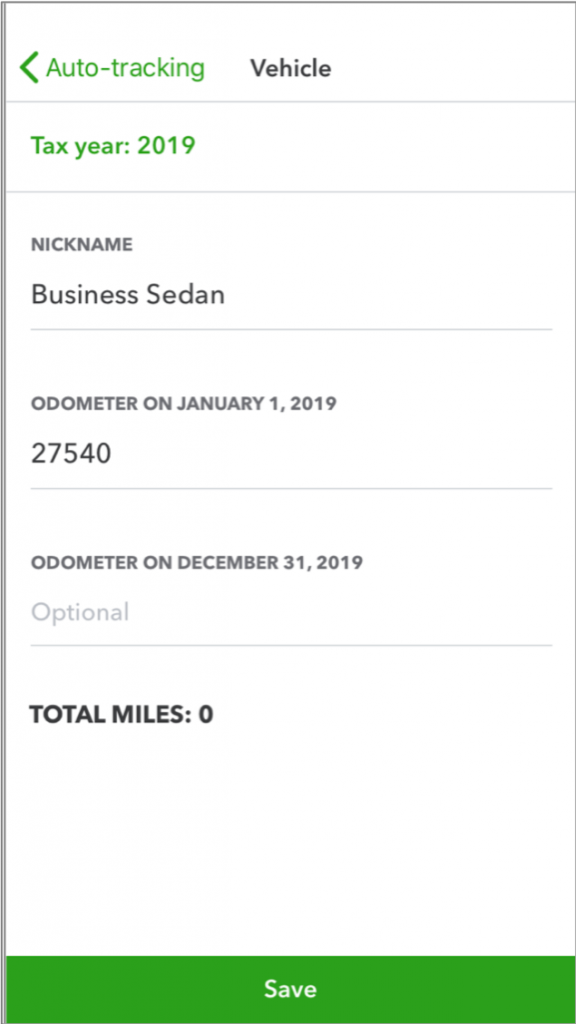
Step 2: Add Vehicles to QuickBooks
After turning on the mileage tracking, the next step is to add vehicles to the QuickBooks.
- Open the QuickBooks mobile app.
- Click on the Menu icon ⋮ and select Settings.
- Choose Manage Vehicles and then Add new vehicle.
- Add the make, model, and ownership details.
- Click Optional info and fill all the fields.
- Click on the Save button.
Step 3: Track Business Miles
Mileage tracker automatically tracks mileage from start to finish. Before starting driving, all you need to do is turn on the QuickBooks Online app.
Step 4: Categorize your Mileage
Review your trip after reaching the destination and categorize it as business or personal. Follow the steps to categorize your mileage:
For Web browser
- Click on the Mileage or Trips menu.
- Find the trips and mark the checkbox.
- Choose Mark as Business or Mark as Personal.
- Review the details.
- To make the changes in location or distance, select the trip, make changes, and click Save.
For Android or iOS devices
- Open the QuickBooks mobile app.
- Click the menu ☰ icon and then Mileage.
- Choose the Unreviewed tab.
- Find your trip. Swipe left the trip to categorize it as Business. And swipe right to categorize it as Personal.
- Add a purpose for the trip.
- Choose the vehicle and click Save.
Step 5: Edit, Review, or Export Trips
If you need to edit, review, or export the existing trips, you can do it in the QuickBooks Mileage tracker app. Follow the steps to edit the trip.
- Sign in to QuickBooks Online in a web browser.
- Click on the Mileage or Trips menu.
- Go to the Unreviewed, Business, Personal, or All tab.
- Choose the trip you want to edit.
- Make changes and click Save.
Steps for exporting your mileage data:
- Click on the Mileage or Trips menu.
- Choose to drop down arrow next to Add trip.
- Click Download Trips.
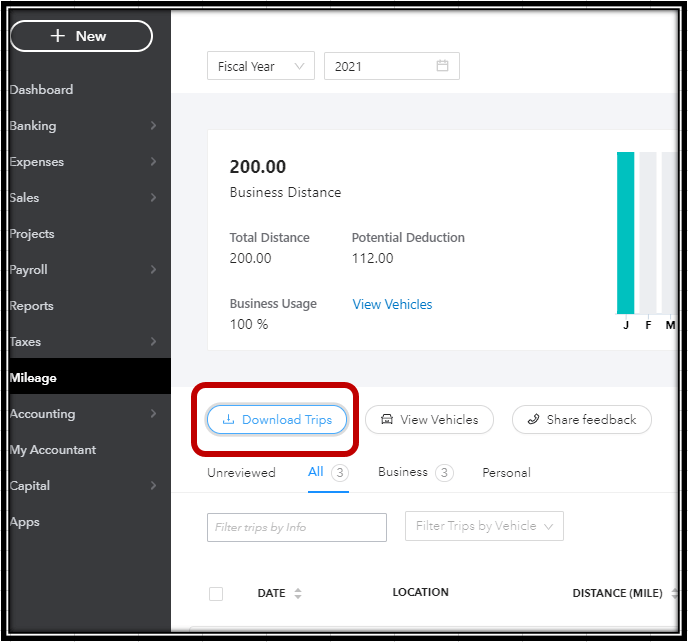
This will download your trip to your computer as a CSV file.
Manually Track Mileage in QuickBooks Online
If you forgot to turn on the mileage tracker, you can do it with the QuickBooks app. Let’s see how to manually enter mileage in the QuickBooks Online app.
- Sign in to QuickBooks Online.
- Click on the Mileage or Trips menu.
- Choose Add trip.
- Enter the trip date, starting and ending destination, distance, and purpose.
- Choose the vehicle and click Save.
Here we discussed QuickBooks Mileage Tracker App. Start your journey with the QuickBooks Mileage tracker and calculate deductions at tax time. If you need support or have any queries, feel free to contact our QuickBooks ProAdvisor. Get in touch by dialing our toll-free number +1-844-405-0904.
