Here we are with a new topic for those who are facing the problem ‘QuickBooks Cannot Communicate With Company File Issue’. We can say that. this will be the best article where you can get an effective solution to this hassle. You just have to keep the patience to read the blog carefully.
Multiple users have reported the same issue that they get the error while connecting to the network company file. It will happen when you update your OS and QuickBooks software to the latest version. For fixing it, you have to check that you are working on the latest updates. In case you are not, then update and install all the updates first then open QuickBooks and then go to their QuickBooks Company file to check out the error message is still appears or not.
The QBDataServiceUser of your QuickBooks version will require Full control access to the folder where your company file presents. Sometimes you will see the error messages when documentation is not done properly. We always advised taking a backup of all your Company files because the backup of files saves data in case of data loss and data disasters.
Point to Remember
QuickBooks Intuit doesn’t support Firewall and Antivirus programs and applications. If you are willing to adopt it in your software, you need to consult the Program Provider to get complete assistance in installing and setting up software.
QuickBooks Cannot Communicate With Company File Issue is a general issue usually faced by the users notice when the error pops on the screen or you are unable to communicate with your company file due to a firewall. You experience this error when a firewall blocks your incoming or outgoing communication to the company file.
Other Recommended Articles:
Quickbooks Time Tracking (Time Tracking Software for Quickbooks)
How to create recurring payments in Quickbooks for Checks
How To Resolve Quickbooks Unable To Sync Licence Issues
Why QuickBooks Cannot Communicate With Company file
QuickBooks lost connection to access company files because of different reasons. have a look at the list to know all reasons for the issue.
- Incorrect DNS setting
- .ND files are damaged, corrupted, or missing
- When your installed Firewall is not configured properly or it installed on the network
- The connection to the server has been lost or it shows an incorrect configuration setting
- When QuickBooks Database Server is not responding properly on the server
Fix the QuickBooks Cannot Communicate With Company File Issue
There is a list of solutions available for you to fix QuickBooks Cannot Communicate With Company File. If the first solution doesn’t work then move to further solutions. Follow the solutions step and step and get better results listed below:
Solution 1: Update QuickBooks Manually
- From the File menu, simply turn off or Stop Company/Logoff
- Perform the same step for every Company that is open, If you try to open multiple Company files in QuickBooks Desktop
- Use this step for open company file, If you try to open Multiple Company files In QB Desktop then choose File and pick Exit
- Go to your Desktop Homescreen and Browse for QuickBooks Desktop icon and right-click on it. After that run it as an administrator
- Ensure that you are working on No Company Open Screen
- Select Update QuickBooks by visiting the Help Menu
- Pick the right options
- Choose Mark all options then choose Save option
- Choose “Update Now” option
- Go to Reset Update and then hit the “Get updates” button
- When Update Complete Message arrives then Quit QuickBooks desktop
- Choose the Yes option if you want to receive the message to install the update
- Once the process of Installation ends, then Restart your Computer
Solution 2: Make some changes in your Network Related Windows 10 Settings
- The simplest way is to perform this on Windows 10 for accessing the Windows 10 Sharing and go to Start Menu for “Sharing”
- After that check out the list created in the above step and then visit the “Managed Advanced Sharing settings”
- From the right-hand side, you have to search for all Networks to expand and then for setting choose the down arrow(you will see in the red box)
- Then Select the Toggle button marked to switching off “Password Protected Sharing”
- Then save “All the settings”
- Now ready to open QuickBooks and then try to connect your company file, your file will open as soon as other network issues exist.
- Another Network issues that create the problems, but not restricted to:
(a) Not installed properly, or multiple-configured QuickBooks Hosting Configuration Settings
(b) When you try to start the required firewall ports on both the server and client workstations computers but you are unable to open it. Not accurately network “file sharing” configuration available on the server computer.
Solution 3: Run QuickBooks Database Manager on your Server
Your server helps in storing all your QuickBooks Company files. Other computers that are connected to your networks are your workstations.
- Visit the Network Issues
- Go to the QuickBooks Database Server Manager. If QuickBooks Is not already installed on your computer then you must need to install it first
- Inside the QuickBooks Database Server Manager, If your company files and folders are displayed choose Start Scan. If it is not present there then simply browse the location of your company file and then select Start Scan
- QuickBooks Database Server Manager automatically fix up the firewall permissions
- Once the Scan Completes then choose Close
When you are done, browse and open the folder you scanned. Ensure that there is an ND file in the folder.
- You will see this format: [your company file]qbw.nd
- If you don’t see the ND Files, scan the folder again
- If still, you don’t get the folder then move to the next solution
Solution 4: Turn off hostings on your computer or workstations
Check whether your Host Multi-user access option is enabled or not on your workstations. These are computers that are connected to your network that doesn’t host your company files. Your server computer must be only one hosting.
- Open QuickBooks in any one of your workstations
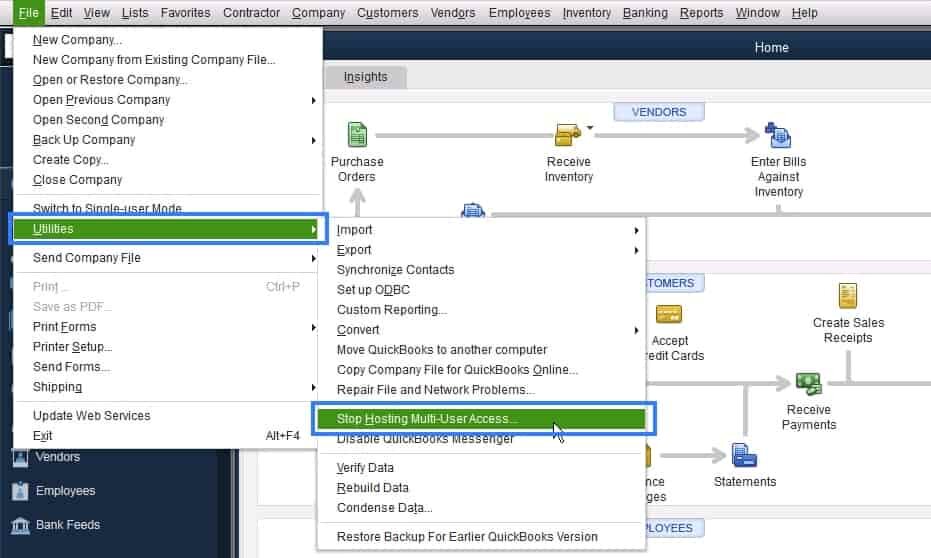
- Always remember in this step, Don’t open your Company file. Rather than visiting the File Menu and go for the Utilities
- Ensure that you don’t need to click on the “Host-Multi user access” option. Then go to the next workstation. This is not causing any kind of issue
- If you find somewhere “Stop Hosting Multi-user access” is an option then choose it
Once you checked all of your workstations, then move to the server computer and reset the Hosting Settings
- Open QuickBooks software on your Server Computer
- Go to the File menu and open it and hover over utilities
- If you find somewhere “Host Multi-user access” as an option then select it. Repeat the process and choose the “Stop Hosting Multi-User Access”. It resets the multi-user mode
- Repeat the whole process once again and choose “Host Multi-User Access”. If you still face an error then contact the support team to get value-added support services and satisfying results.
Solution 5: Automatic Updates
- From the QuickBooks Help menu, Visit Update QuickBooks
- Once you are on QuickBooks Update Window just click on the “Update Now” option
- Ignore the table if you are not interested in modifying anything
- Click on the Checkmark in the box marked
- Reset Update to delete all prior updates download, It will help you in reducing the amount of time require to update
- Choose Get Updates
- The current update ready to download automatically and then you need to restart the QuickBooks to install the update
- You need to allow all the options for installing the new release while restarting the QuickBooks.
Solution 6: Download the QuickBooks Tool Hub and run QuickBooks File Doctor
You will have to follow the steps to download QuickBooks Tool Hub and run QuickBooks File Doctor. This tool will be very helpful in the mini repair of your server and firewall. When it is finished, your issue will be resolved and you can easily open the QuickBooks Company File in QuickBooks Desktop.
Solution 7: Inside the QuickBooks Desktop
- First of all, go to the File menu, and then close Company/Logoff
- Perform the Step for every company that is open, if you want to open Multiple Company file in QuickBooks Desktop
- Choose File and then select Exit
- Go to your Home Screen, Browse the QuickBooks Desktop icon, and right-click on it and then open it with “Run as Administrator”
- Ensure that you are working on No Company Open Screen
- Under the QuickBooks Help menu, you have to visit Update QuickBooks
- Pick options and Choose Mark all options, just click on it and then choose Save option
- Choose the “Update Now” option and click on it
- After that select the Reset Update and then hit the “Get updates” button
- When Update Complete Message arrives and displays on your PC screen, then Quit QuickBooks desktop
- Open the QuickBooks Desktop Again
- Choose the Yes option if you want to receive the message for installation of the update
- Once the process of Installation ends, then Restart your Computer
Solution 8: Manually Configure Exceptions and ports to Firewall
- Visit Start Menu, then enter the Firewall on the search bar
- Select the “Windows Firewall” on the program list
- Go to advanced settings on the left-hand side
- Just go to the Inbound rules and click right, after that select the new rule
- Select the Program and then click “Next”
- Select the Program Path and then choose Browse
- Search one of those paths and then hit next
- Ensure that the “Allow the Connection option is selected” and then pick Next again
- Assure that all profiles are check-marked if prompted then pick next
- Give a new name to the rule, then choose Finish
- Repeat all the above steps for Outbound Rules
- For selecting step 4 inbound rules you have to select outbound rules
- Once the issue is resolved, You have to open the QuickBooks Desktop Again in multi-user mode on your network.
The End Line
Thanks for reading this blog, we hope you enjoyed the article and got the solution for the issue. Then hurry up, and try the solutions one by one to fix the problem ownself. We tried our best to put information in this article, hope you like it. Still, if you are unable to fix the problem, then you can get our ProAdvisor support for the instant to troubleshoot solution.
