Do you want to start over again? If so, then convert from QuickBooks Desktop to online, and make your accounting easier by comparing the previous year’s report. And if you already decided to convert QuickBooks Desktop to QuickBooks Online then, it will be great because here we have given the procedure to convert the desktop file to QuickBooks Online in just 9 simple steps.
Things to Know Before Converting the QuickBooks Desktop File to QuickBooks Online
There are some important points for you to convert from QuickBooks Desktop to Online, you need to remember all the below points before proceeding with the method.
- Some important points that you require considering before proceeding with the conversion process are:-
- There are some programs that are structured and written differently, thus there are chances that some data will not convert fully.
- Make sure that, actually what you want to do, want to convert QuickBooks Online to Desktop, or want to convert QuickBooks Desktop to Online.
- Recurring or memorized transactions and shared reports are some examples of files that will not convert.
- For files that do not have any inventory, payroll, or apps, the conversion will take place in a smooth manner.
- If the files contain inventories, payroll, and have other apps integrated with it, the conversion will take a lot of time. You need to be patient if this is the case with you.
Other Recommended Articles:
QuickBooks errors Code 15102
QuickBooks Error 6000 82 : How to fix
QuickBooks Online Bill Pay (For the Fastest Payment Process)
9 Steps to Convert From QuickBooks Desktop to Online
Follow the given 9 steps to convert from QuickBooks Desktop to Online:
Step 1: Verify All Data (Time & File Size)
You can export the data within the first 60 days of the QuickBooks Online subscription date. And if any case you have crossed your subscription renewal date, then you have two options left, and the option id given below check it:-
- Find a QuickBooks ProAdvisor that can help to convert the files within 180 days.
- The second option is you can also set up a new QuickBooks Online subscription with a different email id.
Step 2: Prepare the Data of QuickBooks Desktop for Export
The below-mentioned steps will help you to prepare a checklist to ensure that your data is all set to export:-
- Updating Data:- It is all approximately cleansing and changing statistics. In case, in case you need to extrude the call of patrons or companies or upload touch numbers, then you may accomplish that on this step.
- Complete Outstanding Tasks:- It is really useful to transform all of your statistics on the cease of the month, yr, or sector because it guarantees that each one of the statements is reconciled, payroll has been processed and stock modifications are completed.
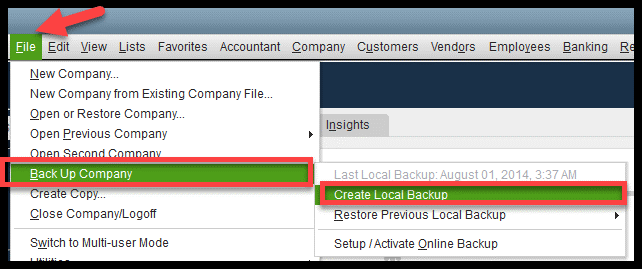
- Backup your Data:- Before uploading the statistics in QBO, make certain you create a backup file.
- Go to the File menu option, and click on the Backup file, and then select Company, then click on the option of Create a local backup.
Step 3: Create a QuickBooks Online Account
For growing an account in QuickBooks Online, fill in the essential data like name, email address, mobile number, and password to install the account. Once performed log out of the QuickBooks Account.
Step 4: Open QuickBooks Desktop
- Once you have got logged from your new QuickBooks Online account then open QuickBooks Desktop to export the data out. But before then exporting make certain you have got downloaded the recent update.
- If now no longer then visit the Help menu after which choose QuickBooks Update.
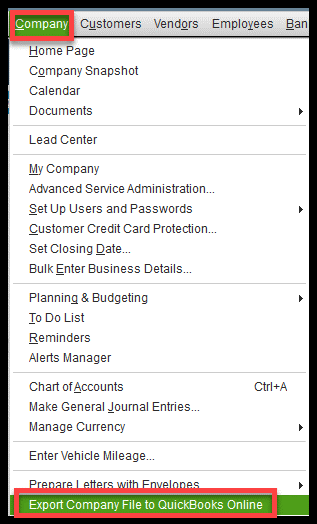
- After you are done with all processes then click on Company Menu and then click on the option of Export Company File to QuickBooks Online.
Step 5: Export Company File to QuickBooks Online
- After you can select Export QuickBooks Company File to QuickBooks Online to the newly created account. You may be requested in case you need to export your current stock.
- However, you need to understand before taking this step that QuickBooks Online values stock the usage of the FIFO technique (first in first out).
- If you assert sure to this the value of the inventory will be recalculated using the same method from the mentioned start date.
Step 6: Again Sign-in into QuickBooks Online Account
You need to again log into QuickBooks Online account. Enter your user ID and password on the required column, and get into your account.
Step 7: Require to Import the Inventory into QuickBooks Online
If you are managing your inventory in QuickBooks Desktop and it is valuable using the average costing method, let me tell you that if you add your inventory to QuickBooks Online, this product value list is based on the FIFO method.
This is the first indication that you will come across when exporting data. If you are clicking the “Yes” option, then every amount of inventory will be recalculated.
However, before you begin operating on QuickBooks Online, take a look at whether or not the records have been exported correctly. You can run a profit and loss statement and a balance sheet report and then compare it with QuickBooks Desktop and QuickBooks Online.
Step 8: Select QuickBooks Online Company
After you have to select the QBO company from the drop-down menu to which you want to import data. And in case if you can skip your set of accounts then you need to create a new QuickBooks Online company link and follow the guidelines which are visible on your screen.
Step 9: Copy Data File
Now we are in the last step, following the instruction, and completing the procedure.
- If you choose the company file, then you need to copy the data file and it will take some time. And once all the data is copied, then you will get a notification and also you have to click on the OK Got It option.
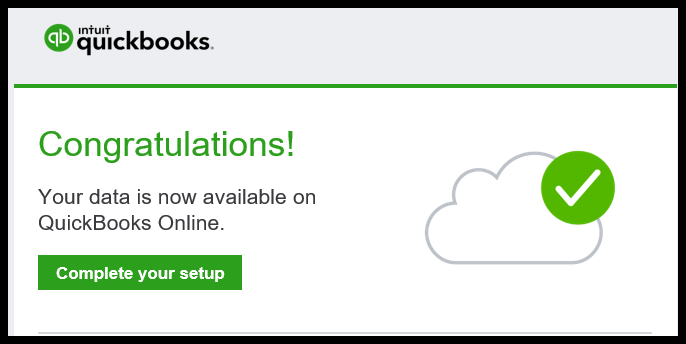
- After your data is ready in QuickBooks Online you will be sent an email confirmation about the same and you will be asked to complete the set.
- However, before you start working on QuickBooks Online, check whether the data has been exported correctly. You can run a profit and loss statement and a balance sheet report and then compare it with QuickBooks Desktop and QuickBooks Online.
- Once your data is ready, you will receive a notification similar to the email below. And when you can click the “Complete your setup” button to log in to QuickBooks Online and review your data.
The use of QuickBooks Online is very convenient compared to the desktop version and that is why more and more people are moving it today.
So, this was the procedure, we hope, these 9 steps are easy for you to follow. First, apply these steps to convert from QuickBooks Desktop to Online. If in case, you are unable to convert from QuickBooks Desktop to Online then, you can get our QuickBooks ProAdvisor support for an instant solution.
